This announcement does not mean that I won't be offering pieces to sell, or even making less tack, quite the contrary is my goal. I currently offer show ring, native and dancing horse style costumes but I have plans to expand into making and offering Akhal Teke, Marwari, Moroccan, and camel costumes. I will also likely offer a few mini costumes for sale to fit the mini Rose Khemosabi mold.
My decision to stop accepting special orders wasn't an easy one to make, but I hope it will allow me to grow more as an artist and work more efficiently. In fact, I love making things for people, I've always had a tough time saying "no" when asked. I do have many costumes I want to make and sell, along with some smaller pieces (halters and presentation sets). What I will probably do, which has been working out well for me already, is offer some costumes as "pre-sales" or "adoptable". Selling pre-finished costumes will allow my customers the opportunity to choose the size of the bridle and collar so that it can still be made to fit a favorite horse. All pieces will be 100% artist's choice, but some input may still be considered on pre-finished pieces.
Thank you to all who have bought tack from me, for all who support and follow my work. My goal is to continue to sell pieces that will delight you. Despite this announcement please don't hesitate to contact me if you see photos pop up on my page of something you would really like. I am prone to allowing customers to call "dibs" on pieces in progress that they see and like. I also don't want anyone to feel like they will miss out so if there is something in particular you would like, give me a shout, or even send photos! There is no guarantee I will get to making it but this way if I make something I think meets your wish list I will contact you first! Don't be afraid to call "dibs"!
Wishing You All A Happy 2018!
Happy Collecting Everyone!
Missy Halvas :)
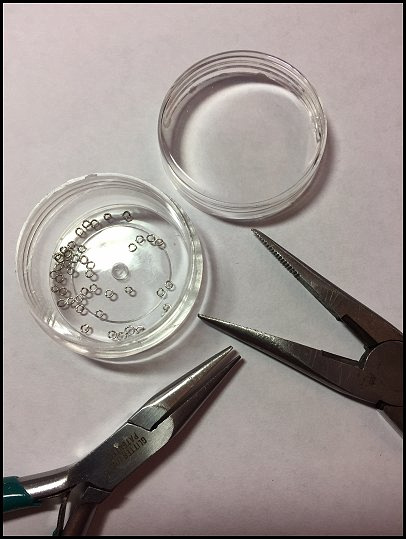
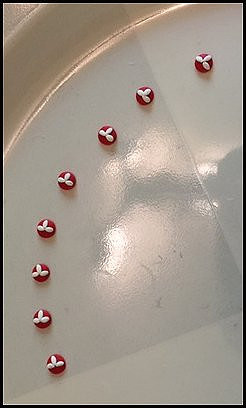
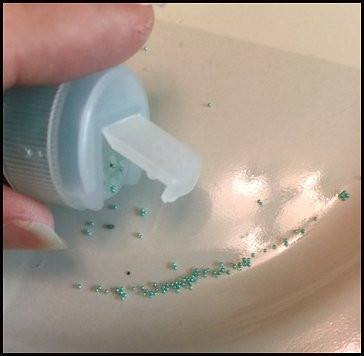
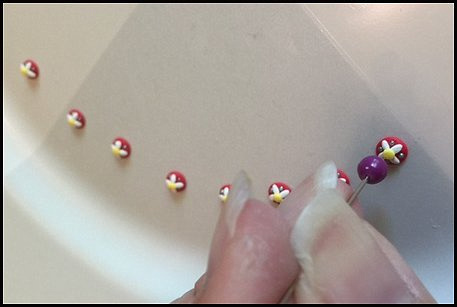
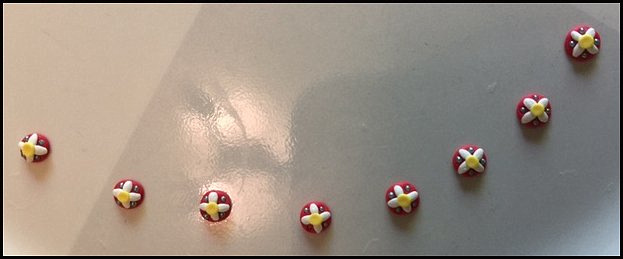
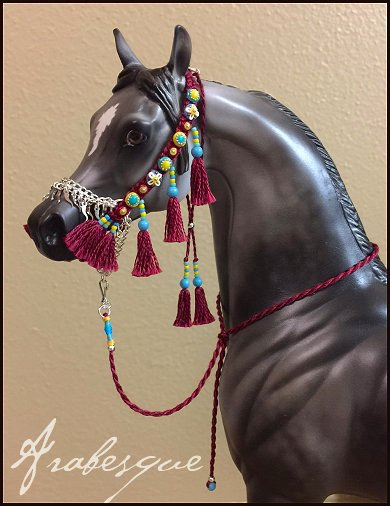
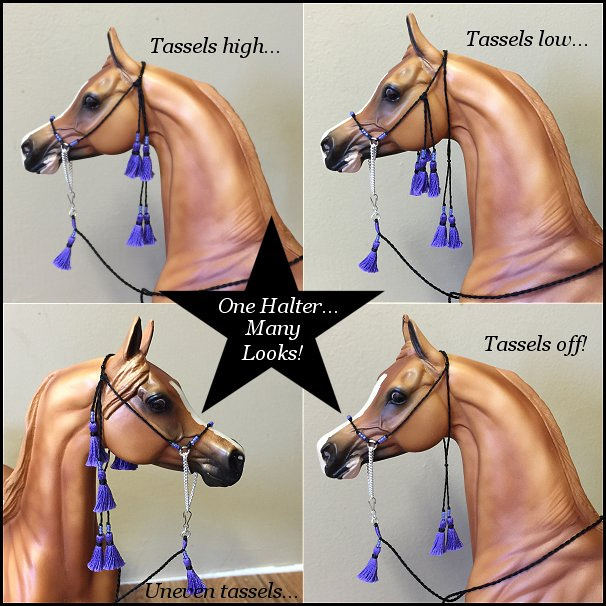
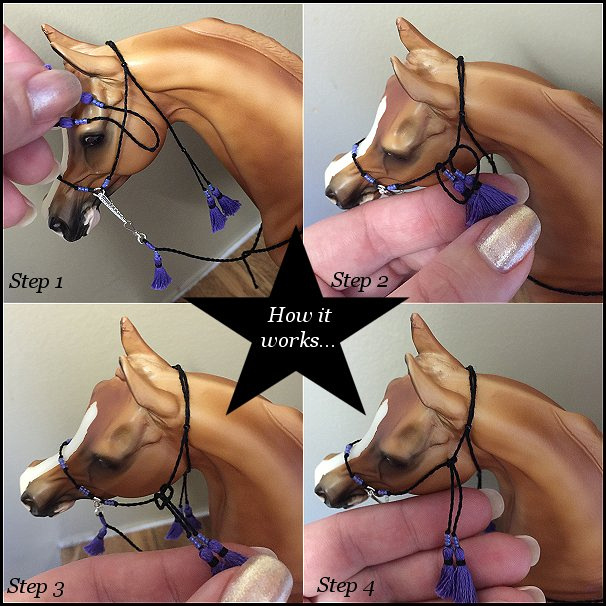
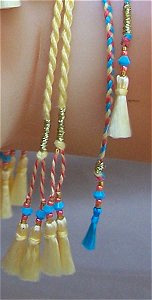
]]>Make Your Own Tiny Jumprings
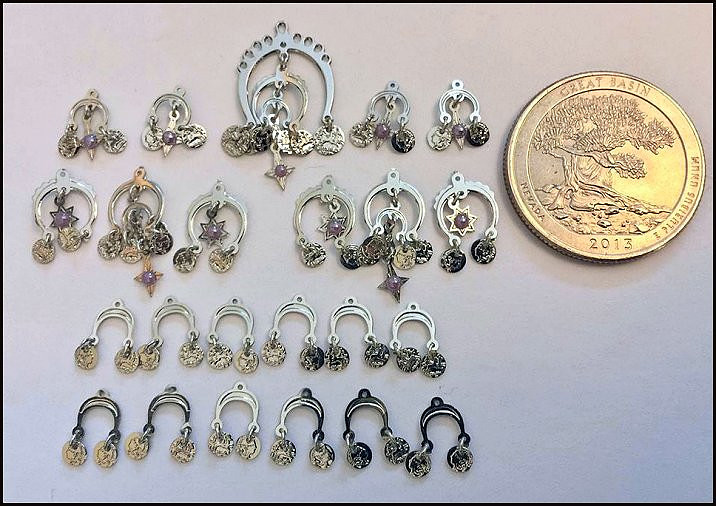
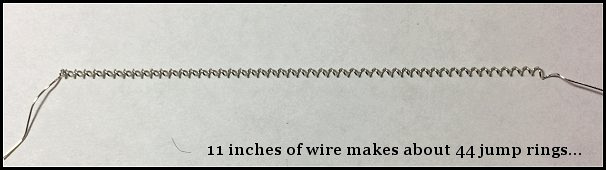
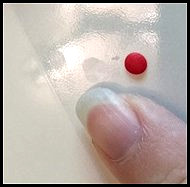
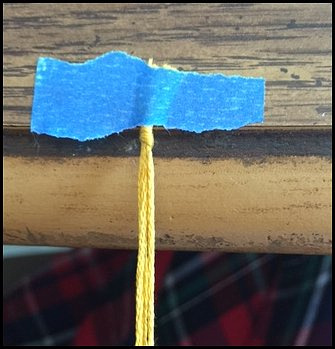
(Photo above shows an example of some hand-made jump rings put to good use!)
At some point while making miniature Arabian tack or maybe even some other kinds of tack you will probably run into the issue of trying to hang or attach a piece with a tiny jumpring only to have it catch at the hole. This often happens to me when I'm putting Rio Rondo charms on the nose chains of halters or working with Arabian horse jewelry. I will take the tiniest jumprings I have purchased and still find the need to ream holes out of those charms with my beading reamer, because the jumprings won't thread through. This can be a frustrating, time consuming process. The other thing I run into is most times my favorite tiny jumprings are a little too big for some of these pieces and in order to get the most "in-scale" look, I should be using a smaller size.
What I have come up with for myself is I prefer to make my own tiny jumprings. There are several things I like about using these: 1) I have yet to come across a situation where they won't go through any of the Rio Rondo hardware I use. 2) They are more cost efficient to make yourself 3) I can make them in a size and gauge that is nearly impossible to find for an affordable price.
If you're going to be stringing a lot of charms I recommend giving this a try, it's pretty easy once you get the hang of it. It does take a little practice to get it down. I've found that I can do about 50 of these in 20 minutes.
Let's get to it!
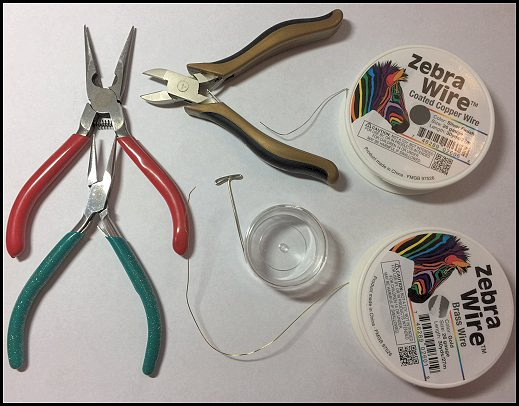
Supplies:
1) Two pairs of small needle nose pliers (whatever you prefer)
2) Wire cutter
3) T-pin
4) Small container (I use small bead containers)
5) 26 gauge wire in silver or gold
For pliers use something small, preferably designed for jewelry making. This is a look at my most favorite pliers in the entire world! They are small, lightweight and have teeth.
This is my second favorite pliers in the world. These aren't anything too special. They are slightly smaller than my red pair and these don't have the teeth. Sometimes when using two pliers at once I find that these will slip, however I put up with it because at times I need the smooth surface verus the teeth. You don't have to use the same kind of pliers I'm using here, just make sure you have two pairs and stick to what works best for you!
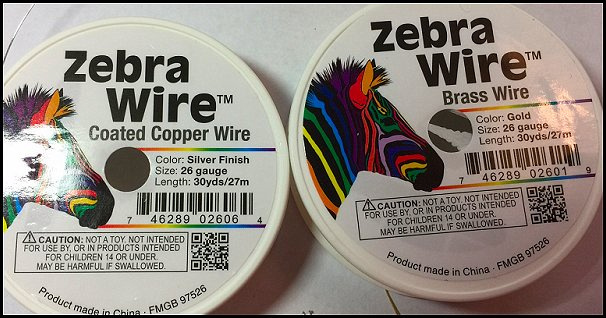
This is the wire I'm using. This is a 26 gauge "Zebra Wire" that I've purchased from Fire Mountain Gems. http://www.firemountaingems.com If you've never visited this website, do it! You can spend hours on there looking at all the stuff they have, it's amazing! Back to the wire...this wire is a jewelry making wire and I bought it because it has a finish on it that is supposed to be more tarnish resistant. It is important that anytime you are buying metals for your work that you try to buy quality stuff because most jewelry making metals, in my experience, will inevitably tarnish with time. You will give your piece more life if you don't skimp on your quality. Silver finishes are most challenging. Anything that is silver plated, or sterling will darken with age, I've found this to be true with the gold plate items as well. It is rarely possible to get these items in a finish that will stand the test of time so keep that in mind!
The gauge of the wire is very important here. I'm making jump rings here that end up being about 2mm in size. 26 gauge is a lot thinner and smaller than most jump rings out there that you can buy. A lot of the smallest jump rings are 22-24 gauge and that often ends up being just a touch too thick to be consistently convenient for the small stuff. However, different sizes and gauges of jumprings come in handy for different things. Larger gauge jump rings, and larger sizes can make a connection more secure because they are stronger. So these little ones I'm showing you how to make are more for detail-type work, but I don't recommend them for everything you do! Once you've worked with a wire a little you will see what I mean, this wire is soft and can't bear a lot of weight or tension.
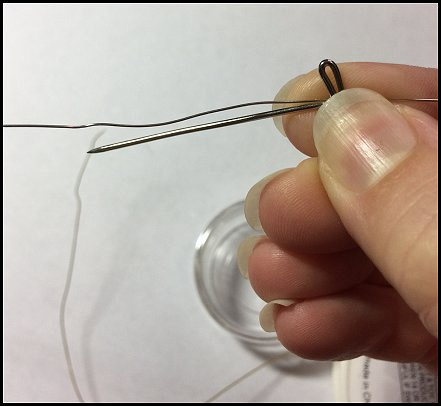
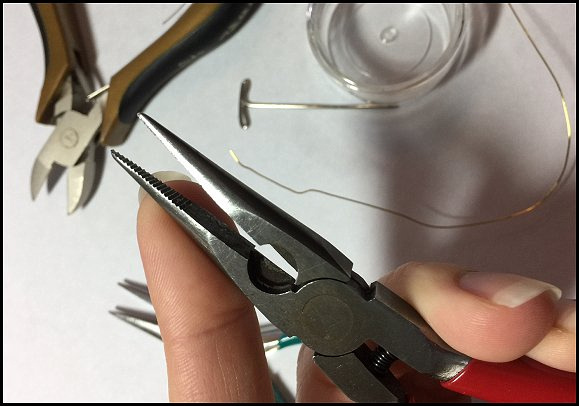
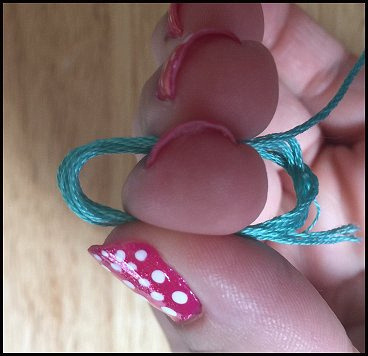
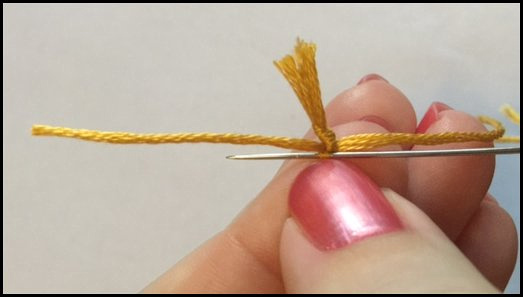
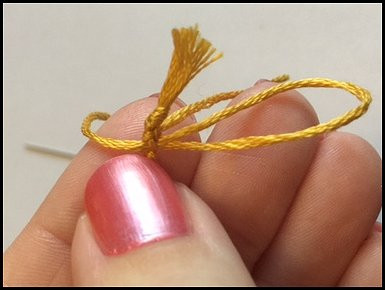
Start by cutting a piece of wire to about 12 inches in length. Grab your T-pin and hold the wire and pin head between your fingers.
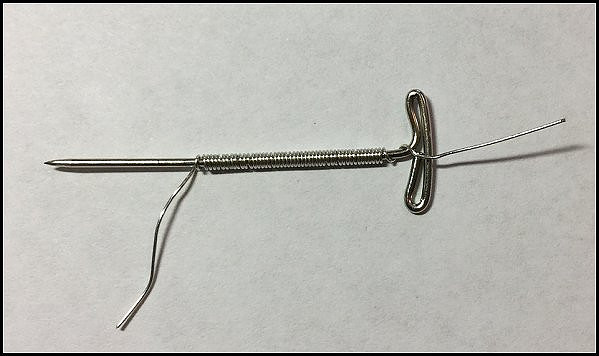
While holding the wire and pin snug in your fingers wrap the wire into a tight coil down the length of the pin until you run out of wire. I wrap until it's no longer comfortable. It is okay to have a tail hanging up at the end.
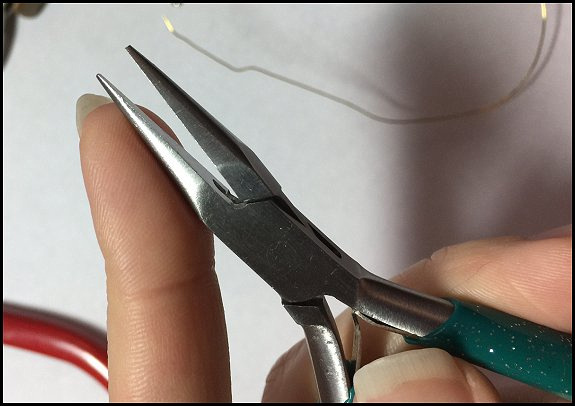
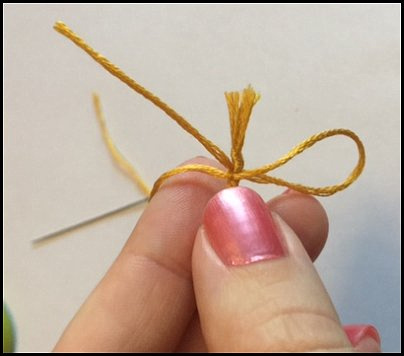
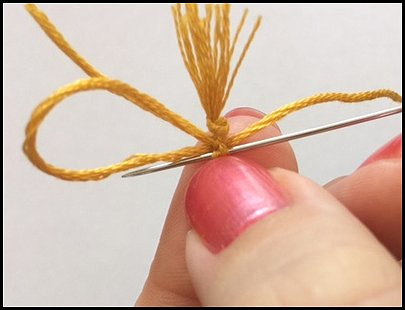
Silde your coil off your T-pin.
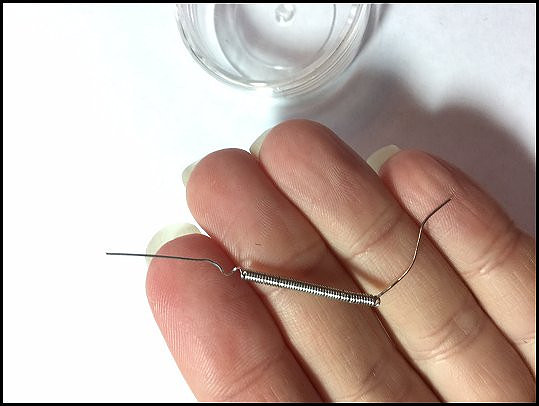
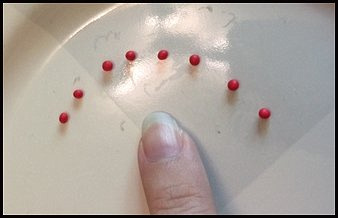
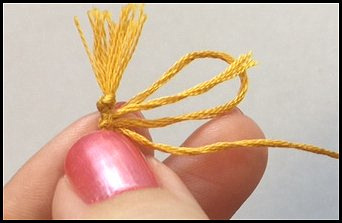
Gently pull your coil apart trying to keep it as evenly spaced as possible. When I do this I hook a fingernail into the outermost coils on either side and just pull. Get the coils about 1/8 inch apart. You won't want these pulled too far apart, but far enough that your wire cutter can get in between the coils to cut the rings.

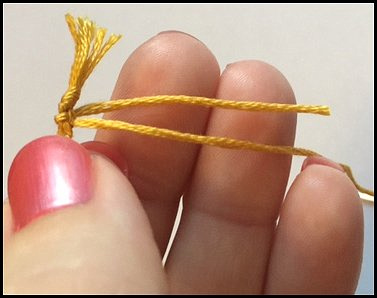
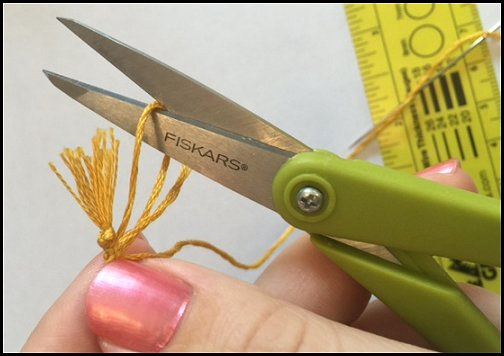
Cut one end off your coil like this to get your rings started. Hold your coil vertically and look at where your first cut is. To make your first jump ring, you'll want to aim your next cut just below your last cut mark, but slightly beyond. I find that by going slightly beyond instead of exactly below allows me to close the ring more easily instead of having to pull it outward and then close it, or having to push it in if it end up with a gap.
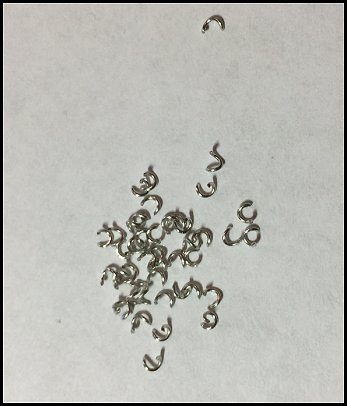
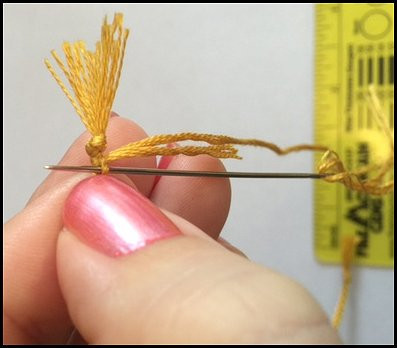
Cut each ring like this one at a time. Pause as you cut each one and let it fall into a little pile in front of you. Another thing I found helpful by accident while making this tutorial is I've got just a plain white piece of paper down while I'm working. These are much easier to see on that white surface!
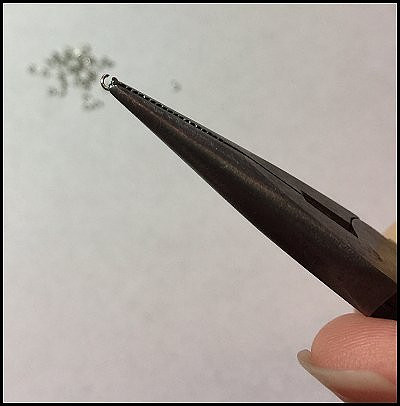
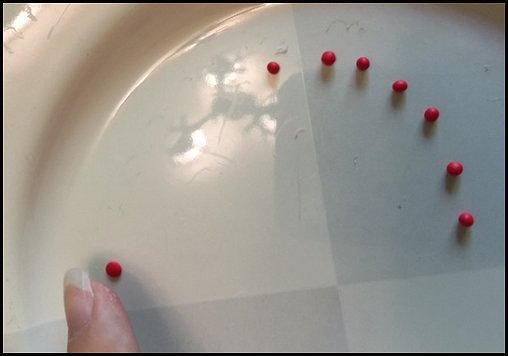
Once you have cut all your rings pick one up with a pliers on one side like this. We are now going to close the rings. For this part pick up a pliers in each hand and gently twist the jump ring together. I then like to take and give the top a little pinch horizontally pinching the ends together a bit, and then I go vertically up and down and give a little pinch to smooth down any sharp pointy parts sticking up. Getting the cut and the closing of the rings just right might take a little practice. Don't be discouraged if when you first start out that 1 in 3 of these turns into a dud, just keep making batches to practice and soon you'll be cranking these suckers out without even thinking! Use very gentle pressure when handling these, 26 gauge wire is very soft and doesn't need a lot of force to be molded into shape!
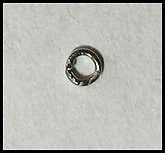
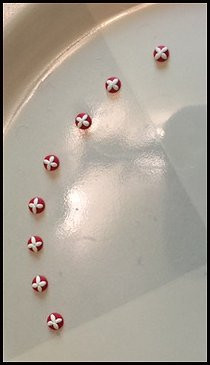
Here's what a finished ring looks like. These end up being about 2mm in size. This close-up you can see one of my little "crimp" marks in the ring from pinching the ends flush together.

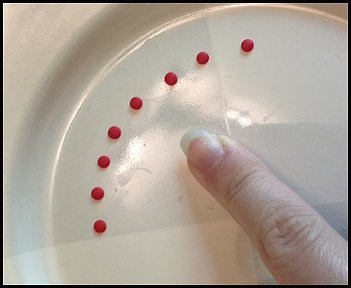
If you have any rings that end up kitty-wopus in shape take and lay them in a flat pliers or a toothless spot on your pliers and give them a press to flatten them out.
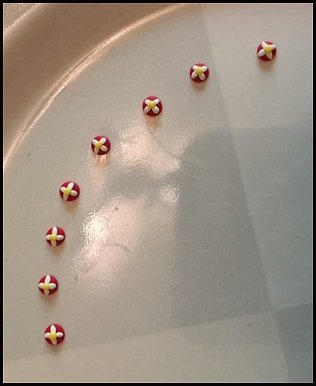
I like to store these in a little beading container. I drop them in there as I close them! I've figured out that I can make about 50 of these in 20 minutes. The coil I made for this demo was about 11 inches in length and made 44 jump rings. I imagine that going a whole 12 inches would easily give you 50 or more rings per coil.
This is busy work! It's something great to do in front of the TV or while listening to your favorite music. Make a couple batches up and store them so that when you get to the fun part of your work you can just grab them and put your work together!
I hope you've enjoyed this tutorial! Feel free to drop me an email with any questions or suggestions on future tutorials! Also sign the guestbook if you would like and let me know what you think!
Thanks For Reading & Happy Collecting Everyone!
Missy Halvas :0)
]]>
Arabesque is now on Facebook! Be sure to visit and like my page to follow the most current updates on new sales pieces, and see in-progress shots of new costumes! Here is the link:
https://www.facebook.com/Arabesque-Model-Horse-Creations-1366114620081983/
I wanted to be sure to blog this information because I've just recently gotten into Facebook and have tried it for a few months now. I've figured out that it is easier and quicker for me to post updates and photos of what is going on in the studio there instead of here. The good thing about this is it will give me more time to work on tack versus trying to keep a detailed website updated. I will still update my website, just not as quickly. So my website will be used more for showing pictures and complete information on new pieces, tutorials, and more lengthy stuff. Progress pictures and sales pieces are going to now be showing up on facebook first!
Thanks For Reading! Happy Collecting Everyone!
(Pictured above is an "in-progress" shot of my first Dancing Horse Costume that I'm working on. This set belongs to my friend Diane Finazzo. Watch it progress along on Facebook!)
Melissa :0)
]]>
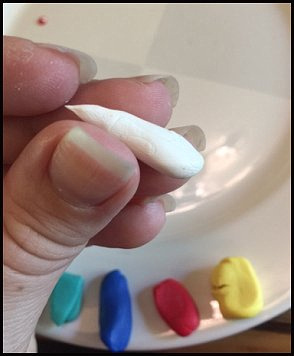
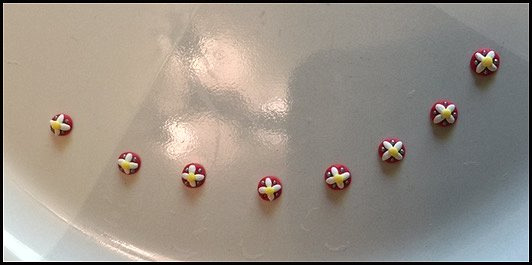
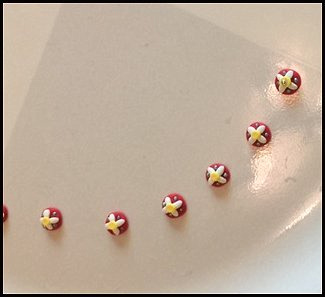
In this week's tutorial I will show you how to make a basic model horse scale cowrie design for native Arabian tack. The nice thing about mastering this basic design is you can do so much with it. I promise if you give this a try, you will figure out how to do even more with this all by yourself! I think just about every Arabian tack maker develops their own method of doing this with time. I don't claim to be the best at it, but I have done it A LOT! (...TOO MUCH...) Cowries are actually what I consider the *groan* part of tack making but they are a necessary icing on an Arabian cake, therefore like usual, I'm going to ask you to get your patience out for this and no matter what remember that *it's fun*!!!
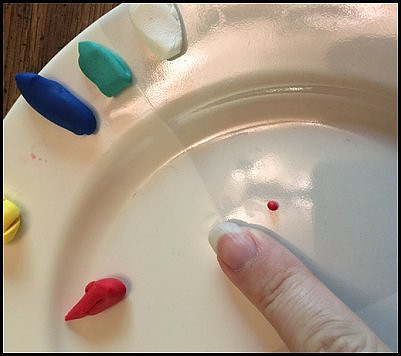
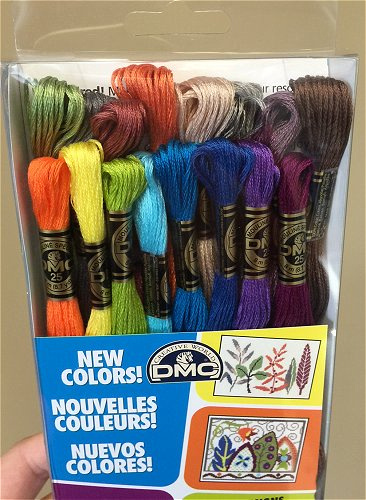
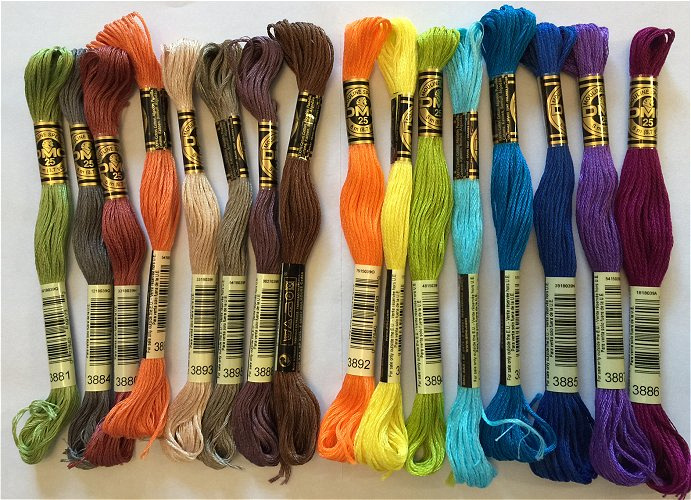
A few basic things before we get started. I typically use Sculpey clay for my cowries, it is an oven bake clay that comes in many many beautiful colors. The colors you will need to get started depend on your project, however if you're going to start a stash I recommend grabbing the basics. Get your primary colors: blue, yellow, red, black, white... You can mix these colors just like you would paints to get custom colors so if you can't find a color you need don't worry--you can make it!
For those unfamiliar with Sculpey, it a lovely thing! One of the main reasons it's so lovely? It lasts forever! I'm not kidding...years and years without drying out. I've never thrown Sculpey away, and I don't think I've ever had to buy more than one block of the same color either. For a work surface to bake my clay on, I prefer to use a glass plate that is bake-able in the oven. I think most dinner plates can tolerate this but be careful. Mine happens to be white and is actually something I rescued from the garbage of all places!
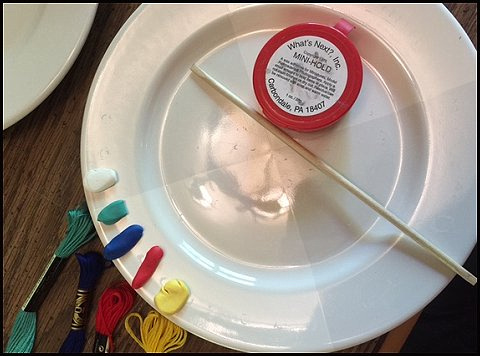
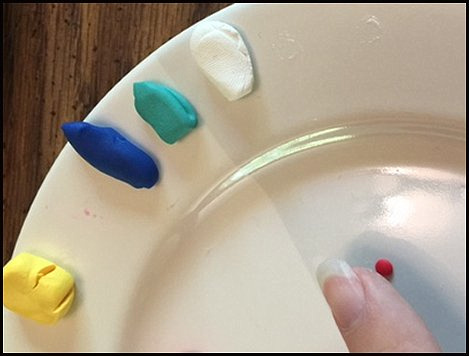
In the first photo you can see my glass plate with my mixed up colors. I matched these colors to the embroidery floss that I used on my presentation set that these cowries will be for. The second photo is just a picture of the bottom of my plate to show you what it is. I don't think it's anything super special. One thing I like about having a solid white plate to work on is it's a clean "non-busy" surface to create on, almost like a blank sheet of paper. I can imagine if I had a loudly decorated plate I would probably be distracted and get a headache...well, I usually get a headache anyway!
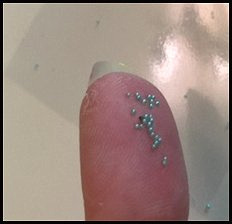
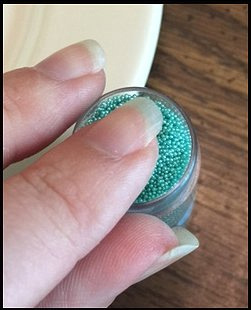
MICROBEADS
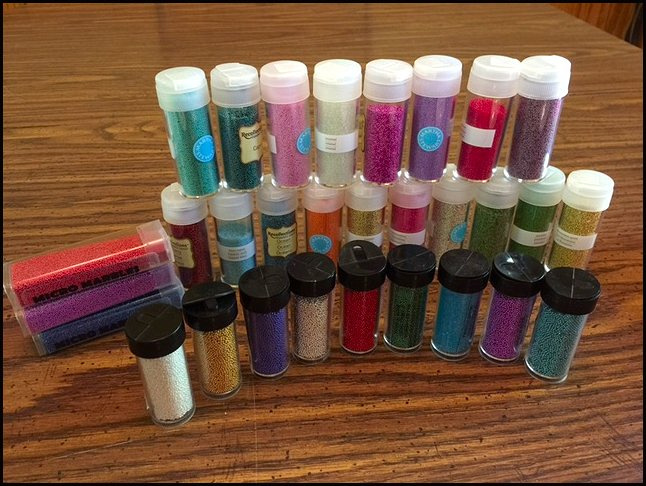
I would like to say a quick word about Microbeads. First of all, what they are very often used for, is to make the little bead/ball shapes on cowrie designs. They add a really nice touch of color and detail. As you can see I'm a bit of an addict, and here is a photo of part of my collection. I will never have too many as long as there is another color I find that I don't have. These are most commonly found in either a scrapbooking section of a craft store under "microbeads or micro marbles". They are also commonly used for fingernails and are known as a "caviar manicure". You can search these on ebay under "caviar beads for nails". They are also used for jewelry designs and can be found in jewelry supply sections of stores or online. There is a really nice starter kit of these that you can get from Michaels, it is the "Martha Stewart" brand but they come in like a pack of 18 tubes? I've also recently scored a few collections of tiny tubs on ebay in the nail section. Just do some searching and you will find them. They also come in different sizes. Some are very tiny and some are a little larger. If you plan to make these a lot try to find both sizes. Often times the bigger ones work nice as a center accent while the little ones fill in nicely around other areas.
Continuing on then!
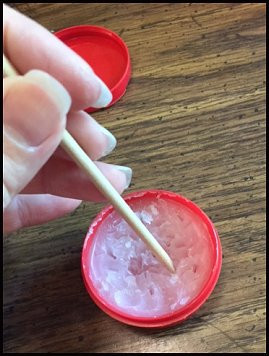
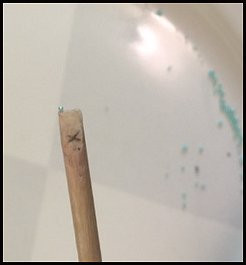
Two of my favorite supplies for this project are a tub of a sticky wax that I purchased from Rio Rondo and a long wooden cuticle stick. A cuticle stick is something you find in a nail supply section. Each end of my stick has a flat edge to it. The tool you use isn't that important as long as it works for you, this just happens to be my favorite pick up tool no matter what I am making. I use one end of this stick to pick up tiny micro beads and the other end to tap them in place. So one end of my stick is marked with an X, that is my "sticky" end. The non-marked end is my not sticky end that I do not dip in the wax but use to tap objects into place as needed!
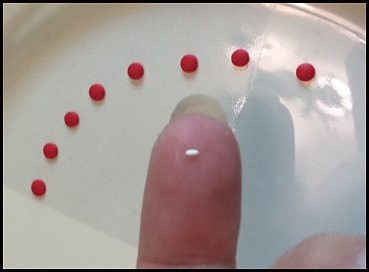
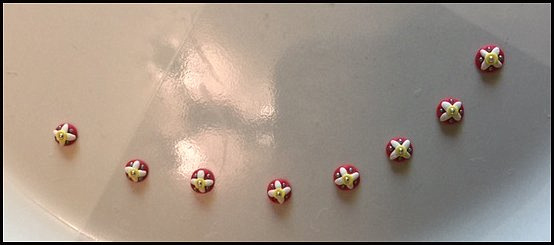
Step 1: Get started by getting your cowrie base color out and roll a small ball to get the approximate size your cowries should be.
Step 2: To test out the size of your ball gently tap the ball down into more of a flat circle. Use gentle movements when handling cowries. You don't want to leave your fingerprints all over your work!
I've decided this one is about the right size so I roll it back into a ball...
Then roll out several balls for however many cowries you want and try to make them as close to the size of the ball you originally made.
Once you get your sizing down roll one away and gently tap it into place with your finger. I like to work on a plate with my hand in center and my work on the outside of the plate headed in a circle. Makes for less of a chance of accidentally squishing one! If your clay will not stick to your plate take your white or lightest clay and rub it along the surface of the plate to make a greasy smear. I call this "seasoning" the plate, then you can get that clay to not stick to your finger and stick to the plate instead.
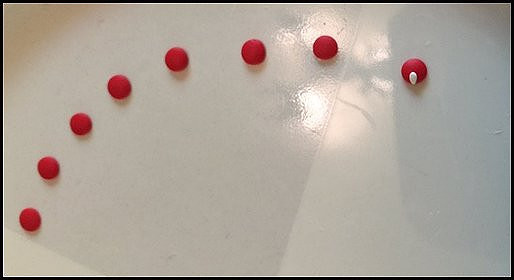
Tada! A nice row...
Step 2: Now you're going to make your actual cowries. Before you touch white clay make sure you wash your fingers thoroughly. Anytime I handle red or a darker color it never fails to transfer onto the white clay, and be ready if you handle red, it is the hardest color to get off your fingers!
For the cowrie part I like to use straight white. I've tried flesh tone colors, even more see-through varieties of clay and the plain white shows the detail the best so far in my opinion, so for me I like to use white. I take and pinch one end of the clay down nice and pointy!
Then gently roll out the tiniest little oval shape. This may take some practice and several attempts to get each one the right size. Go as small as you can. Think about my little red circles as a base for a flower, and the cowries are the petals. I need to fit four petals onto my base so I don't want them too big, or hanging off the edges.
Now you can see I've gotten one laid down on there. And I go around to each cowrie and give each one a first petal...

Each one has a first petal....
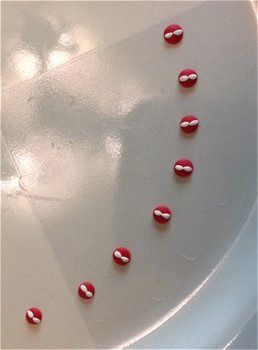
Then go directly across from your first petal on each one turning your plate as you do and lay down your second petals...
Then halfway between the first two to make a third petal, and finally your fourth...
Step 3: Pick out a center color. Another tip here that I will point out is if you plan to use yellow in your design try to do it in clay. Maybe you'll have better luck that me but I have never had any luck finding yellow so I almost always incorporate it into my designs with clay instead of microbeads. Once you pick out your center color, just roll out tiny little balls and set them right into the centers of your little cowrie flowers. Mine look like daisies!
Step 4: Next you will want to set your microbeads into your design. I take and get one end of my stick a bit tacky by tapping it into my wax. Don't use to much that you get your beads gunky, the perfect amount of stickiness is just when it will pick up a bead and hold it long enough for you to easily sink it into the clay. If your beads won't let go of your stick rub some off with your fingers. I use an additional plate I have and just dump some little beads onto it, sometimes a paper plate or even a plastic lid to something works great for these!
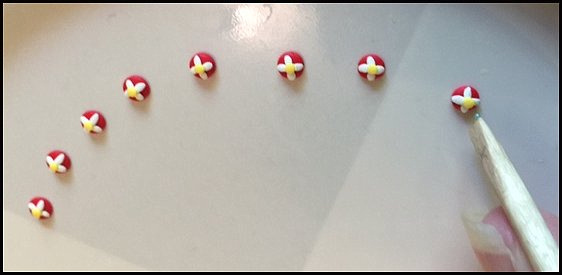
Start by placing beads on the outside of your design, leave the center for last...
Here you can see I set my first bead in place. This is the part where I flip my stick over to the non-sticky side as I'm doing this and gently tap that bead down a bit and into place. You don't have to completely sink these into the clay, but you want them about halfway sunk to get them to stay. On your last step, sealing these will help the beads stay put.
There we go, there's all my outside beads in blue!
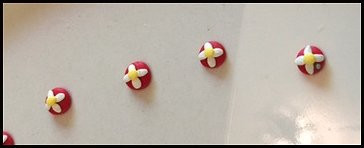
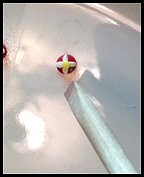
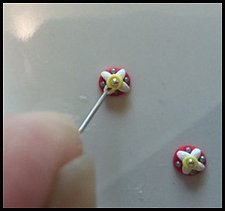
Step 5: For detailing I like to use a needle or a pin. This is just a basic sewing pin with a ball on the end of it. I like to take and just make a little "dapple" or divot into the center of each cowrie with it first. What this does is it will give that center bead a gentle ditch to rest in and it kind of pushes the cowrie petals together underneath your center clay color.
Just go through and tap each one until you give each one just a nice little dimple!
Before you switch colors you'll want to clean up your beads. The easiest way I find to clean these up is to use my finger. Just press down on them until they stick to your fingers and scrape them on the edge of your tub of beads to clean them up.

Step 6: Dump out your center color. For this set I'm using silver. And now I'm going to go along and just press a silver bead into each cowrie center, flipping my stick over to tap each one down into place before moving on to the next.
There they are, all beads are set and you're ready for some detailing!
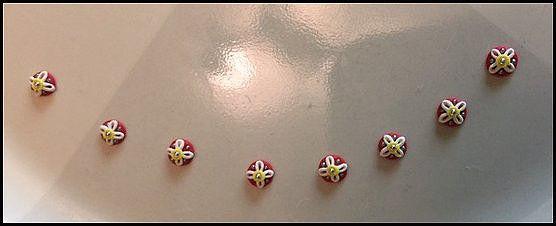
Step 7: For the detailing part I take my needle, holding it angled away from my work, and gently press each petal in the center to make the cowrie. You can get even more detailed here if you want by drawing in little "cowrie teeth" with your needle by holding it the other way. For this set I chose to keep them plain, sometimes when I make actual teeth, things get messy!
Step 8: For baking these your temperatures may vary according to what kind of oven you have. I have just a regular electric Fridgidaire glass top oven. I preheat my oven to 275 degrees and bake my cowries for about 14 minutes. The thing with working with clay pieces this small is they don't need quite as long as a larger piece of clay would. You don't want to under bake them or they will crumble apart, and if you over bake them they will scorch and turn brown and you have every right to cry! I've done it a million times! Make sure you set a timer and do not let yourself get distracted while these are in the oven! I've done it so many times and probably still will in the future...
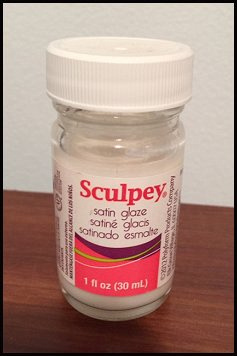
Step 9: Let your cowries cool completely, and then seal them. For sealer I've found it is best to stick with the Sculpey brand. This is the one I use. I just take a small paint brush and paint it on. Don't use too much or it can dry bubbly looking. Also don't be alarmed as you paint this onto your designs it will go on a milky color, but it does dry clear so just breathe! I didn't illustrate how this batch looked with the glaze because unfortunately this batch did not survive. The center bead color actually rubbed off to a plain clear bead color when I applied glaze...one of the many possible tragedies of cowrie making!
Some people even take these before they seal and paint the centers of their cowries with a nude color to give them even more depth and realism! Try it out, do experiment, and find out what works best for you!
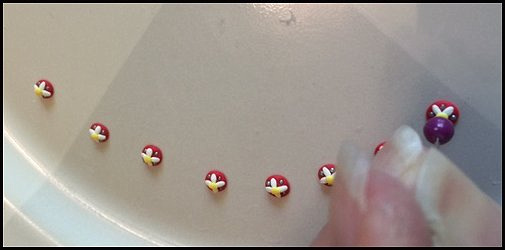
And that's all there is to it! Once you get the hang of this clay you can make so many different variations of cowries for your tack! To glue them onto your work I recommend using super glue. My favorite is the "gel control" in the blue and gray bottle. This will get those little suckers to hold forever. I use my same pick up sticky stick to pick the cowries up and set them. I place a blob of glue on a paper plate or sticky note and use a toothpick to place dots of glue on my work, then set the cowries so I don't overuse the glue.
I also recommend making extras of every set you make. You may have some that turn out better than others, and you may accidentally break a few while setting them or working on your tack. It's also a nice gesture if you're selling tack to make some extras to send along with the sales of your pieces in case something falls off or breaks. Below I've included a few examples of some that I've done...

I hope you've enjoyed this tutorial and find it helpful! Get to practicing and as soon as I can I will do another tutorial on some more possible design ideas to try on your work!
As always thanks for reading and happy collecting everyone!
Melissa Halvas :0)
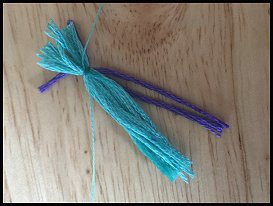
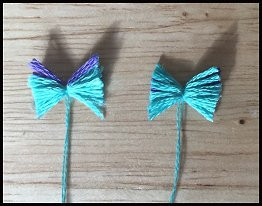
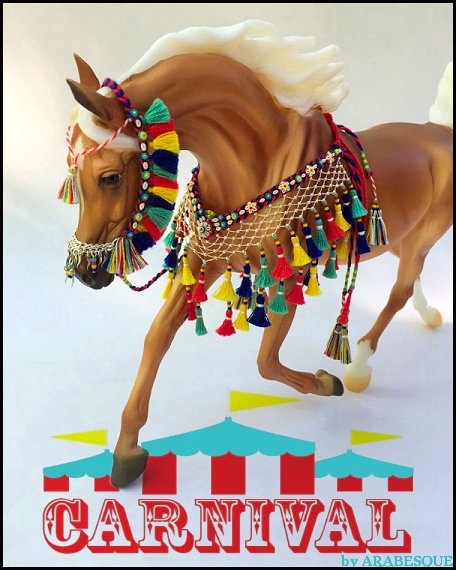
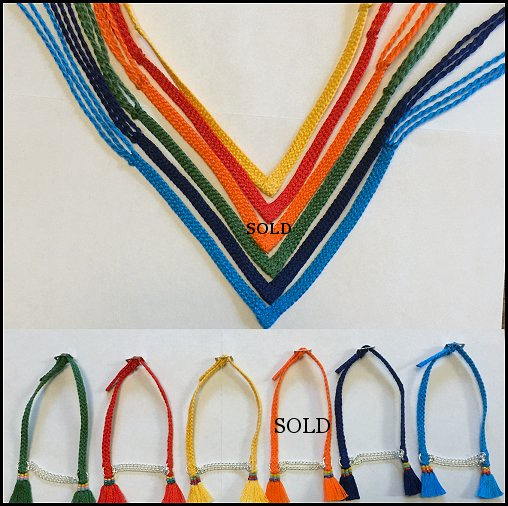
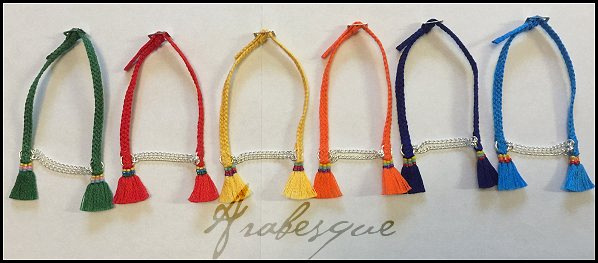
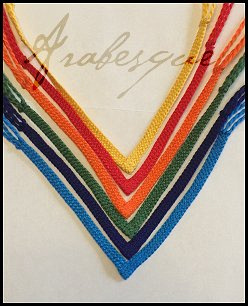
]]>How to make mini pom poms for model horse tack
Pom Poms are incredibly popular on real Arabian horse tack! They can also be found on tack intended for other breeds, one that comes to mind instantly is Marwari as an example. What I'm going to show you today is an easy method that I've developed for making attractive multi-colored pom poms. Pictured above is just an example of some creations I've made using this technique!
Let's get started!
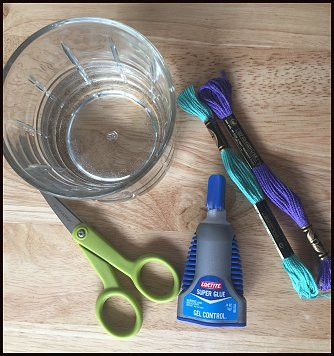
For supplies you will need embroidery floss, a nice sharp scissor, a cup of water, and some super glue. For super glue I prefer the "gel control" in the blue and gray bottle. I use this for nearly everything small in tack making that needs a tough, quick drying hold!
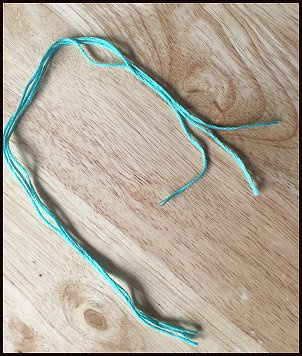
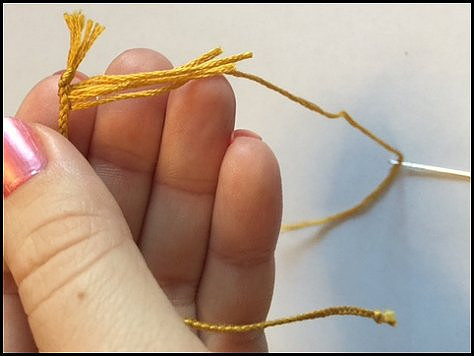
Decide how many pom poms you want to make and cut some embroidery floss into sections. These are roughly 8 inches long? Each section of embroidery floss has six tiny strands in it, and we will use individual strands to tie our pom poms. Here I've cut 3 strands because I'm going to make a big batch of pom poms. I tend to screw some of these up, or they don't come out as uniform as I like, so I will make a bunch and pick and choose which ones are the keepers at the end!
Here's my individual strand. To get it ready I dip my fingers in the water and wet the strand down to straighten it, then lay it down flat on my work surface.
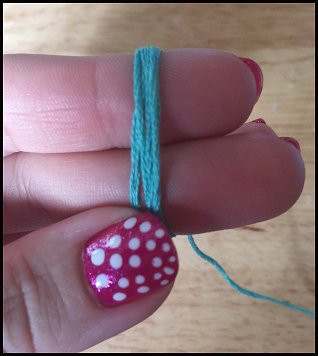
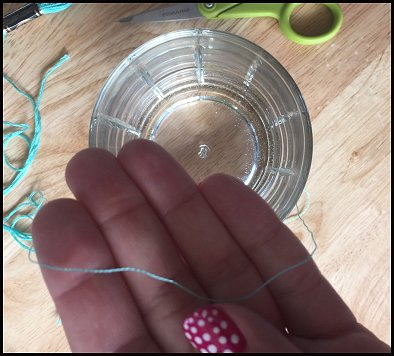
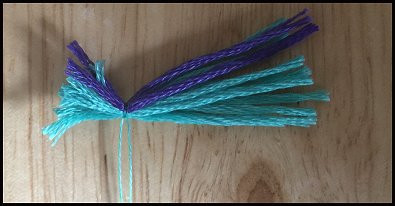
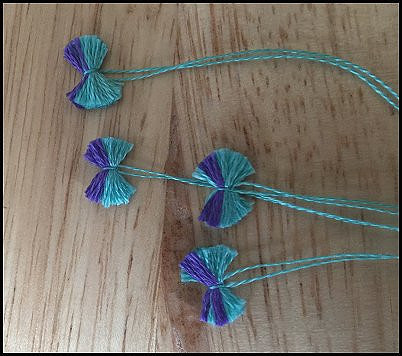
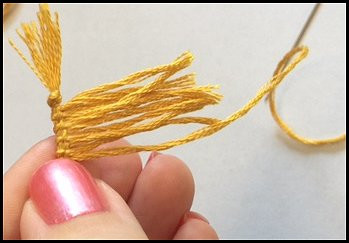
Determine what color or colors your pom poms will be. For mine I am doing a mint-y turquoise and purple mix. Mine will have purple centers, and the turquoise color will be the outside color. I will need more of the outside color and I'm going to cut that first. For this part I wrap embroidery floss around two fingers 6 times to make 12 pieces. (This wrapping over two fingers is also the same method I use for tassels)
Slide your fingers out and snip the threads at the top and bottom to make your stack of threads.
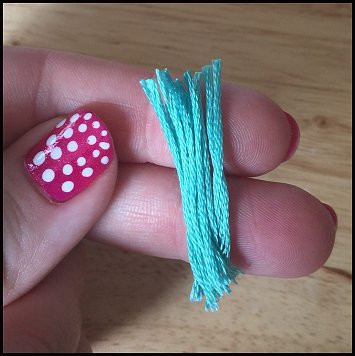
So here is my stack of 12, in this case the "outside" color.

For the inside color I just use 2 pieces of purple.
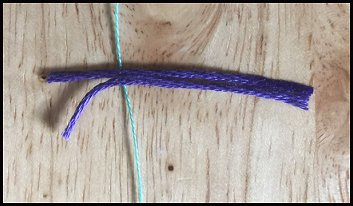
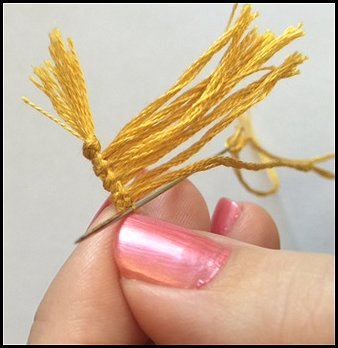
First lay your center color down over your thread. Place it off to the side of the stack. What this will do is leave enough room to make two pom poms out of this stack. Next, lay your outside color over the top.
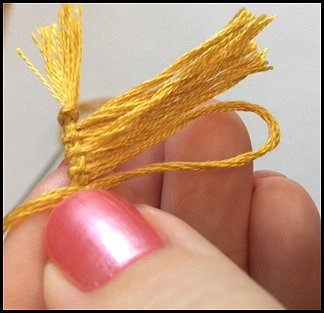
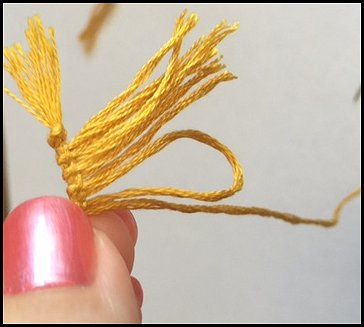
Double knot your thread and then pull both strands to the "bottom" of the stack, so your knot faces away from your center color.
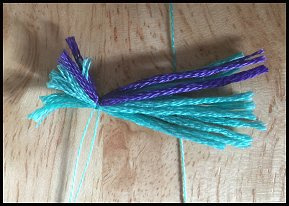
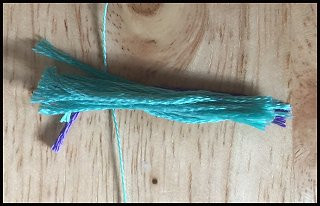
Repeat these steps on the other side of your stack to make it look kind of like a piece of candy!
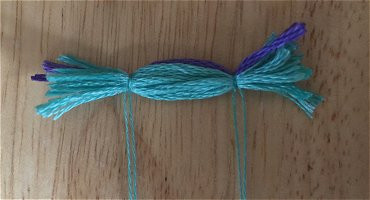
Cut on either side of your threads leaving a little fringe to either side. Now you have two pieces of candy!
I like to round my edges off a bit.

Now pull your string down between your thumb and pointer finger and gently start to squeeze the edges of your piece of candy together to get the shape forming. Take your super glue and put the tiniest dot of glue right in the center. You don't need very much. If you use too much it will ooze out the top and you will glue your fingers together....I've done this!
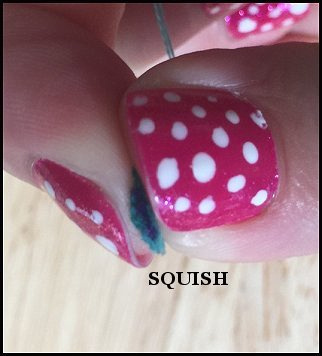
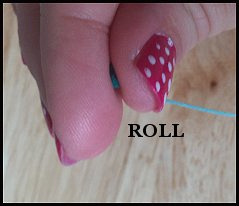
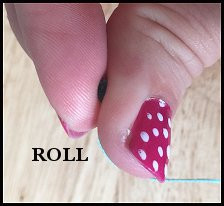
Now squish! And roll, roll, roll that pom pom into shape! Get that glue to set! It doesn't take long at all, that glue grabs pretty instantly and then you're able to start trimming. Now pretend you are trimming a tiny hedge and trim, trim trim your little bush!
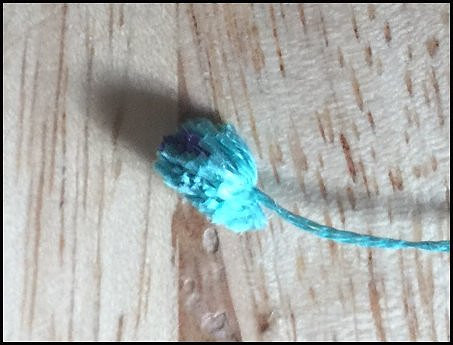
Here you can see I trimmed at a sharp angle.
Cut straight across the top and poke the pom pom down with your finger. There really is no right or wrong method to trimming these down. Figure out what works best for you. You can make these smaller if you want. I should note that for the ones I've been making, I've been doing them about the width of my headstalls on my native halters.
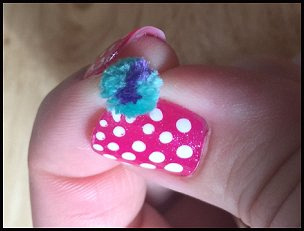
Cute aren't they? It takes practice to get these how you want. I recommend doing a big batch for fun and pick your favorites to put on your tack. Also getting the mix of colors just right is tricky. As you can see in this second photo that purple goes wherever it feels like. Can you see using even more colors, or just one color? Making them even smaller and cuter? See what you can do, and feel free to show me!
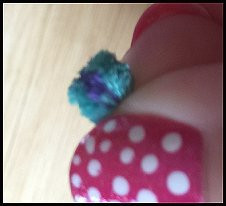
For attaching I recommend gluing them onto your tack. I thread them through a needle first, and pull the needle through my work to get them placed where I want them. Then I take a small dot of super glue on the bottom of the knot and using the threads I pull the pom pom into place until it set. I then sew and knot those threads into place a back up so these little buggers will never come off!
And because while working with this color combination I couldn't think of anything but Sulley from the movie "Monster's Inc."....

I hope you found this tutorial helpful! Let me know what you think by commenting on the blog or drop me an email! Let me know what other tutorials you would like to see! Below I've shared more examples of native tack I've made using this technique!
Melissa Halvas :0)
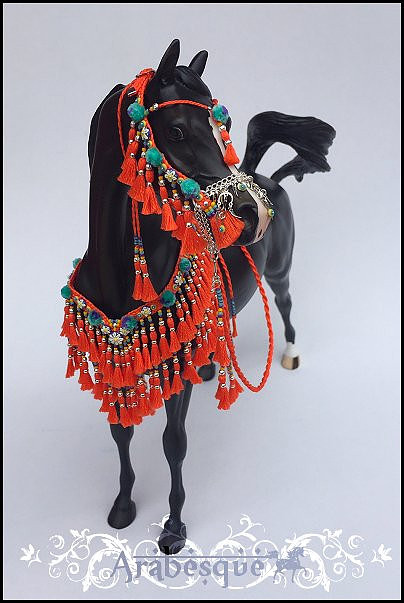
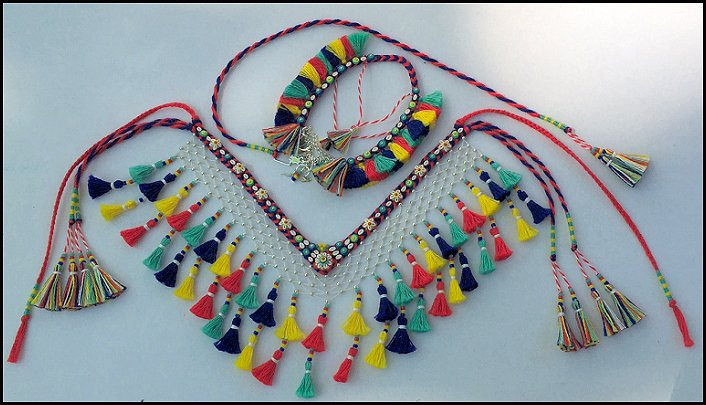
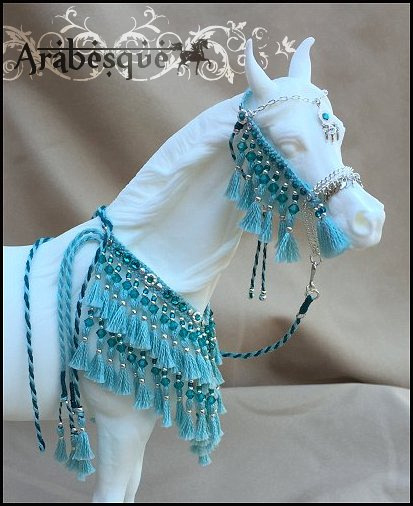
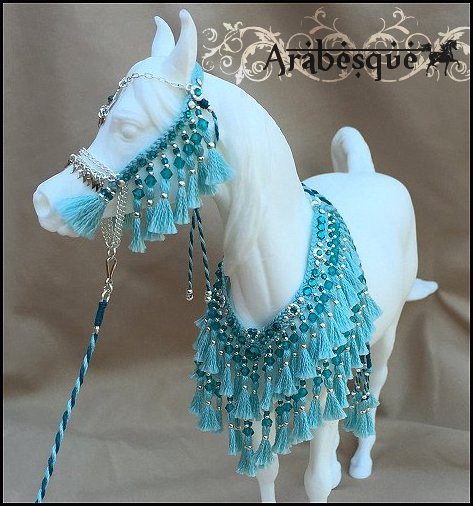
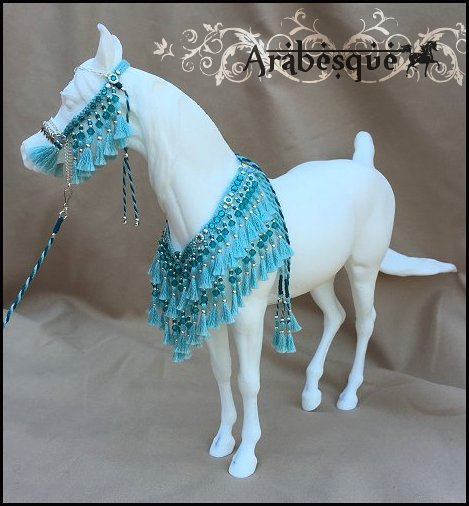
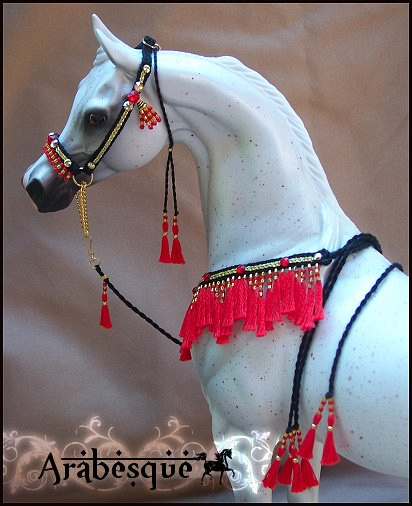
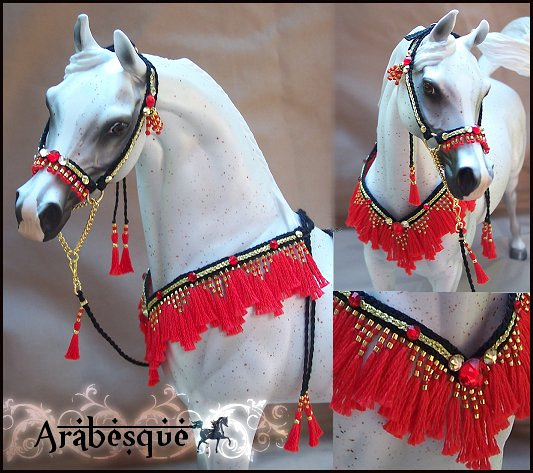
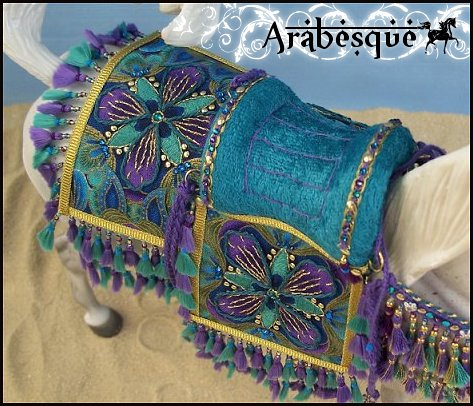
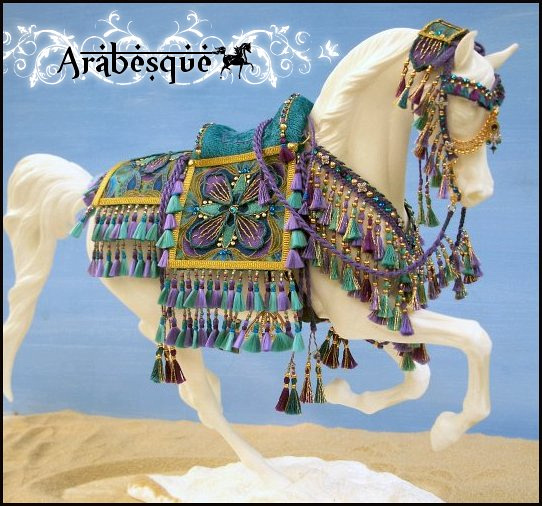
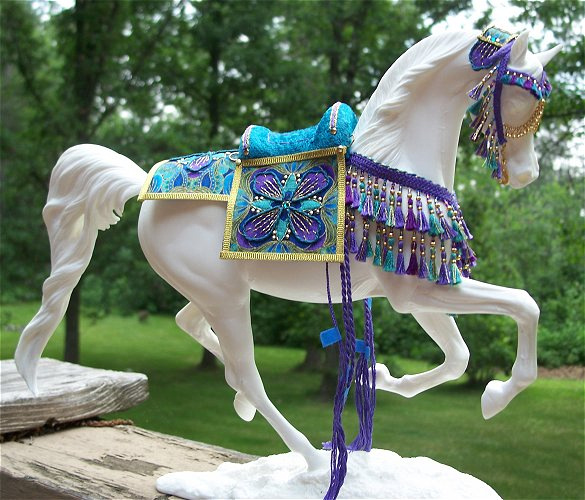
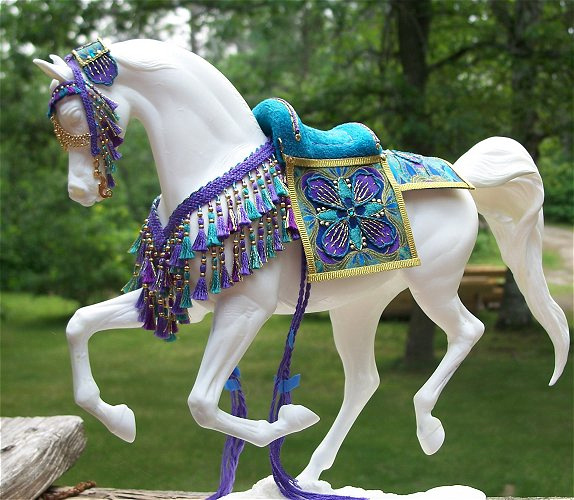
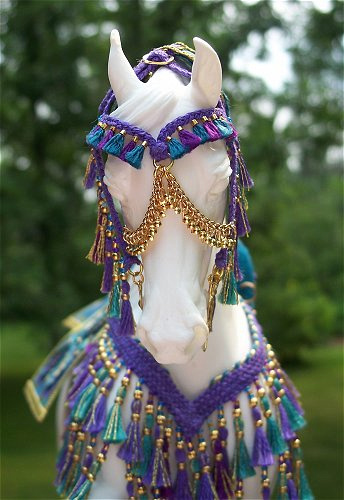
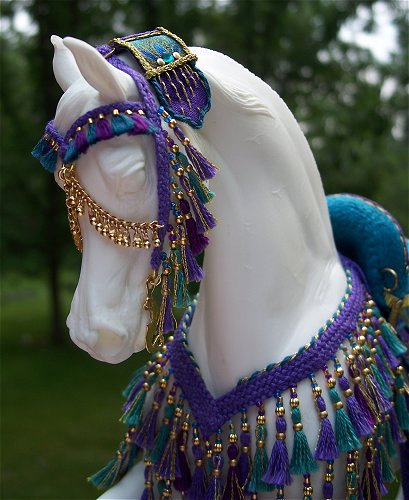
This is a new presentation set that I just finished up. I call this one "Carnival" in honor of this years Breyerfest 2016 theme. The fun mix of colors used (red, turquoise, royal blue and yellow) remind me of the fun and bright colors you would see at a carnival. This one isn't adjustable so it will only fit models with a very similiar or smaller head size. This is a native themed set that was specially made to fit the Weathergirl mold. The set also fits Ashquar, but it is too small for the PSA.
The most standout feature on this set is the "Egyptian" style webbing that I did on the collar. I had to be real inventive with my technique to make this work and it's safe to say I'm hooked!
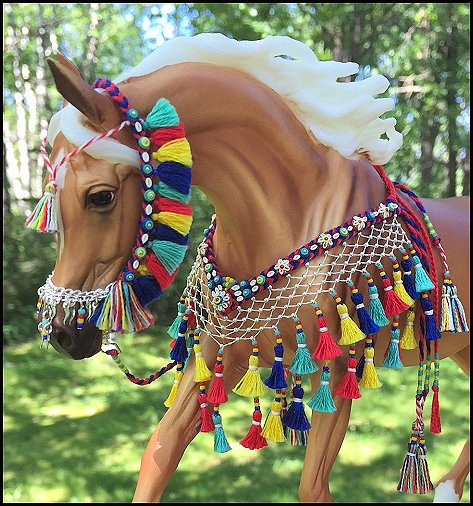
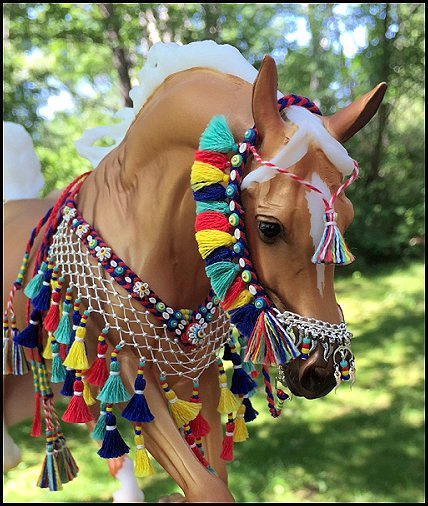
(The lighting was so off in this photo above that the red kind of looks coral, I decided to add it because I think it looks cool and I now think I need to intentionally do one in coral and blue!)
Thanks for Reading and Happy Collecting!
Melissa :0)
]]>
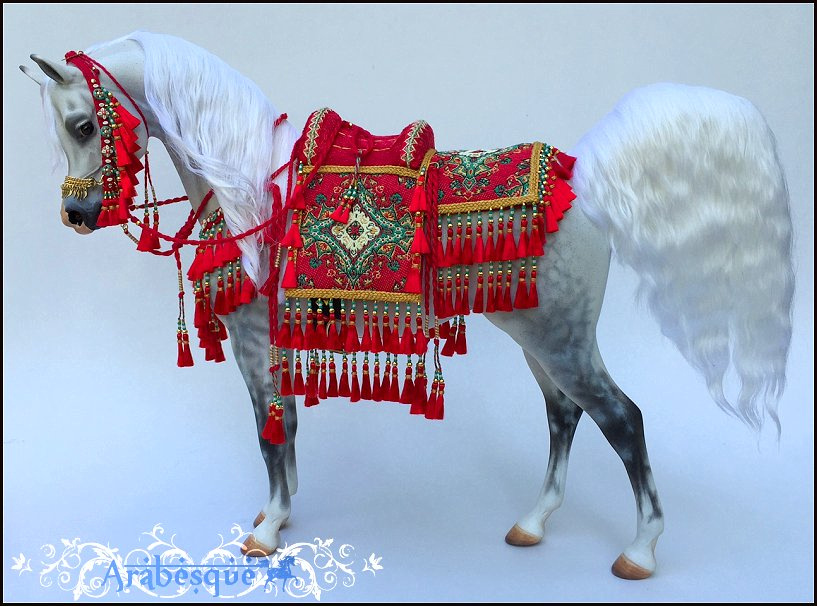
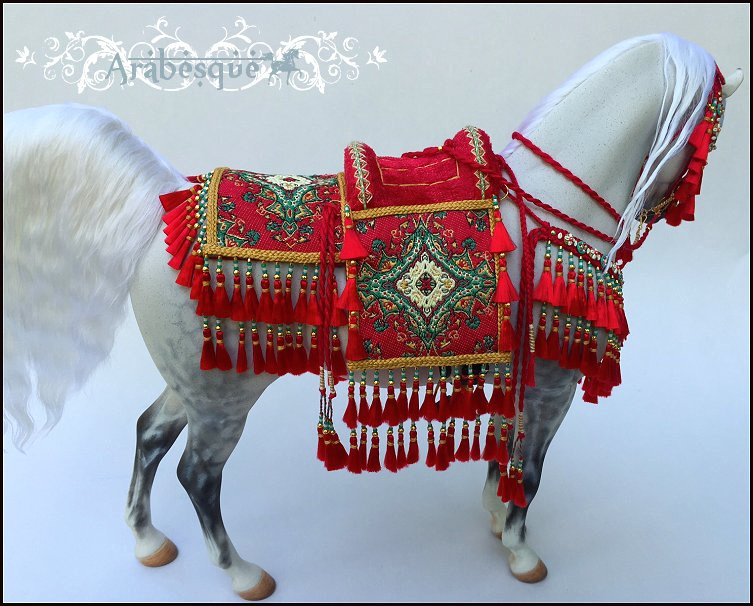
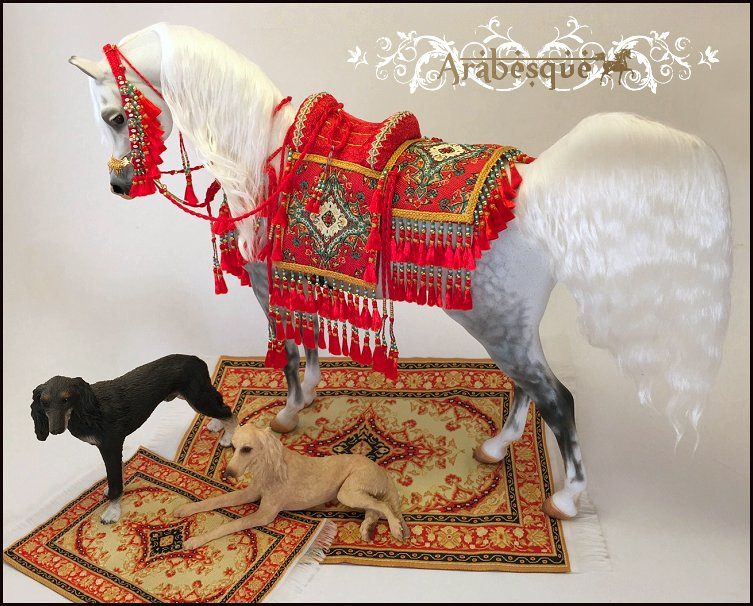
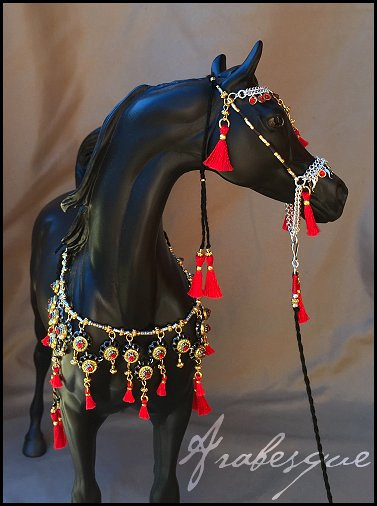
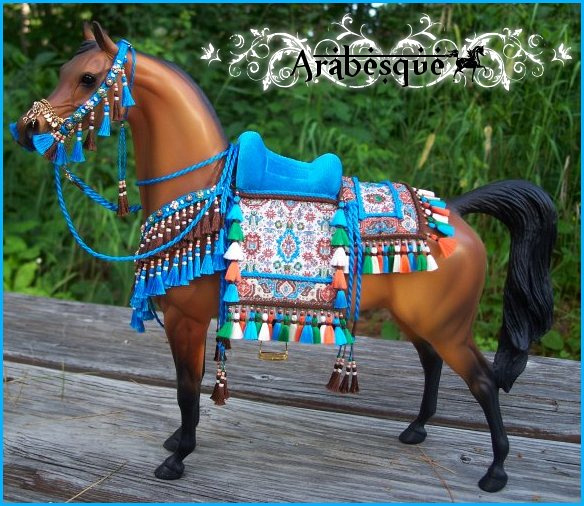
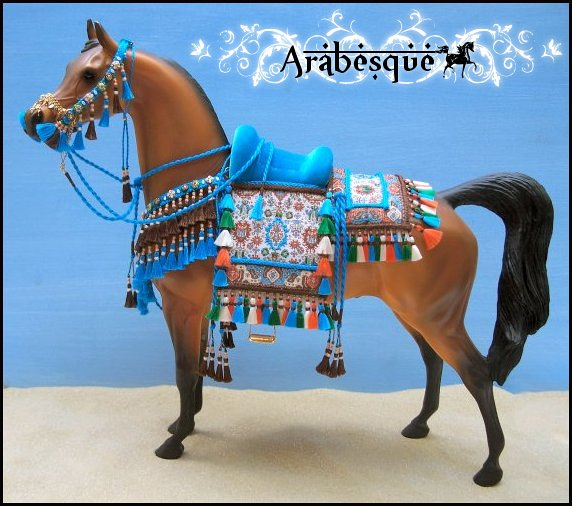
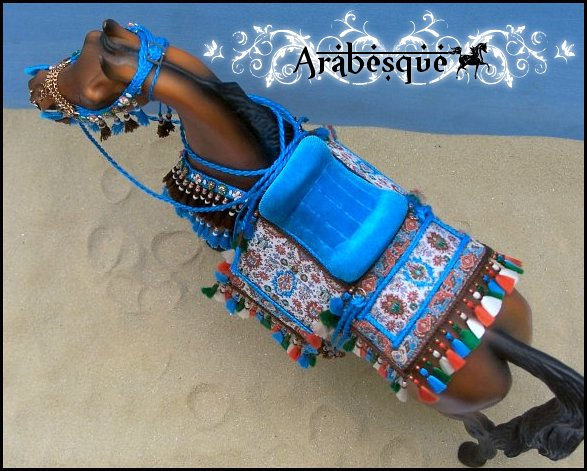
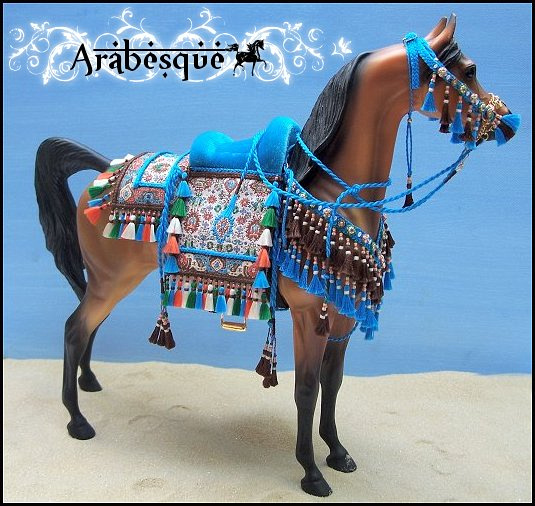
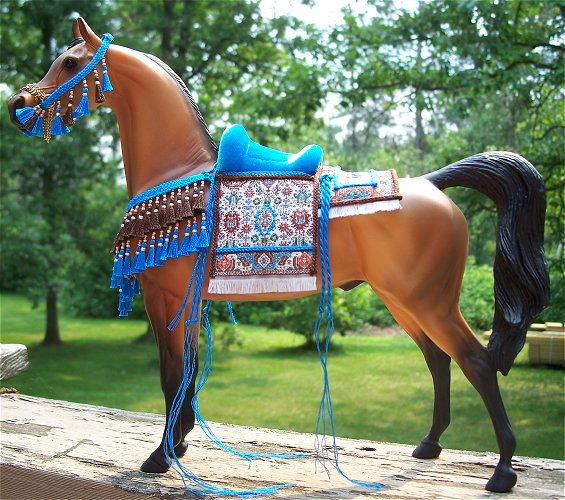
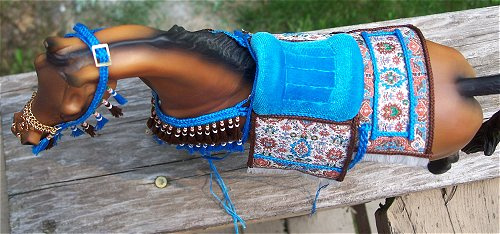
Here is a new costume that I just finished up this week. This is a native style done in vibrant red, accented with old gold and a seafoam green. I made this one to fit the Peter Stone Arabian but it is adjustable in size, as you can see it does fit my Bint Nazeem resin and she is fairly large. Lots of details on this set, so I will break it down by part and go through each one. There are six pieces in all to this set: Bridle, Halter, Collar, Saddle, Girth, and Girth Strap.
Halter/Bridle
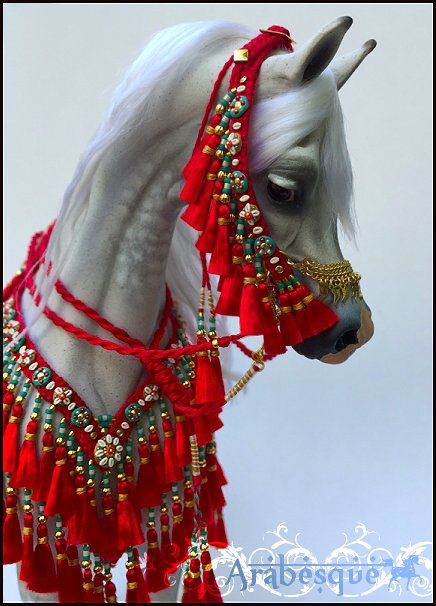
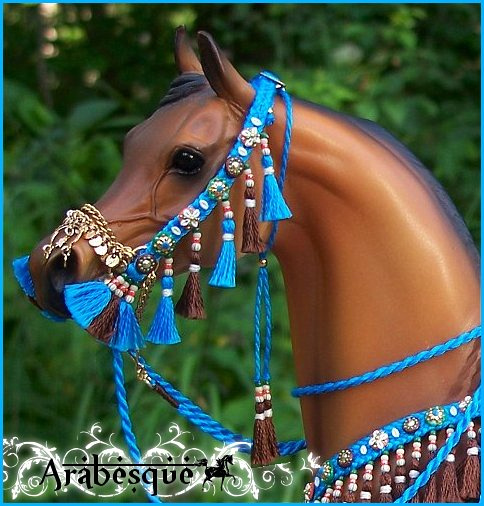
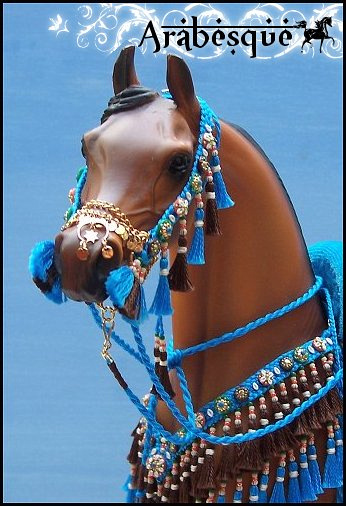
The halter and bridle are two separate pieces, allowing the halter and collar to be used separately as a presentation set. The bridle is a separate piece that has an adjustable headstall, D-ring snaffle bit, and reins and it is meant to be worn beneath the halter when in use. The reins are one piece, and they have a sliding bead that allows you to easily gather the reins at the horse's neck for showing if needed. The reins have a decorative tassels accent that you can slide around; the point of this piece is not only for decoration but it will keep the sliding bead from falling off the reins. The bridle does require the use of sticky wax to hold it into place. The halter features an adjustable headstall with a buckle to size up or down. The throat lash is not detachable, but has a sliding bead that allows you to loosen or tighten it. The lead line is detachable and I have done it up in a decorative slip knot that you can loosen or tighten around the horse's neck without undoing it. However, the knot isn't permanent and may be undone if desired, I will leave it knotted in case the new owner finds it easier. Lead ropes are typically tied around the horse's neck on native costumes when not in use. The halter is heavily decorated in hand made cowrie shell designs, silky red tassels, and a gold tone triple chain with tiny shark teeth. The halter has been lined to improve longevity.
Collar
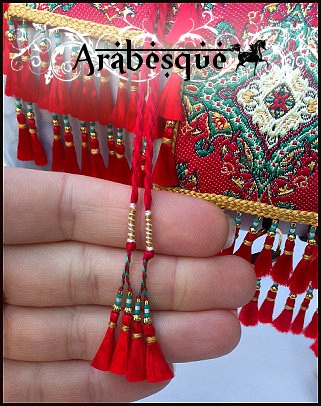
The girth strap attaches to the back of the collar with a small hook, but when detached the collar can be used for presentation. The collar ties to two rings at the front of the saddle as is typically done with real native Arabian costumes. There are three sets of ties on each side of the collar. When you tie the collar to the saddle, only loop the top set through, the bottom two sets are meant to hang down decoratively. Like the halter the collar is also heavily decorated in matching hand made cowries, and silky red tassels. The ends of all the ropes on this set are also very detailed, wrapped in multiple collars and adorned with tassels. See photos below to see what these ropes look like. The collar has been lined to improve longevity.
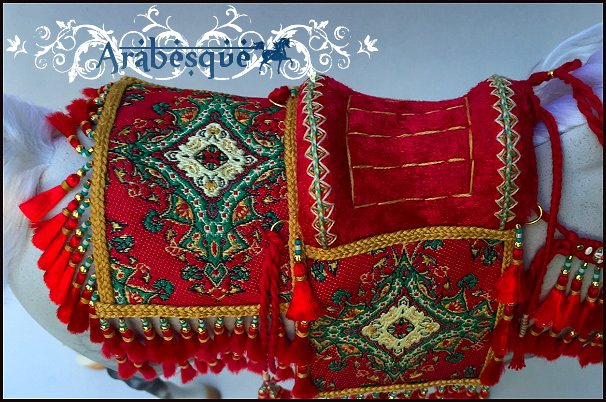
Saddle
The saddle is heavily decorated in two rows of red silk tassels. Hand embroidered accents have been added to the pattern of the drape to bring out the richness of the colors used. The seat is covered in a matching red velvet and is also hand embroidered in a newer pattern I just came up with that was inspired by a real costume. As mentioned above there are a set of rings on the front of the saddle for the collar to attach to, and then there are a set in the back that hold a set of ropes that match the collar. The stirrups are english style with black treds, and are attached beneath the saddle as is traditional for these costumes. They are attached with black leather lace straps which have been hand thinned and are adjustable in length with buckles. The girth is completely detachable and attaches to the underside of the drape with velcro located on either side of the saddle. The girth strap itself loops around the girth and adjusts in length via sliding beads and it attaches to the back of the collar. The drape also has a wire frame to allow you to bend it easily to the shape of the horse. The underside of the drape is completely lined to protect the model from scratches.
This set is easily one of my most favorite pieces I've made yet!
Thanks for reading and happy collecting everyone!
Melissa Halvas :0)
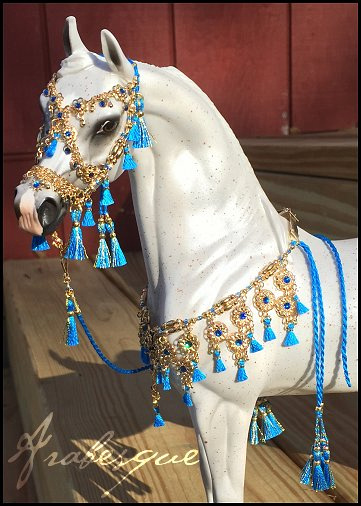
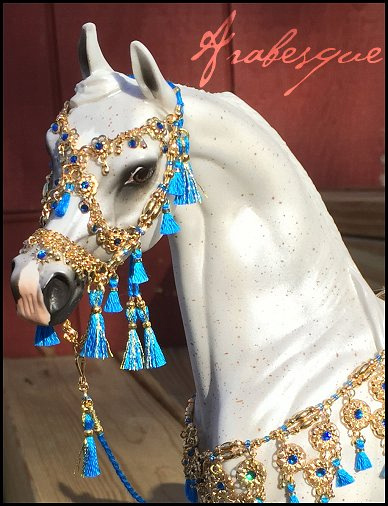
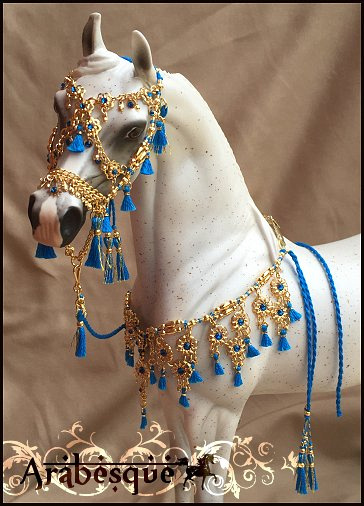
*Arabesque* Model Horse Creations

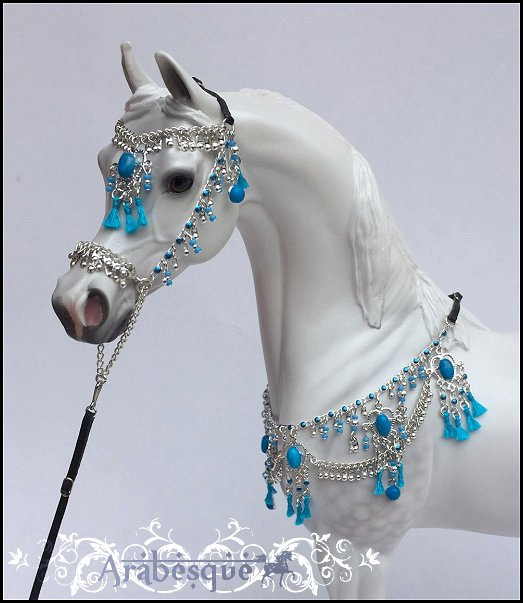
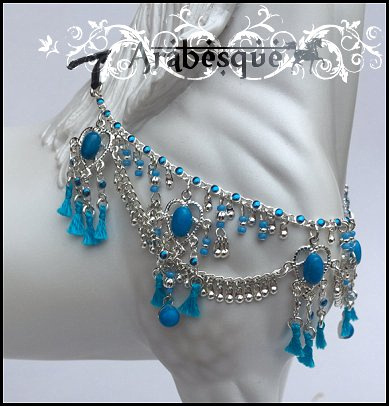
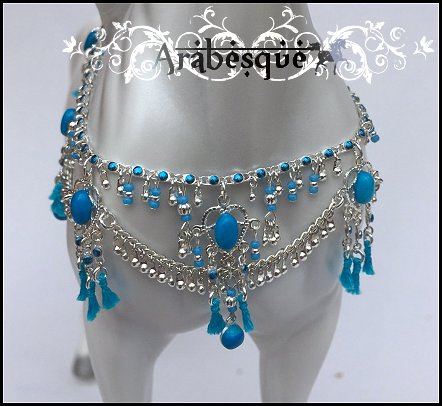
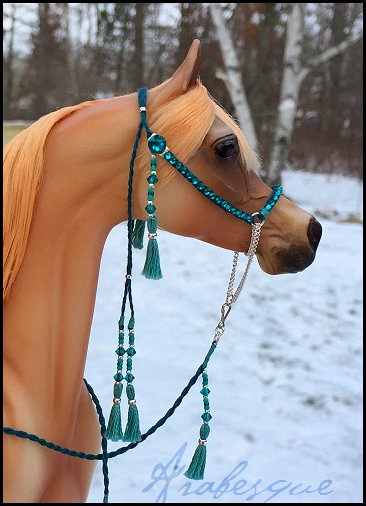
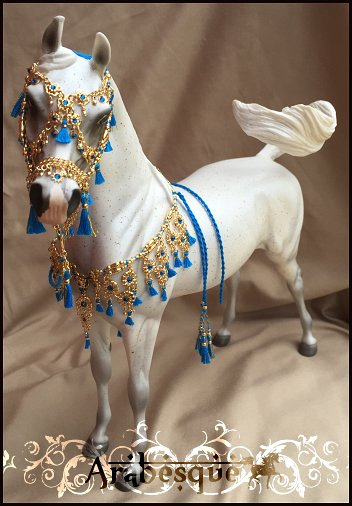
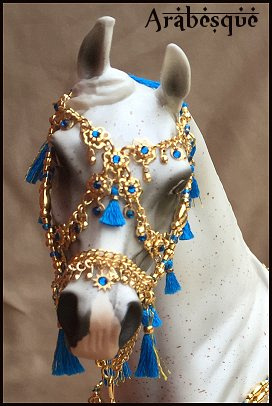
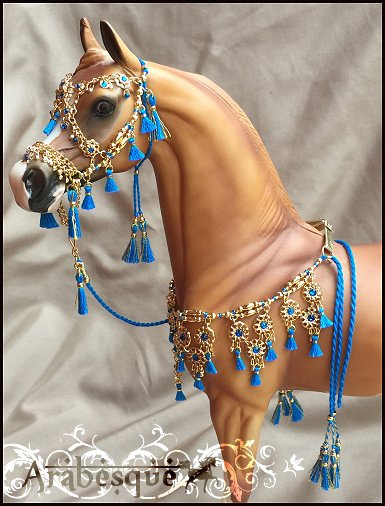
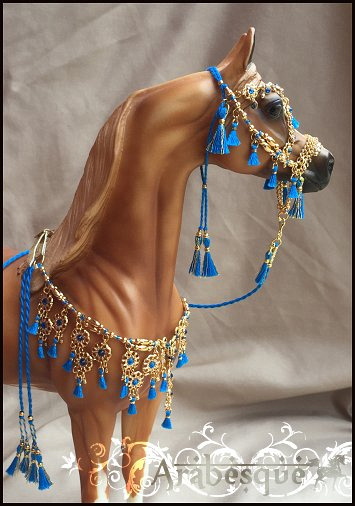
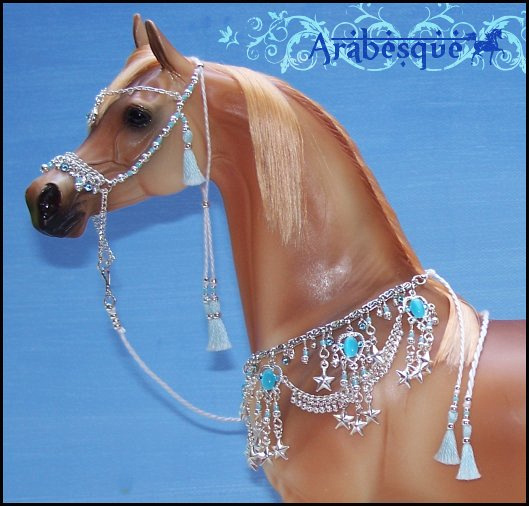
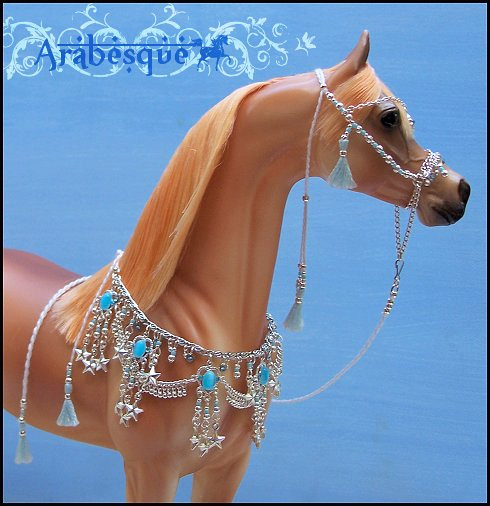
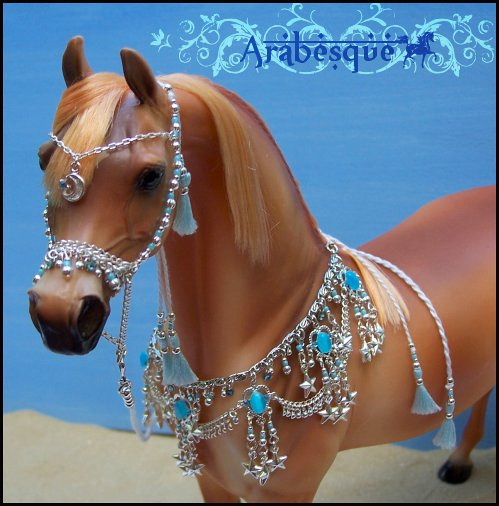
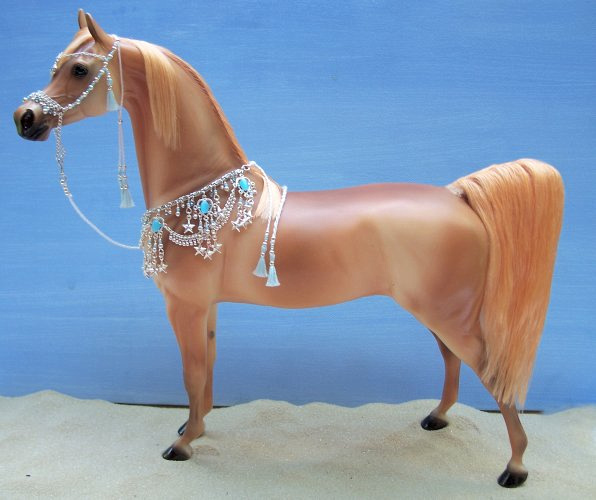
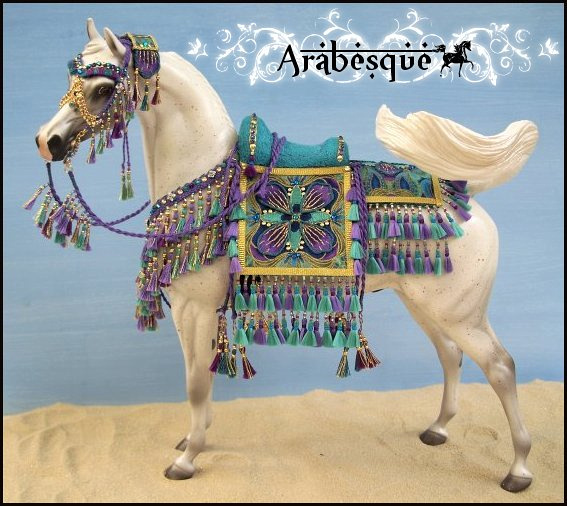
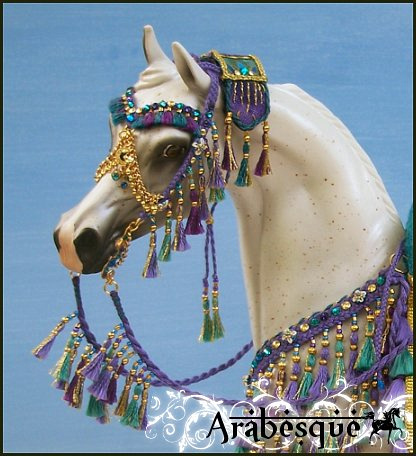
My newest creation is an Arabian horse jewelry presentation set that I started last year. I randomly picked this one back up after finding some crafting pieces in my stash that I thought would look great with this set, and then inspiration set in! The design is much like the original "Green Hearts" set I did last year, and the lighter blue star one. These sets were inspired by a reference photo I have of a real Arabian horse set, saved from pinterest:
https://www.pinterest.com/pin/493073859179182387/
While the design of this set was influenced by this real photo, the elements and colors used all had to be decided by me, lending the final piece to be a unique and very original creation. One of the fun challenges of working in model scale and making something like this modeled after life size, is finding parts small enough to stay in scale. Most of the time the pieces I find are not made specifically for model horse tack. As part of my tack making hobby I constantly search and think of how something I see or find could be used on model horse tack. Then after I find piecse to use, many hours are spent just trying to figure out the best arrangement of the pieces so that they will compliment, rather than overwhelm the face of the horse. Most of the charms on this set were hand made, and some of them three times over before I got the exact look I was going for. I can honestly say this piece was another true labor of love--I detailed the hell out of it! Now on to more of those details...
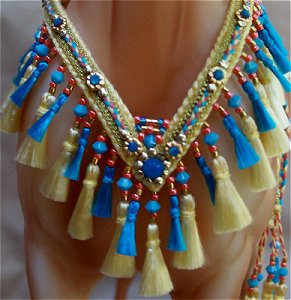
I've used real hand thinned leather lace at the back of the headstall, back of the collar and for the lead line on this piece. Each of these pieces are adjustable in length with small buckles. The strap ends are finished with tiny silver pieces. The set was made to fit the Peter Stone Arabian but can size up or down a bit to fit models similar in size. Due to the brow band it's not going to fit horses with a much broader face, or much narrower face or it won't hang right. The headstall features a noseband with a double row of charms, which have been attached in a way that prevents any sort of frustrating tangles. This layered look was inspired by a halter I've seen that has two rows of coins on the noseband, so on this halter I did two rows of charms.
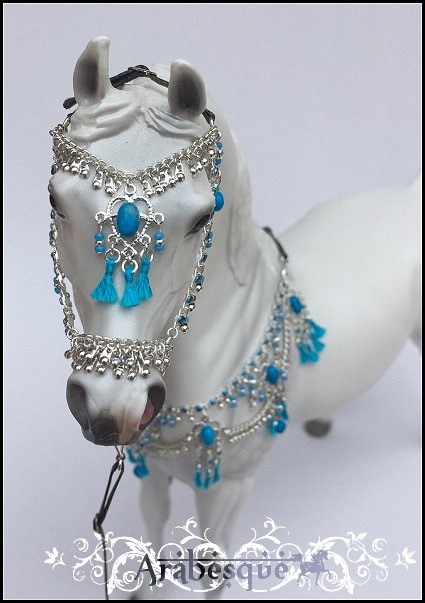

The largest stones on this set are an imitation turquoise. There are then a mix of blues found in beads, tassels, and the tinier blue studs that I used to accent the entire top of the collar and sides of the headstall. The mix of blue elements, combined with their silver counterparts ties the whole thing together. My end goal was to create a collectible piece for someone's favorite collectible to wear!
I donated this presentation set to the 2016 NAN auction!
Thanks for looking & happy collecting everyone!
Melissa Halvas :0)
]]>
I have four other native sets over half completed like the royal blue one I just listed for sale, these were listed in a previous blog as well. I'm offering early reservations on these sets in case anybody sees a color that they like and would like any input on the finishing details. All of theses sets have halter bases and collars completed, tassels are made and ready to sew on or are either already put on. All the hardware on these sets is already set for silver, but I can do any charms wanted. I had plans to do pom poms on all sets like I've done on the royal blue set, but if preferred I can do straight cowrie designs as well. You can also have your choice of brow band. Input is welcome or if no preference is given they will be completed similar to the way I've done the Royal blue set. The royal blue set is currently completed and for sale, please visit my other ads to see it. The orange set is the only one currently reserved, and is not available. These are sized to the PSA, but all have adjustable buckles and can size up a bit to fit larger models. Please look at the picture below for an idea of what the other colors look like, they are:
1. Green (accent colors are pink, yellow, and turquoise)
2. Red (accent colors are blue, green, and yellow)
3. Yellow (accent colors are red, purple, and turquoise)
4. Bright Blue (accent colors are red, orange, and yellow)
Each set takes a little over 15 hours of time to make so they are priced according to the hours and cost of supplies I have into them. They are $150 each. Price includes free first class shipping to U.S. If you live outside the U.S. and want to purchase please contact me for a shipping quote.
I do accept time payments. Reserve a set of your choice for $50 down and pay $50 per month until paid off. Or you may do half down, half upon completion or (within 30 days) Your set will be ready to ship by the time you have paid it off or likely before. The idea here is that these are nearly done and there is very little wait time to get a nice set! I will complete these in the order that they are reserved!
Feel free to contact me with any questions and for more pictures of any of the colors or to hear what I have planned for details on any set, and remember it's not to late for you to choose what those details are either!
Thanks for reading and happy collecting everyone!
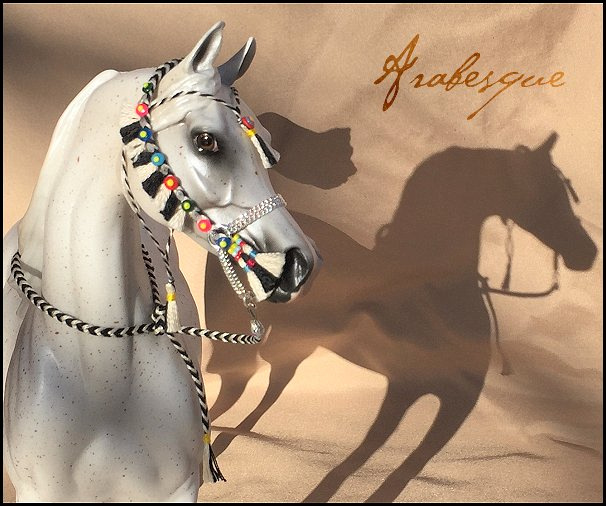
Now on to the details! This set is made to fit the PSA but it is adjustable with a buckle on the headstall so it will size up a bit to fit some larger models. The throat lash tightens and loosens with a slider bead. Lead line is detachable and is only tied around the horse's neck in these photos for modeling purposes, it is not permanently tied.
The nose chain is heavily decorated with a variety of Rio Rondo charms, along with a few hand made colorful charms that are made to imitate the "egyptian eye", a charm that can be symbolic of warding off evil spirits.
Then of course the set is decorated with my newest favorite thing to make pom poms! These ones are red with a splash of yellow. I've also thrown in some hand made cowrie charms and more little egyptian eye type decorations throughout giving this set a highly decorative and delightfully textured effect.

Finally, all rope ends are wrapped in colorful threads, and topped off with even more tassels and beads. The colors of this set are very rich in person. The blue is a very bright royal blue, the vibrancy isn't quite captured in these photos. The supporting colors are a mix of turquoise, bright red, and a golden yellow. Finally the set is heavily accented with glints of silver all throughout.
Thanks for reading and happy collecting everyone!
Melissa :0)
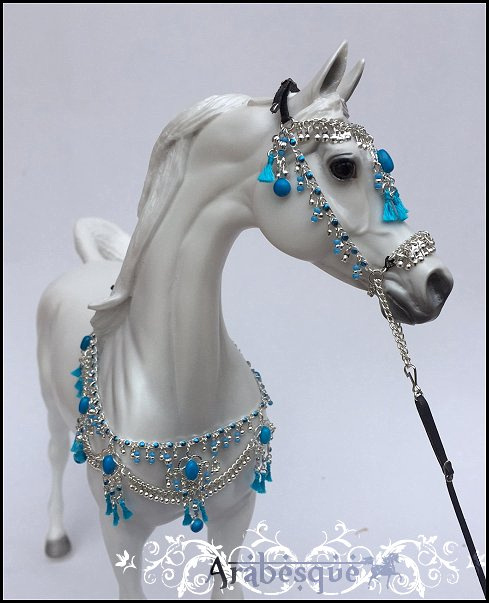
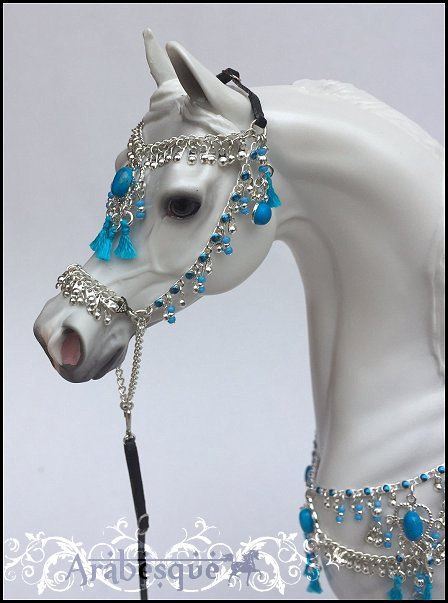
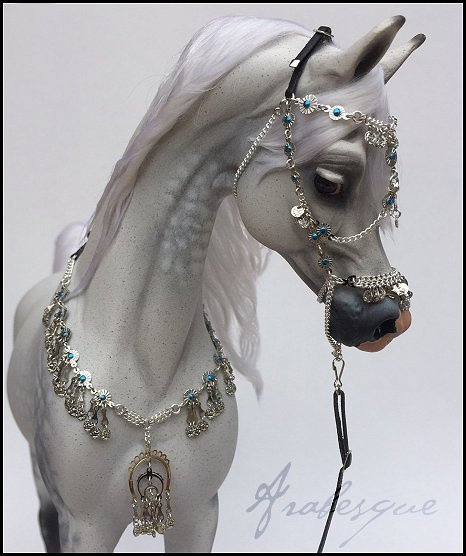
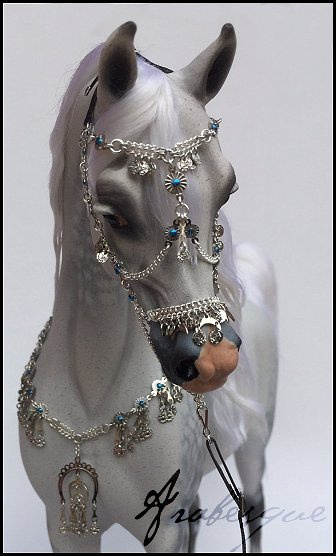
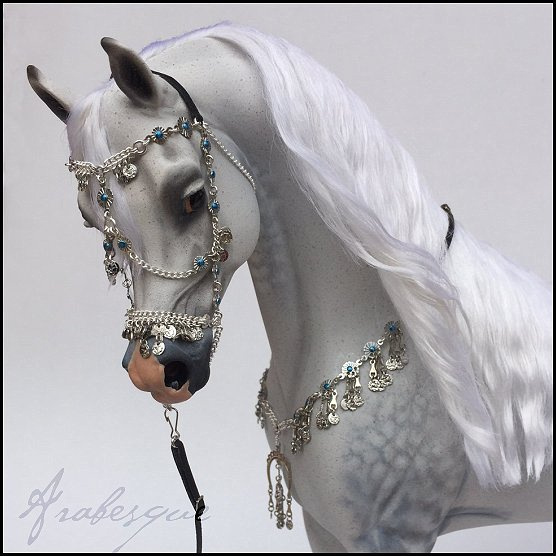
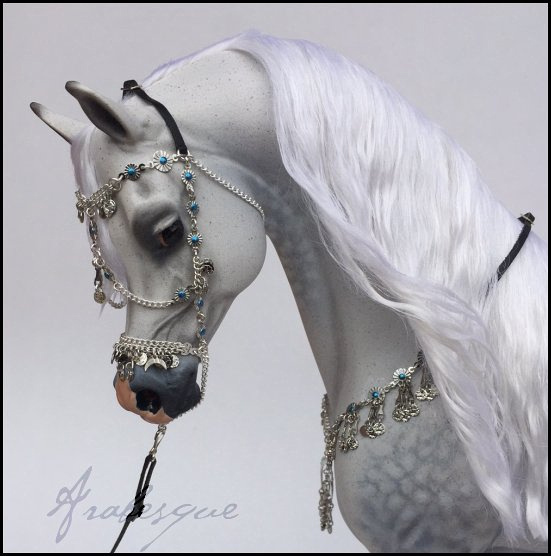
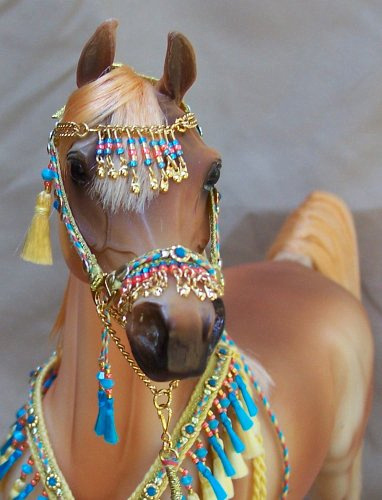
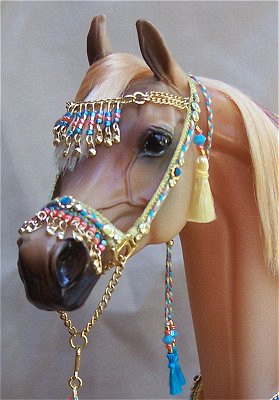
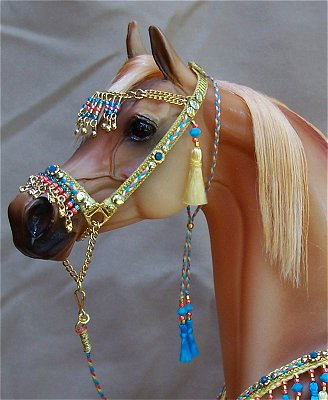
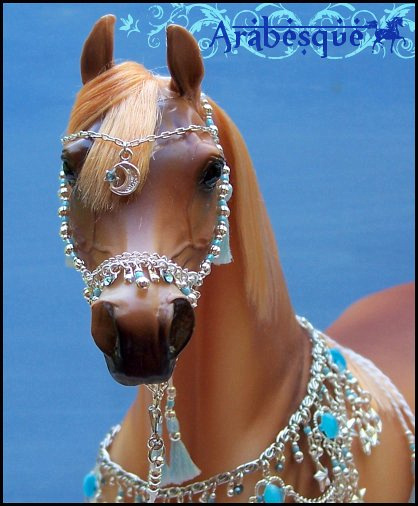
]]>This set has been in the works for awhile now and I've just been dying to finish it, but it's been time consuming. I easily put in over 20 hours of time getting this just the way I wanted it. The thing with making Arabian horse jewelry is getting the fit just right. On this particular set the chain I used is so super fine that I had to make most of my own jump rings to link all the tiny pieces together. I also hand drilled holes into the collar links to make them fit this design.
I sized the halter to fit larger resins such as ones sculpted by Vicki Keeling and Debbi Lermond. It is shown on my Bint Nazeem resin. It would be even better on a horse with a slightly raised head, the reason being that any time horses with tucked heads wear heavier headstalls with chains such as this one tend to hang down close to the horse's eyes pretty easily. However, this can be adjusted using a tiny bit of sticky wax at the very base of the adjustable headstall strap. If you pull the strap back a bit and stick your wax down in place it helps hold the chain back from the horse's eye. The headstall is adjustable with a leather strap, but it is too large overall for the PSA. If you have any questions about the fit feel free to ask!
The straps are made from super fine, hand thinned leather lace. There is an adjustable strap at the headstall, and one at the back of the collar piece. The lead line is detachable and also features a decorative buckle, just like what is seen on most real arabian halter leads. The throat chain detaches on one side via a tiny hook which is easiest to put on with the help of a tweezers or small pliers. All sharp parts have been hand filed to help protect your horse from scratching. I've embellished the set with tons of tiny blue stones for a flattering pop of color, just like how it's seen in the reference photo. There are tons and tons of tiny coins used in this set hanging from little charms. It's hard to see in the photo but each coin is etched with amazing detail, another feature to really appreciate about Rio Rondo's newest casts! It is truly a detailed, super dainty and in scale Arabian horse jewelry set, and I'm proud to say by far one of the finest things I've ever made. It is a unique one-of-a-kind piece!
Thanks for checking it out everyone! Happy Collecting!
Melissa Halvas :0)
*2/4/16- Update: Also looking for Wind Walker, Pasha, Optime, Raakid, Khemosabi, Nahar, Luxor, Indian Silver, Indian Fire....several others, feel free to ask or offer ones not listed here!
Non Arabians- looking for Eberls Rearing Akhal Teke and new standing Akhal Teke Mare
*2/6/16- Update: I'm looking to take up to three Arabian costumes to work on right now. I have one booked, and one pending, so I've for sure got one more spot open right now!
This ad will be updated as the booking process progresses along! There's a chance to get your costume in time for the summer show season if you book your slot now!


Yesterday was also a very happy friday when this lovely girl showed up at my door! This is courtesy of a trade that I am currently doing. I have decided to let my Lyla resin go to focus on more traditional scale items instead! Now, what color should Joelle be is the question! This is a shot of one of my work desks (I have one upstairs in my house and one downstairs!) and I'm currently working on a few presentation sets that have decorative blankets that go with them. One of these blanket sets will be offered for sale when finished (the other is not pictured in this photo). I'm trading one set to my friend Diane and she will get to pick which of these two sets she wants when I'm done, and the other will be a sales piece! I'm just a trade happy fool this year, but what a great way to commit to growing my collection because that's so important right?...LOL! I'm an addict...
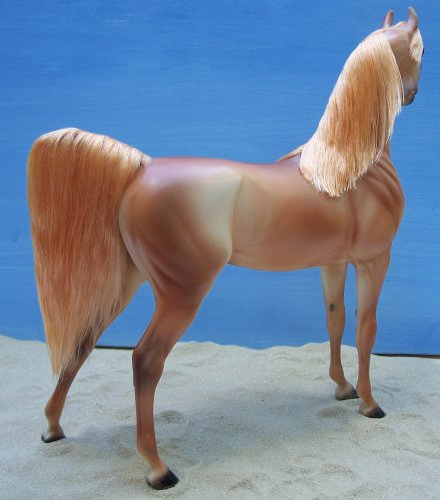
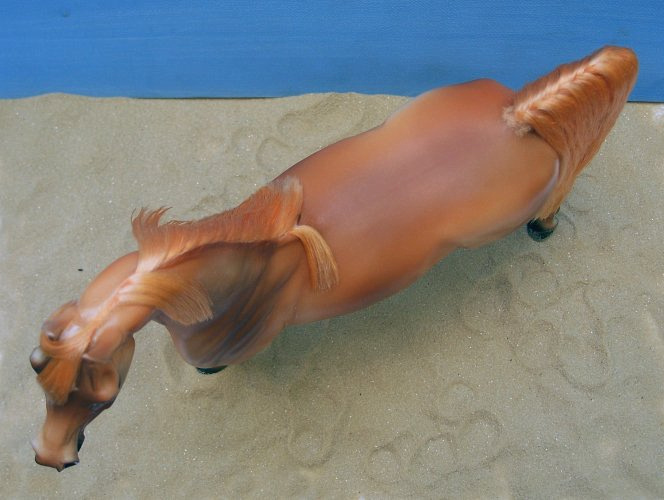
First of all, aren't they beautiful? These two horses are resin Arabians that were sculpted by Vicki Keeling. They were painted by Shannon Mayfield, and then I got the honors of doing their hair. The halters are also new and were made by me specially for these two beauties. The chestnut is an "Abu" owned by Diane Finazzo, and the grey is a Bint Nazeem owned by me. When Diane sent me Abu to be haired and I saw these two horses side by side they just begged to be photographed together. I felt so inspired! I asked her if I could keep Abu around long enough to make him and Nazeem some halters so that I could photograph them together just like this! I do have more photos of these two that I will share in another blog. I plan to take some more photos as time permits and just have some more fun with them before Abu heads home to Diane.
So this was also my first time making "pom poms" for an Arabian halter. They are commonly used on real Arabian native halters in all sorts of colors and I've always wanted to try this. Very similar to my trials with coming up with a way to make fringe, coming up with a way to do pom poms in this scale was also a challenge and took 3 failed attempts. BUT, the good news is for those that are interested I do plan to share what I learned about making pom poms for model scale halters in a future tutorial because they are super fun to make when you know you're going to be able to actually use them! LOL!
Today I also managed to accidentally capture Abu and Nazeem in these unique photos where rays of sunlight are coming down! They look just magical don't they? I also need to take some more photos of Abu's hair job to share. He was an absolute delight to hair and I'm really happy with how his mane and tail came out since this was one of my first times mixing mohair colors to get this dimensional chestnut effect.
The red halter is currently for sale, and is made to fit large resins. Contact me by email for details: [email protected]
Thanks for reading & happy collecting!
Melissa :0)
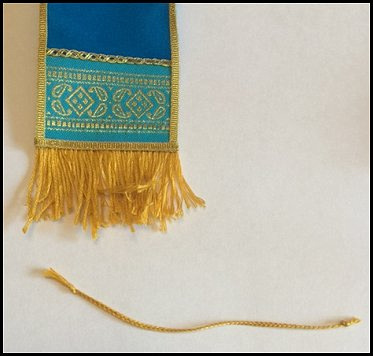
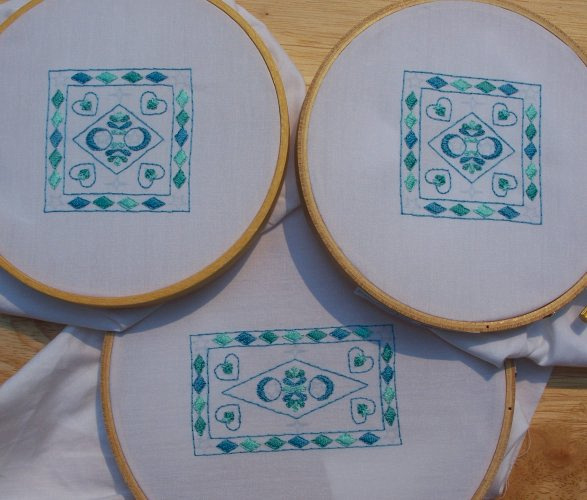
]]>How to make fringe for model horse tack
It occurred to me recently that there aren't many options for model scale fringe out there. I've heard from another tack maker who has worked with fringe quite a bit, that trying to find fringe in model scale is basically a search for vintage material. For someone like me who hasn't yet really played with fringe, this bummed me out. I had to find a way to make fringe for model horse tack, and this is what I came up with. I'm sharing my method in case others may find it helpful. This can be used on model horse saddles, blankets, collars, halters, brow bands, or even doll clothes. The sky is the limit and the best part? You can make it in just about any color that you want, any thickness that you want. All it will take is just a little patience. And if you are exploring the wonderful world of tack making or doll clothes, you should have plenty of that!
Okay, so in this tutorial I am adding trim to a model Arabian horse presentation blanket that I'm working on and I'm using DMC floss for the fringe.
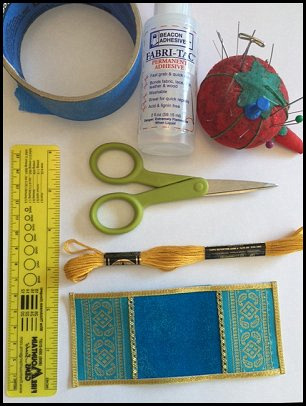
Supplies:
1. Tape (I use painters tape)
2. Glue (I use Fabri-tac)
3. Large needle
4. DMC Floss
5. Scissor
6. Ruler (optional)
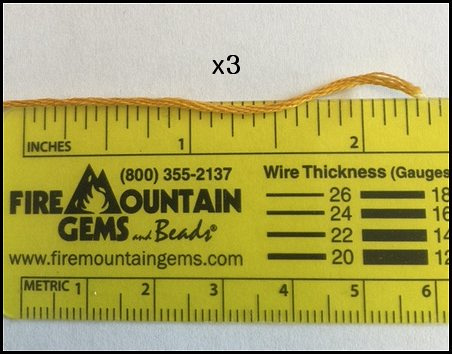
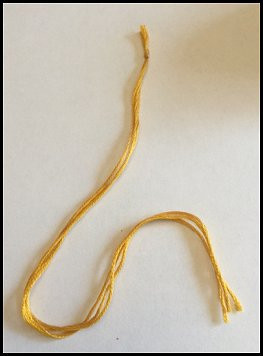
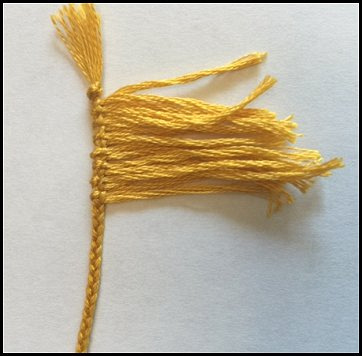
Figure out how much fringe you need by measuring the edge of your project. For this I'm measuring the edge of my blanket. A ruler is optional, you can just lay the thread along the edge and measure length that way. Since I have two sides of this blanket that will need fringe my length needs to be at least double, however I am a firm believer in always having more than enough material in front of you so I have tripled the original length to give me extra length to work with--it's just easier! This stuff is cheap so don't be afraid to have some wasted--it's better that than finding out you don't have enough length and have to start over. Cut 3 strands of embroidery floss to the length you need and put a knot in the end.
Tape your string to the edge of a table at the knotted end and do a nice semi loose braid. What I mean by "semi loose" is don't do one that is super tight, and don't do one that is saggy, just a nice easy tension braid that you can pull a giant needle through. Put a knot in the end of your braid.

Cut a long piece of embroider floss and thread it through a large needle. The needle I'm using is quite large and easy to thread with embroidery floss. You will have to re-thread your needle multiple times through this process so find one that's easy for you to use.
Start your needle by threading it through the side of your braid, down by the knot.
Pull your thread through until there is about an inch of thread left. This first thread you leave out is your the start of your fringe.
Flip your braid over and bring the needle through the bottom of the braid so that your thread comes out right next to your first free thread.
Pull the thread until that loop disappears, then flip your braid back over. You've got your second strand of fringe now.
Bring your needle up through the side of the braid again like you did when you started, and pull it up until you have a loop about the same length as your threads.
Flip your braid over again and bring your needle through the bottom of the braid so that your thread comes out right next to the loop.
Flip your braid back over, and pull your thread all the way through until all your threads are on one side again creating our "fringe" effect. I recommend cutting the first loop at this point so that as you continue this pattern you are unable to accidentally pull on that loop.

Bring your needle up again to form another loop the same length as the rest of your threads then stop pulling. Flip your braid over and bring the thread down through the bottom to continue your fringe pattern.
Pull tight then flip your braid back over. Cut your loop like you did before and continue with this up and down weave pattern until you get your fringe to the desired length you want. Essentially it is like you are making "U" shapes woven into the braid if that makes sense. These threads are not secure or knotted in any way. What makes them secure and permanent in the end is when you glue the trim down onto your project. For this reason I like to leave the fringe long until I get to that point to avoid accidentally pulling a thread out. If you run out of thread as you go (and you will) just make sure you end your thread on a fringe end (such as in the last photo) and cut it off. Cut another long thread and start it up again as you did at the beginning.
I've left my "working fringe" very long here as I go, you can save yourself some thread by doing this a little shorter. I'm just wasteful with my thread so for this project I kept it long and easy to work with.
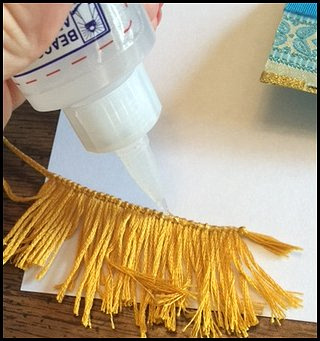
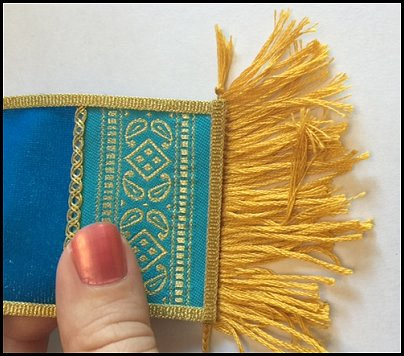
Once you get your trim to the length you need it go ahead and glue it down to the back side of your project. For this part I stopped making my trim once I got it long enough for one side of my blanket, and I will continue making the trim after I glue this part on. For glue I like to use Fabri-tac. It's a clear glue that I buy from JoAnn fabrics, but I think just about any craft store has this. It's a tacky, quick drying and really solid, just be careful because it can be a little string-y/glump-y/sticky to work with and thick, but the hold is worth it!
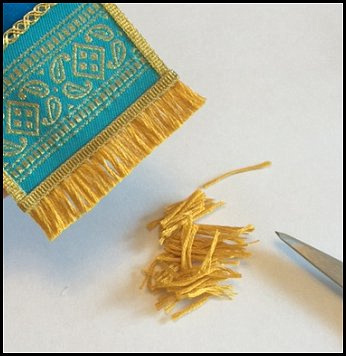
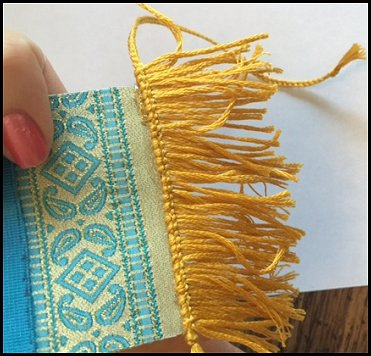
Trim the extra edges off your trim after you glue it down. Take your leftover piece and re-knot the end so you can continue your fringe making for the next piece. I then trimmed my fringe down shorter. I recommend waiting for your glue to dry completely and then you can re-trim your fringe by wetting it down to get a really nice precise cut along the length. Just get rid of the excess first so you don't have a ton of thread to wet down. I use a small cup of water and dip the fridge ends in it. Be careful not to wet the fringe up to the glued spot. You can even just wet your fingers and smooth the fringe down to get it damp enough to get a clean cut along that edge.
Hopefully now you have an idea of how you can utilize some fringe making in your own projects. Experiment with different kinds of thread, such a rayon to get a nice silky effect. Try mixing different colors together. Or try a thinner effect by pulling some threads out of your embroidery floss before threading your fringe. (Since there are six threads in a floss strand maybe try dividing your thread in half before you start "fringing" and you'll get a thinner effect.) These are just some additional ideas of various effects you could get by using this technique. Use this on model horse blankets, saddles, collars, headstalls, brow bands, or even doll clothes. The sky is the limit! If you have the patience and the creativity you can create anything!
Here is a look at how the finished set turned out. I ended up doing more trimming to the blanket to get it more straight.
I hope you enjoyed this tutorial and found it helpful. Feel free to email me for your input, and let me know what future tutorials you would be interested in seeing!
Thanks for reading & happy collecting!
Melissa Halvas
]]>
A beautiful Arabian sculpture by Vicki Keeling, painted by Shannon Mayfield and finally haired by me! Oh yeah, and unknowingly named by Diane Finazzo after I sent her pictures of this horse standing in the Minnesota snow. She said "she looks like a snow princess" and so she was named. The snow pictures didn't turn out so great, so these are not the snow pictures. I also realized exposing my precious horse to the harsh Minnesota winter elements was probably not the greatest idea for her paint, though she seems no worse for the wear.
Vicki Keeling's Arabians are some of my absolute favorite in this hobby, there isn't a single sculpture of hers that I don't want! After seeing this one in person, I'd love about 5 more. This one might be my favorite Vicki sculpture ever. She is also a very nice and large full size resin. I had her painted to a light dapple grey by the talented Shannon Mayfield who managed to capture the soft expression of this horse's face with her work. And finally, I got the honors of putting the icing on the cake by doing the hair on this horse. I used white mohair, and this particular color had a lot of natural wave in it so the end effect gave her mane and tail a very ripply waved look. She originally started with a different forelock that was more full and all pulled to the front, and I just decided it was overwhelming on her face, so I tore it out and got it right on the second try with a more subtle forelock that falls partly down her face and then some is pulled to her off-side.
I'm currently working on hairing another Keeling resin called "Abu", also painted by Shannon, owned by my friend Diane. He is a gorgeous bright chestnut with a mixed mohair mane and tail. I will be able to share finished photos of him pretty soon, probably next week sometime. Diane has graciously agreed to let me hang onto Abu long enough to make him and Bint Nazeem some native halters because I so need a picture of these two together before they are to part ways! Needless to say I am one smitten owner of one gorgeous Bint Nazeem and I just need more! And I cannot wait to play "dress up" with these awesome horses!
]]>Email: Melissa @ [email protected]
For one week only all my halters are on sale, buy any 2 for $50!
In the Nazeer halters I still have 3 of each color to sell and a couple of crystal halters left as well! See my most current ads and what's still available by checking HERE!
You can also email me directly at: [email protected]
Thanks for reading & Happy Collecting!
Melissa :0)

Here we have a soft blue and off-white combination...
And secondly we have a greenish teal and off-white combination.....
These are all currently for sale, if you are interested in purchasing one contact me!
I will be making more of these but not in this exact style or same colors. On the next batch of halters I will be taking a bit of a different approach. The first batch of 9 is a more "simplified" version of this style so these halters are a bit cheaper, the next ones will be more detailed and probably be a bit more in price just FYI!
]]>
Stay tuned to see these progress along!
]]>This teal halter is for sale, contact me if you are interested!
(Just love how the shadow came out on this photo! That wasn't planned at all!)
I'm also working on wrapping up more halters in this style this week in some other colors. Below you can see I've got a green/white one and a blue/white one. The white on all these halters is more of a subtle cream off white, not a true white so it gives it more of that authentic vibe I think. I will also have 3 of each of these colors to sell as well, so 9 altogether. If you are interested in reserving one before they sell out contact me today!
Another thing I just saw recently saw that I have to talk about since I just happened to be making some of these "Morafic" style halters is that a very talented artist is releasing a resin Arabian sculpture of Morafic. Check out "Moonsong's Morafic" by clicking HERE. This one is being cast by Seunta so more details on this one will also be posted on their website I'm sure! http://www.seunta.com I would love to get my hands on one of these new Morafic resins so I can make some halters to fit him!
Here is a link to the website with some background information and reference photos of the real Nazeer/Morafic halters.
]]>
Today turned out to be one of those beautiful fall days! Technically here in northern MN I think we're supposed to have snow, but I was happily outside in a sweatshirt with my cat and dog having a blast! The sun was warm and the fresh air felt so good, so I gathered up my ponies in their sparkly outfits and took some photos outside. These are my favorites of the day....
Magic and Boogie shared a kiss...awww! Anybody who has ever tried to photograph a black model horse knows it is very difficult to do. By some freak miracle these next photos turned out awesome!
Here's some sunnier photos of the blue and gold set! Shows off the sparkle in the rhinestones a little bit more than the last photos I took of it!
Coming up next on the work table is going to be halters halters halters, and I also have 6 new native style presentation sets in the works, totaling 612 tassels! All the tassels are done, I will be starting the halter and collar bases this week and then it will be on to details after that! Progress pictures of those coming soon! All of them are sales pieces! Why so many? Because I have mastered the art of tassel making with a child on my lap, and decided I would seize the moment and make them until I want to puke! 612 tassels later and I'm definitely ready to move on to making a different part of these sets!
]]>
(In that center piece close up the medallion to the left of the center piece was turned during the photo. Just wanted to make note that it's not a half a medallion but a full one, it just wasn't positioned right for the photo! LOL!)
]]>
The air was chilly this afternoon, but still "fall like". We have seen our first snow already but it did not stick around so I'm not calling it winter out there yet! I was able to take this nice fall photo of this red set as the sun was starting to come down...
This set is currently for sale! Contact me for details!
Thanks for reading & happy collecting!
Melissa :0)
]]>
Brand new presentation set, made to fit the classic scale "Lyla" resin. This is a new design by me, done in a pretty soft teal and accented with a darker teal. I used real Swarovski blue zircon crystal beads and rhinestones to make this set really sparkle! Headstall features detachable lead, throat lash tightens via sliding bead. It has a dainty crystal charm browband and a tiny shark tooth nose chain! The collar fastens around the neck with heavily detailed ties. There are nearly 100 little tassels on this set! This set is currently for sale, contact me if you are interested!
The collar is done, just need to finish up the halter!
This will be a sales piece!
]]>
Well, it's been awhile since I posted a good blog, and the main reason is because of this little cutie pie! He's been keeping me super busy! Wyatt was born on August 15th, he's going on 8 weeks old here after this week. He snuck out a few weeks early, so was born kinda small but we've made leaps and bounds to catch up! Momma takes good care of him and feeds him lots! We're both doing really well and finding some sense of normal now, meaning I'm adjusting to not getting much sleep. Each week I get a little smarter at this and at least now I've figured out how and when to eat, go to the bathroom, shower etc...in the beginning weeks it's easy to lose sight of all that because I was just so focused on taking care of this little guy, I forgot about me! And that whole bit of advice about "sleep when baby sleeps..." well, not always! During the day I take advantage of those naps he takes to play with my model horses! Still gotta have a hobby here and there when I can! That being said though I love being a mom! I feel like this is what I was meant to do and I'm so blessed that I get to stay home and take care of little Wyatt and watch him grow everyday. Even just week to week it is amazing the little changes and things you notice that they can start to do. Motherhood is probably the most incredible experience in the world, and I am truly blessed! That being said, little Wyatt calls all the shots around here and I'm scheduled completely around HIM. That's the major reason that I've decided not to take custom orders at this time because there just aren't any guarantees. Some days I can get a lot done and others...forget it! LOL!
Anyway, on to the model horse stuff......
This guy is new, and so is the tack! I scored this pretty Peter Stone Arabian off of Stone's website recently during a sale. This is "Speaking Bluntly" a pretty OOAK dark dapple gray with a neat swirling tail. Just love him, he is so beautiful in person!
The set he is wearing is part of my new collection that I call "Egyptian Treasure". This is the silver version that I've been promising to share. I've always wanted to do something in gray and never have so this was my chance to have fun with a different color scheme. Even better, I got to photograph the gray on a gray!
The collar is covered with tons of colorful tassels in varying sizes and in rows at varying lengths to create this unique waterfall kind of effect. Originally there was a fourth row that hung down in the center in that dark gray color but it was just too long so I cut it off! Didn't want to be too over-the-top! As usual I threw in some Swarovski crystals for some added sparkle, something that's becoming a bit of a signature in my work...it just has to sparkle!
This set is owned by my friend Diane. :0)

Lastly, here is a sneak peek at a new set coming up. This is Debbi Lermond's newest resin Arabian "Lyla" and she is a beautiful classic scale mare. I just scored one of these last week, and decided I need to make some tack for this one. This presentation set will be a sales piece when finished. Sorry for the terrible photo, but it's only meant to be a "teaser". I haven't completely added the tassels to the other side of the collar yet so that's why I photographed the offside because that side has all of them on. This one is going to be oober sparkly as well. I plan to do 2 or 3 more "Lyla" sets, maybe some halters. If you are reading this and want something like this (or if you're interested in this set) for your Lyla feel free to contact me while I'm in "Lyla" mode!
That's all for now! I've got several more projects going on that are too early to show yet, but as I find time to make tack and blog I'll try to post progress here, or in the least I'll show them off when I'm finished!
Thanks for reading & Happy collecting!
]]>
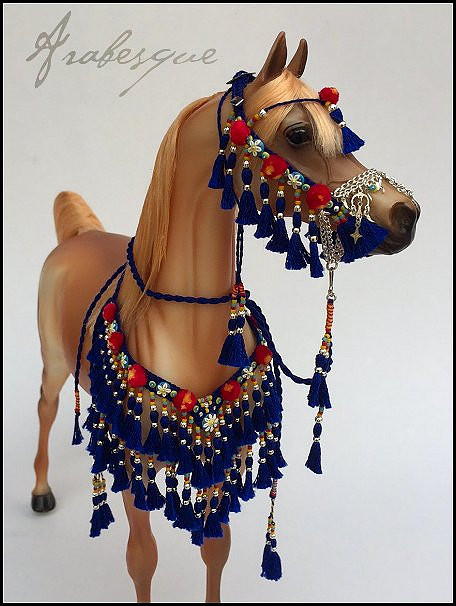
Well, I've found a little time to pick at a new presentation set in between being a new momma! I'm a little overdue with posting the news here, but I had my baby on August 15th, he came two weeks early but was born a happy healthy baby boy: Wyatt Gordon Halvas. I will do a separate blog on him soon though with some pictures to share! He is keeping me super busy but we are both doing wonderful!
The halter on this new set is inspired by a reference photo I found of a real Arabian horse halter, and then I threw in some of my own touches and adapted this into a unique custom full set. I tried to find a link to it on my pinterest account but was surprised I don't have it on there, if I come across it I'll add it on here.
The halter features a custom chain brow-band with hand made dangling bead charms which fall beautifully down the horse's face. The nose band is also hand beaded with matching gold charms. The headstall is made of a pretty metallic gold overlaid with hand braided colorful accents, then covered with metal studs, and real Caribbean opal swarovski rhinestones for added sparkle. The headstall is adjustable with a buckle, and the throat lash adjusts in tightness with a sliding bead. Lead line is detachable.
The collar features dozens of hand tied and brushed silk tassels alternating in soft yellow and bright Caribbean blue, and varying in size for a dimensional effect. The collar is decorated to match the details of the halter with hand braided colorful accents, gold metal studs and more Caribbean opals. The center of the collar is decorated with a large Caribbean opal stone. All rope ends are finished with colorful wrappings, beads and tassels. The collar is attached by tying it behind the horse's neck.
This set is an original one-of-a-kind creation of mine, and I will not be making it again in these same colors. I'm also not currently accepting any custom orders on my work so if you like it, now is the time to grab it! I will periodically be listing unique sets to sell as I find time, but with a newborn to take care of my time is extremely limited at the moment.
This set is made to fit the Peter Stone Arabian, but is adjustable and should fit some models that are larger in size. This set is priced to reflect the number of hours put into it and cost of materials. No detail was missed on this set, I put a lot of time into it, over 15 hours to be exact. This is a quality and very collectible piece. For details on purchasing or to see if it is still available view the ad on MH$P by visiting the link below:
http://www.modelhorsesalespages.com/view.asp?id=1184682
9/9/15 - Set is sold, thanks Kate! :0)
Thanks for reading and happy collecting everyone!
Missy :0)
]]>
The halter is adjustable with a buckle so it can go a little larger or smaller, and it has a throat lash attached with a sliding bead for exact fit and safety (because we know those Arabian horse models can slip out of their halters and run away!). The nose band on the halter has been completely hand beaded to match, and the tassels along the sides of the halter are something completely new, hand-made, completely beaded and totally fun! And then lastly of course, there are some matching Swarovski crystals thrown into the sides and noseband of the set for accent. I thought about going nuts with the crystals, but decided a less is more approach suited this set better, and the attention is drawn more to all those tiny tassels! The lead line is detachable. All rope ends have been finished with matching bright red tassels. This set is originally made to fit the Peter Stone Arabian mold, but should fit models similar in size, possibly some larger resins too.
This set is a one of kind! For details on purchasing this set check out my ad on MH$P to see if it's still an active listing:
http://www.modelhorsesalespages.com/view.asp?id=1178223
I'm hoping to start another set in this style with tassels varying in color this time. To see one of the reference photos I used for inspiration in making this set, check out this picture link below from my pinterest:
https://www.pinterest.com/pin/493073859181738179/
]]>

This one features a brow band with a little half moon and star charm added. The nose band charms are a combination of several elements used in the set from beaded dangles, silver charms, and little coins with added rhinestones. That's some thing else that's new with this set that the last one didn't have is rhinestones, just a few thrown in here and there for accent and sparkle, because hello! stars sparkle!
Still have plans to do 3 or 4 more of these. Most of them are spoken for, but I am going to try to possibly come up with a set or two for auction if I can. I've gotten an awesome response to making these sets and lots of interest so I want to try to reach as many collectors as I can! I have other styles close to this that I want to attempt as well which should be fun to make, not going to reveal any details on those yet, it's a secret! These jewel-y fun detailed sets are just right up my alley though, so I foresee myself doing a lot more with these kinds of sets when I can find time!
This set is owned by my friend Diane. Pictured below is a photo she sent me of this set on her custom Breyer Huck model. Just love the color combination here. This is an amazing horse too, he suffered quite a break to the neck and was expertly restored his former glory by Diane's talented friend Gary!
So I decided to try something a little crazy. Inglenook is easily my favorite Peter Stone Arabian out there, so much so in fact that I felt I needed two. I didn't expect to score one that was such a lighter variation to the original however. So I had a little trouble deciding which one should be haired. I had already prepared some flaxen mohair that was more what I would describe "pumpkin-y" in shade so I decided the darker one would get hair since his color seems kind of "pumpkin-y" to me as well. Note that neither of these horses is mint condition, they both have marks and scratches so customizing them does not hurt my feelings or worry me. Besides that hair makes everything better!
So I cut off his tail......
And I sanded down his mane and forelock as carefully as I could....
There was a slight challenge detaching the tail from the leg, and plans were made to hair the tail so it falls to left side to cover that spot up...
A nice deep trench was carefully dug into his neck line....
Then his tail went on first......
Then the mane.....what a wild man!
I iz cousin IT! HELP ME!!

But then he got some serious style....
(If you're curious about this presentation set be sure to catch my next blog!)
I decided to give him a couple chunks of messy mane on this side....
I got that tail to swish off to the left just slightly to cover up the bald spot on his leg..
I also added some gloss to his eyes, nose and hooves to add to this new life he's been given!

His new mane really reminds me a lot of his old mane...the length and the way it falls...he's a sleek man!
The results of this experiment? No horse is safe anymore....now I'm looking at my lighter Inglenook and thinking he could maybe be a palomino? I just plopped the hair on him to see how it looks. I just love hairing, might have to do a few more!
And really this experiment gave me some helpful practice for the more important thing that's coming next! I have a gorgeous hair-prepped Arabian resin painted by Shannon Mayfield that I get to hair next! Now that I got to practice on Inglenook, I feel more prepared for the task! Stay tuned to see that blog coming soon!
]]>
Extra roominess was added to the headstall so that the halter will fit Bint Soraya, so it is slightly larger on the Stone Arabian.
In hindsight I probably should have tried to use a different background than this sky blue one I have because it blended a bit with the turquoise of the costume, but the idea was to get a less distracting background, plus I just love blue anyway!
On the halter piece she picked out the style of charms she wanted for the nose band, adding a unique touch. The colors were a bit inspired by the "Tiger's Eye" feathered presentation set I did, she liked the turquoise and brown together. The other colors used in the drape came into play later. Special beads were also used on this costume on the halter and collar pieces, hard to tell from the photos but they are white with little orange and green stripes! When I saw them I had to use them because I love a chance to add unique touches to my work when I can!
I just love the color of the blue velvet I used on this seat, it matches the colors of the set so well and just looks like luxury for a doll butt!
And there we have it, another native Arabian costume done! Thank you Jessica for ordering this set from me, I had a great time making this for you and I hope you & Soraya will enjoy it too!
Now that I've shared this set, it's time for me to share the bad news. I've had to cancel my remaining commissions/trades that I had lined up this month due to some unforeseen pregnancy ailments. It turns out I've developed carpel tunnel in my wrists, and I've also been experiencing swollen fingers when I work. I had been putting in 30-40 hour weeks sewing on tack and have made some great progress turning out many new pieces of tack, but I think it's finally catching up with me. Since I'm getting so close to having my baby now (4-7 weeks), and with the awful Minnesota humidity in the air, it's no surprise that I should experience a little swelling. Unfortunately it's slowing my work down, it's becoming painful and with my due date being this close I don't want to leave anybody hanging or waiting on me. So this costume was the last of my commissions, possibly for the year. I will continue to work at the hand embroidered costume that I have started, however the finish date on that set will probably be pushed back quite a bit more than I had hoped, but I'll post progress pictures here as I'm able to!
I won't be accepting any new orders on tack for awhile. I do hope at some point to try to build an online store of my tack that I'll make at my leisure, but of course I'll need some time to adjust to being a new mommy first so I can't say when that will be. I might post photos of new stuff that I make for several months to the blog and what's new pages, mostly keeping my website updated as I go, but won't probably release anything to sell until I become more mobile again. I also want to work on hairing a few horses, so you'll see those pop up on the Blog. I'll try to stay as active and current as I can, but I might go a little inactive for awhile as I adjust to motherhood!
Thanks to everyone who has supported my work and who have been so welcoming on my return back to the model horse community! It's good to be back, and I will be around!
Thanks for reading and happy collecting!
Melissa Halvas :0)
]]>
I think my favorite part of this costume is the bridle. I didn't know right away how I wanted this bridle to look. I let the drape develop quite a ways before it really came to me, and I even had a different headstall already put together when I changed my mind. I wanted something elegant and flashy. One night while trying to sleep (naturally this always happens to me) the idea for this bridle just flashed through my mind and I just knew how I wanted it to look!

I'd also never attempted a poll piece before on one of my bridles and wanted to try my hand at it. Using extra material left over from the construction of the drape I was able to create the poll piece.
Teal and purple are perhaps some of the most difficult colors to find for an Arabian costume, especially if the end result is native style. I wasn't sure I was going to find something until one night I accidentally fell across these beautiful iron on applique's in these colors. The drape pattern is actually constructed from these appliques, they were cut and custom assembled, hand embroidered and accented with rhinestones and nail heads to make the design they came out to be, and they were not square in shape to begin with, that is something I had to make them become, but I couldn't be happier with how they came out, and how truly one-of-a-kind they are! The combination of colors, rhinestones and gold accents shaped this costume into more of a flashy show ring style with native influence.
I made this set to fit the Peter Stone Arabian, and Rasha. The bridle especially fits Rasha really well. I think the overall style is a good fit for Rasha being that she is in that hand gallop/cantering show ring pose anyway, and this is a show ring costume.
And there you have it, now I have two costumes done and just two more to go for the month! Hopefully I will finish up my next costume sometime next week! Stay tuned to see more soon!
Thanks for reading and happy collecting!
Melissa Halvas :0)
]]>
Jessica's costume saddle got put together last week! The seat is covered, and the trim is mostly added except for some brown along the bottom panel where I ran short on brown thread! The good news is I've got some more now so I can continue on with that. I've got the nose chain done; we decided to go with gold coins and a gold charm on this one. I tried to take a good photo of it today but that one came out blurry so I'll have to try again. This one might be finished or close to done next week already if all goes according to plan! I also took a picture of this set on my bay PSA to get an idea of how it looks because the set is being made to fit a bay Bint Soraya resin. I really think the turquoise just pops on a bay so I think it's going to be great!
Heli's costume is being born one careful stitch at a time so far, and I have to say I'm having a blast embroidering the panels for this set. I've got the main colors blocked out on each panel now, and next I will go in and embroider the stars with silver thread. After that I will freehand in all the various swirls and curls that will go into making the panels rich with detail and authentic in feeling. This design is a collaboration of some of my own ideas combined with looking at reference photos of real native costume designs. I hope to have this costume done by the end of July, which shouldn't be too hard once the other two are all finished up!
And that's how my work bench is looking for the past week! 32 hours of sewing....here's hoping to do it all again this week!
Thanks for reading & happy collecting!
Melissa Halvas :0)
]]>So this one was commissioned by Lea of Finland. She contacted me one day and offered to trade an artist resin (a gorgeous curio sized "Sayyed al Hawah" by Debbi Lermond) for a Native Arabian costume, and I really liked her ideas she had for this one. She had really liked the "zebra" style halters (as I like to call them) that I had made in the mixed black and white, with the yellow, red and blue accents. It turns out we were able to come up with a design theme in these colors.
This one features a coin/charm noseband in gold. The throat lash is detachable on one side to make tacking up easier on larger models. This set was made for horses larger than the PSA such as those larger Arabian resins that are out there, so you can see on some of these photos with the PSA's that the costume is a bit roomy, but it does still fit him. The bridle is separate from the halter and is worn underneath, the bit attaches with sticky wax.
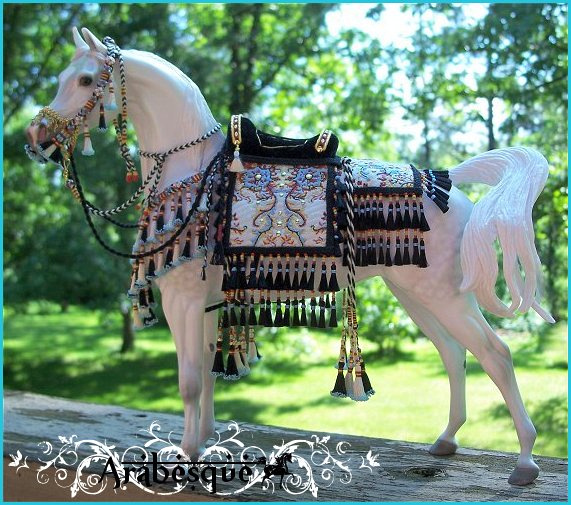
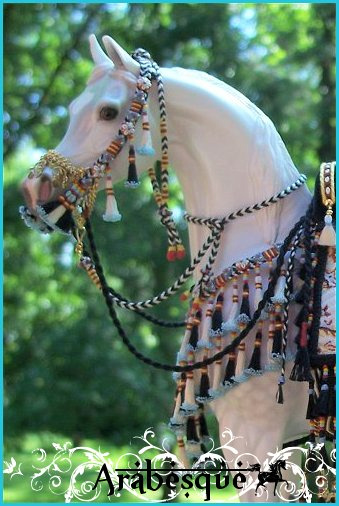
All tassels on the halter and collar were double wrapped in yellow and red threads, then dipped in blue beads for the unique native "el badia" or "extra beaded" effect. This also helped bring more color to the set.


The seat is covered in a soft black velvet and artfully trimmed out with a design that matches the costume's panels as well as some hand sculpted cowries, finally topped off with some silky white tassels for contrast. The tassel on the front pommel is an accent I had done on another costume and I liked it so much I will probably be using it a lot more, maybe as kind of a signature accent to my work!
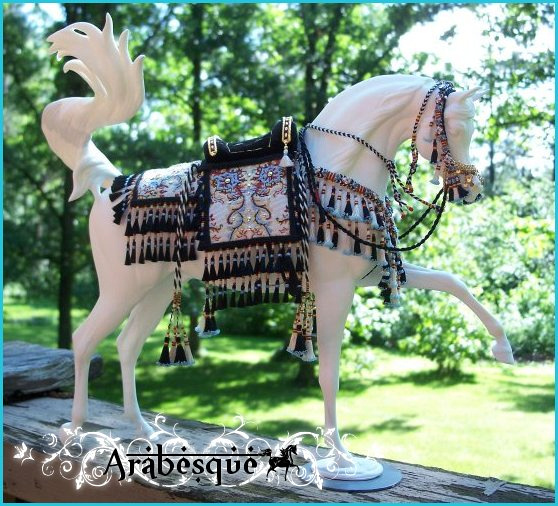
Here is the set pictured on my unpainted "Ajmal" resin, sculpted by Debbi Lermond. Those that are familiar with Ajmal or Debbi Lermond's work know that her traditional scale horses are full sized and there is so much horse to looooove! Okay guys, seriously heads out of the gutter. So as we continue on to the next photos you'll start to see how Ajmal's head fills out the halter and throat lash better than my PSA's do.
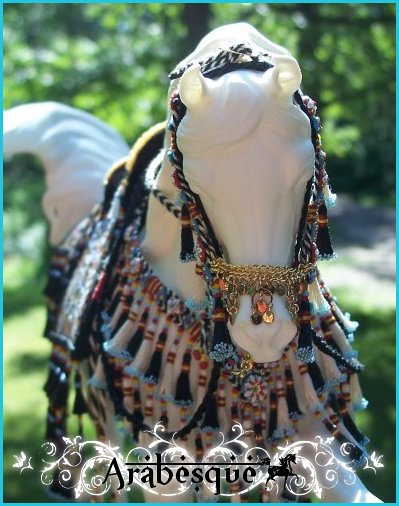
The nose band features gold coins, and three additional upside-down horse shoe shaped charms for added dimension. I really like to add extra pizzazz to my nose chains.
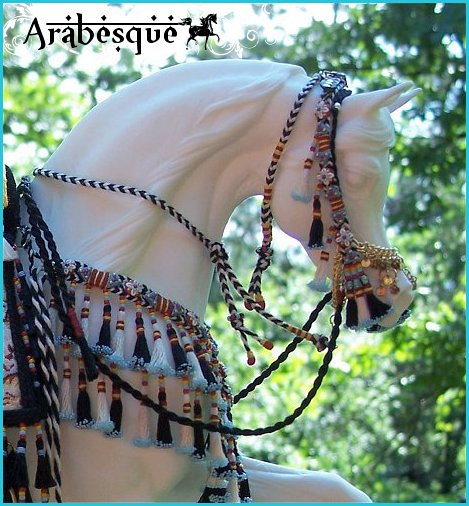
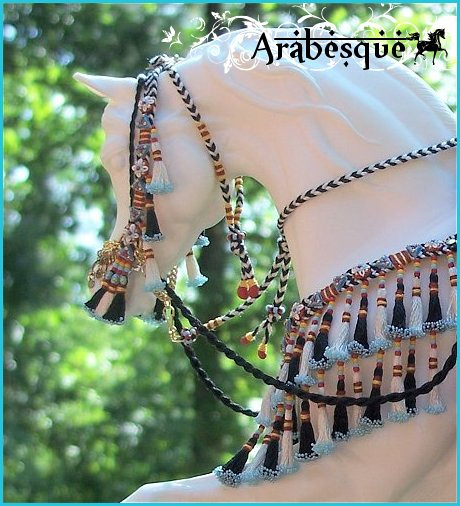
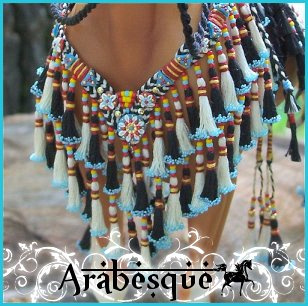
To keep with the theme of the headstall, I also hand wrapped red and yellow accents on the collar piece as well, so it is a mix of hand sculpted cowries and colorful thread details. Also note that usually when a native bridle is placed beneath the halter you see it emerge on the bottom side of the halter. The main reason the bridle is visible on the top side of the halter in these photos is it was helping hold the halter away from Ajmal's face. Heavy halters tend to fall or droop on horses with tucked heads and that was kind of going on with Ajmal while I was trying to take photos.
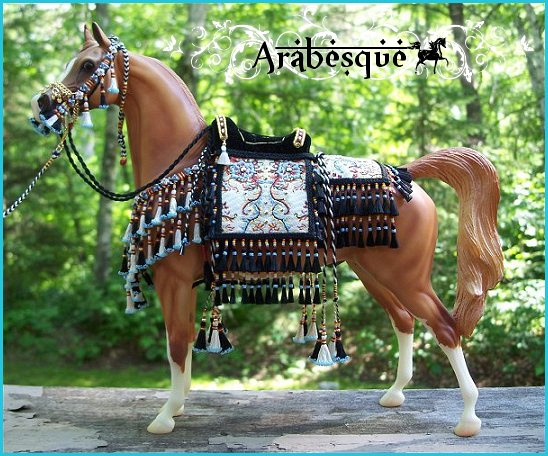
I decided to place this set on my PSA "Ra" to see it on a horse with a little more color. For some reason the lighting on this photo makes it feel like it has a vintage vibe (to me anyway!).
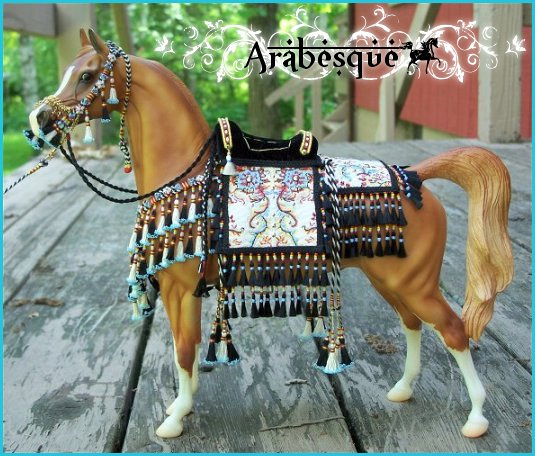
This last photo had some nice lighting. Too bad it was on the deck with the house in the background instead of with the nice green foliage in the background like I hoped, but I think it may have turned out to be one of the best photos I was able to take of this set!
And today, this set is officially on it's way to its new home with Lea in Finland! It's always a triumph to officially pack up a costume and ship it to its new owner, there's something that feels incredibly gratifying about that part. Of course the best part is when the customer actually gets the costume! I cannot express enough thanks to Lea for commissioning this set with me, and for sharing her ideas with me to make it happen! It's been a pleasure, and a wonderful journey bringing this piece to life, and I'm just so grateful to be back into making costumes and doing what I love!
Coming up next I have more progress photos to share on my next three costumes, and hopefully I will be able to do a blog about that by the end of this weekend!
As always, thanks for reading everyone and happy collecting!
Melissa Halvas :0)
]]>First up we have Lea's costume, a fun kind of "zebra" style (as I've nicknamed it) native set. This set is the closest to being finished and I have a goal to have it done by the end of the month. The main focus is black and white accented with light blue, yellow, and red. The drape will have a double row of silk black tassels, and those are already tied and ready to go on. Mainly from here it is just details, ropes, stirrups etc...to finish it up! The halter is also sized a little bigger to fit larger models.
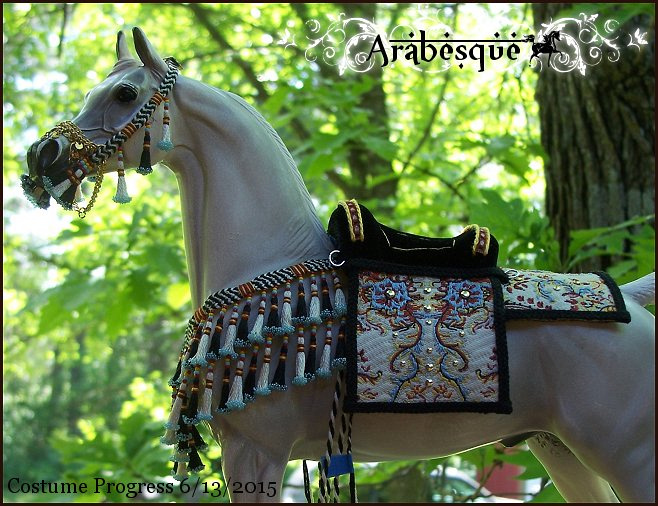
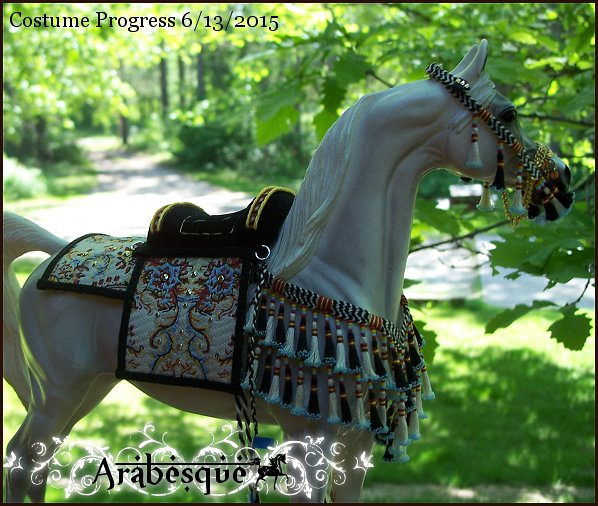
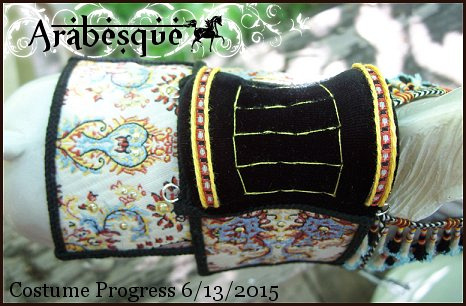
Next up is a costume for my friend Diane. She's told me that she's always loved the colors teal and purple together but that combination is not easy to find in what I typically use for costume materials, so I had to do some searching. Believe it or not this drape was born from an iron on applique that I heavily accented and quite carefully cut to make this design happen. Thankfully Diane said "artist's choice, go for it!" and this one has been a lot of fun to make. I've really let this one talk to me as I go. Our initial goal is to have some native theme in the design, but this one is going a bit more show ring with all the fun flash added. The halter and collar will have a combination of cowries and rhinestones, metal studs for accents, and the cut of the drape and seat style also add some native flair. However, the halter and collar tassels actually have bits of metallic gold thread mixed in to give this set extra show ring style sparkle. I had enough material to design a poll piece for this set that will attach to the headstall and decided to give that a try. I've since decided I'm going to redo the headstall because I'm taking that piece in a different direction now. The costume's drape will have a double tier of silk purple and teal tassels. My goal for this set is to also have it finished by the end of the month or real close to it.
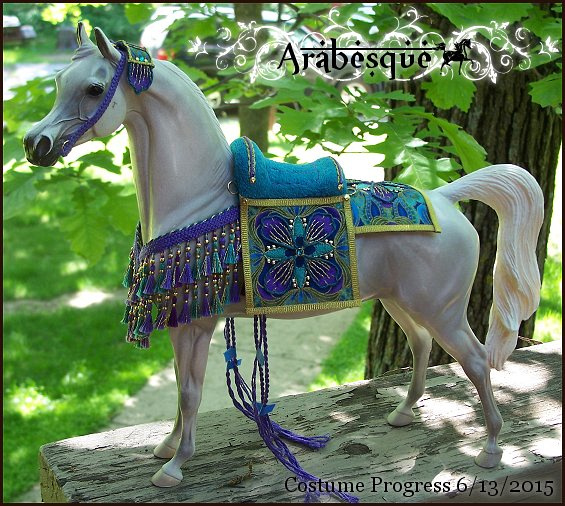
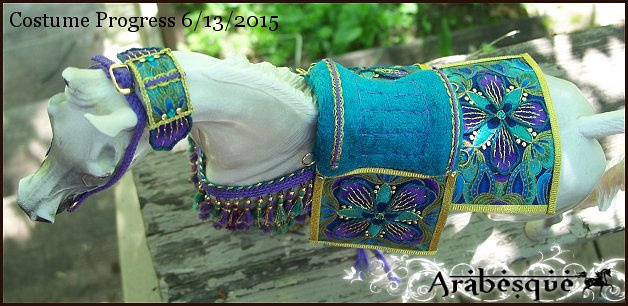
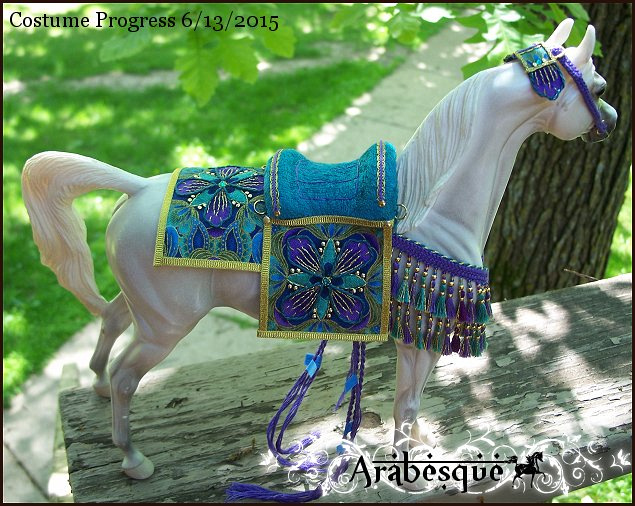
Third up is Jessica's costume. She really liked the colors of the feathered presentation set I did with the "tiger's eye" theme, and wanted a costume with the turquoise and brown. She has a Bint Soraya being painted to a pretty bay that this set will be for so this one is very roomy in the headstall on the PSA because it has to fit Soraya's head when it's done. By some happy accident when I was cutting the drape on this one I was able to preserve the fringe at the end of the rug and decided to work that into the design. This drape will have orange, turquoise, cream, and emerald silk tassels, just a single row, accented with brown. The seat in these photos is just shown to give an idea, but once it's covered it's going to be done in a matching turquoise velvet. This one is such a fun set, I'm going to absolutely have to see it on Jessica's Bint Soraya when all done for sure, I think these colors will be fantastic on a bay! The deadline goal on this one is by mid July.
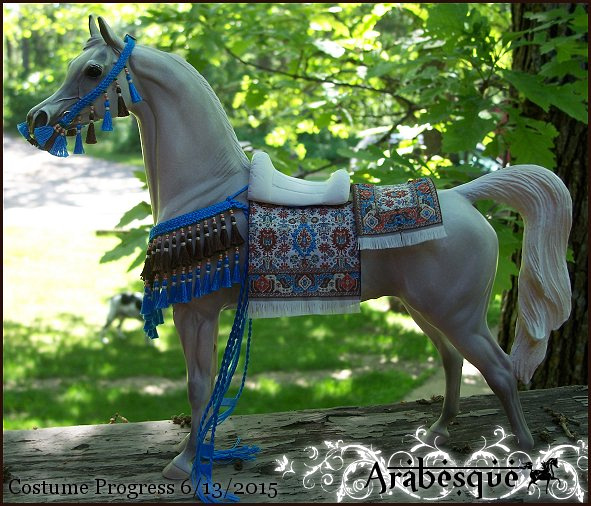
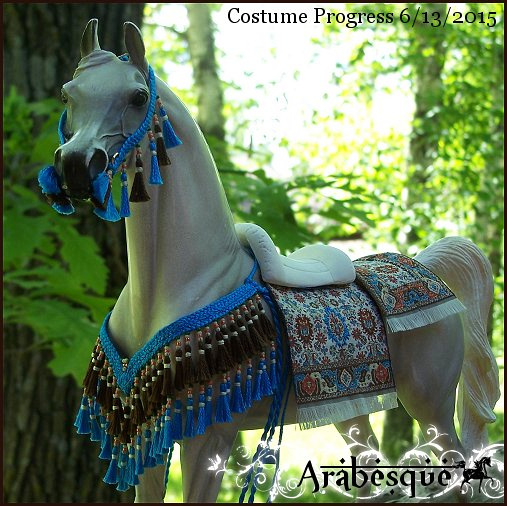
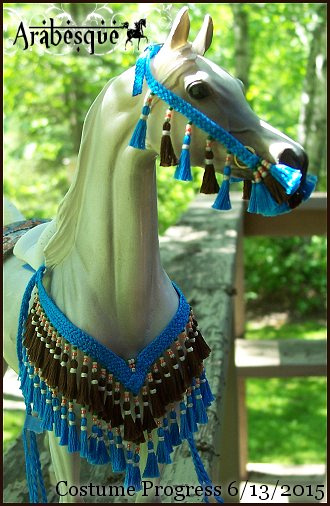
I also have a fourth costume in the works for Heli that is going to be a hand embroidered pattern. If you'll remember the blue mix set I did:
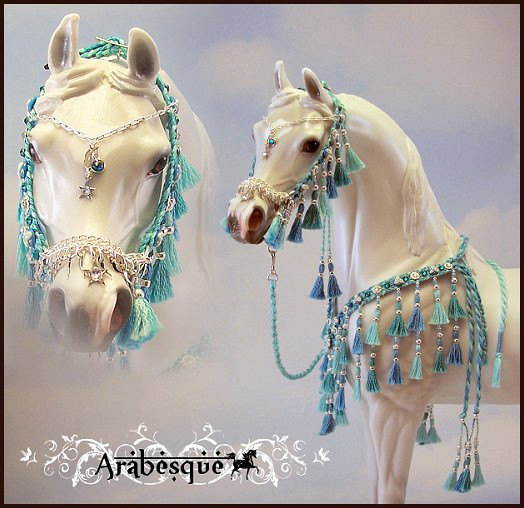
The costume will be based on this idea, but with a triple tier of tassels, and more tassels per row to make it real nice and full. And we'll be keeping up that soft sparkle, celestial theme also with this one. The embroidery pattern will actually feature some embroidered moons and stars. It's a combination of looking at reference photos and some of my own touches in there. The deadline goal on this costume will be end of July.
As you can see I've got my work cut out for me, but I'm just having a blast working on all these beautiful costumes! And I'd like to offer a special thanks to the four ladies who have contacted me to work on these costumes, you have all been just wonderful to work with and I can't wait for you to have your costumes!
As always, thanks for reading and happy collecting everyone!
Melissa Halvas
]]>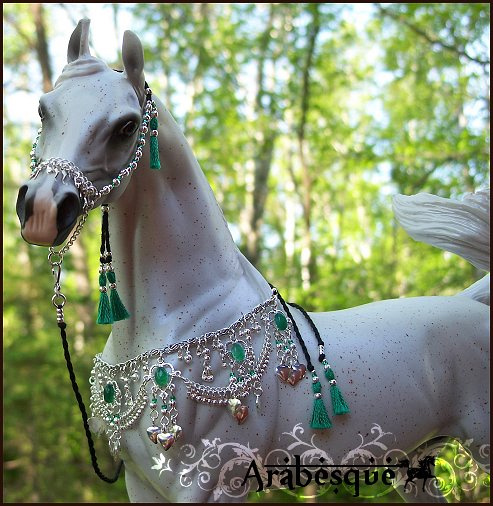
Last night I completed this unique jeweled presentation set. This one is based off a photo of a real presentation set, one that I have been in love with forever. I cannot describe how many hours of time and thought have been spent trying to come up with a way to redesign something like this for model horses, or how long it's taken to find the right pieces to put this together right. What you see here is a result of many hours of trial and error, lots of frustration and a whole lotta patience! This model horse set also has a little of my added flair that I'm known for. I added a touch more green sparkle to mine, some tassels, and some heart charms. There was one day I was studying the reference photos for this and I thought I saw hearts. So the set became nicknamed the "Green Hearts" set and I developed my theme for the set around that. Here is a look at the reference photos I used, hopefully these links work, these are from pinterest:
https://www.pinterest.com/pin/493073859179182387/
https://www.pinterest.com/pin/493073859179158449/
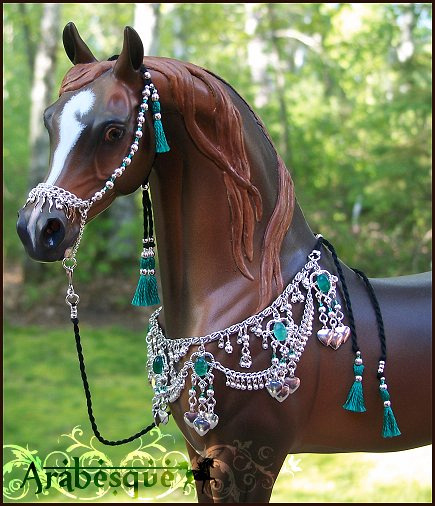
The headstall I kept simple so that the attention and main focus could be kept on the very detailed collar, which is how the original set was done. I cannot even count how many tiny little charms are on this one but some of them are handmade, others assembled into my own creations. The dangling chains are completely lined with a row of little tiny silver charms. The cabochon stones that I used are green agate stones, and are hand assembled over a unique heart shape design that drips down into more hearts, charms and beads. The green in this set is what I would describe as varying from a mellow medium/light green to emerald. There is some natural variance in the colors of lightness/darkness in the green agate stones which add unique contrast. I love the way green looks on horses that are chestnut or bay in shade the most, but I'll admit it does look pretty snazzy on Boot Scootin' Boogie!
This set will be a one-of-a-kind creation for Arabesque, I will not be making this one again in these exact colors. My books are closed for the remainder of the year, and I will likely not be accepting custom orders on these types of sets due to the artistry involved. These are something I'm going to make when it tweaks my fancy, so they'll more or less be random! It's easier to make it the way I want to and then offer it for sale as a special. Since I cannot settle on a price, I thought I would offer this up for sale for this week and see what kind of interest there is! So if you like it, now is your chance to snatch it up! I will be taking offers possibly as late as Sunday 7th of June @ 12pm eastern time.
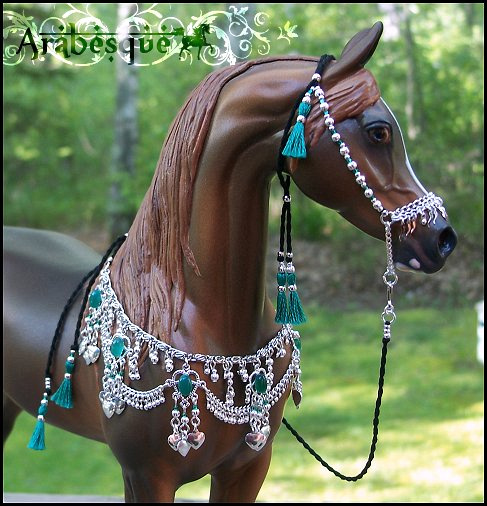

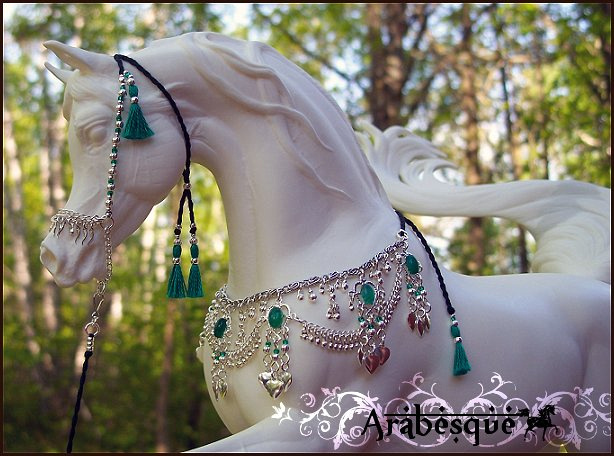
If you'd like to place an offer feel free to email me at:[email protected] or use the contact feature on my website which also goes straight to my email, whichever is easier! All offer prices will include shipping in the offers made price. I am willing to consider time payments but preference may go to those who can pay in full. I will accept offers for the entire coming week, or stop accepting offers if I receive one I'm happy with!
To track the original adverstisement for current offers and updates, please visit the following link:
http://www.modelhorsesalespages.com/view.asp?id=1162235
As always, thanks for reading and Happy Collecting to Everyone! :0)
Melissa Halvas
]]>http://www.arabhorsestore.com/store/images/ChesSet3_1.jpg
The horse is also new, and I purchased him directly off of the Stone website at the beginning of the month. He is just gorgeous and I was smitten the minute I laid eyes on him! This is "Boot Scootin' Boogie", a pearly flea-bitten gray Arabian, this is the matte version. He was not a bad price either, if you're interested in purchasing one he is a limited edition run of 45, so a little bit bigger of a run than Stone has been doing this year so they still have some left, here is the link:
http://www.stonehorses.com/arabian-fleabit.html
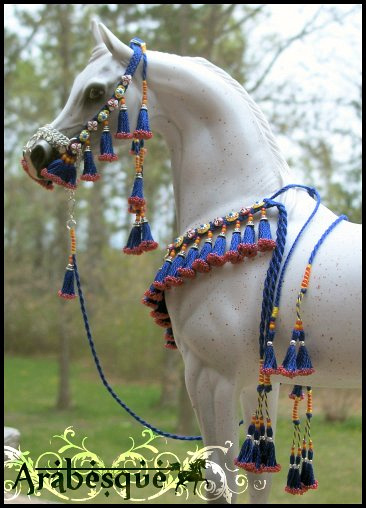
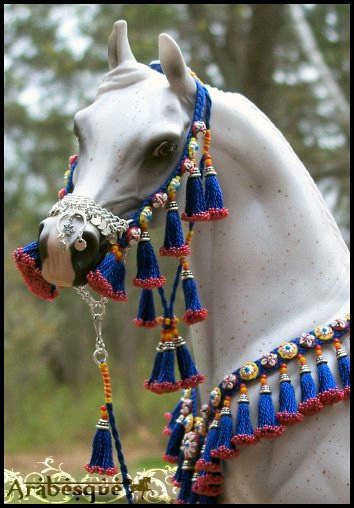
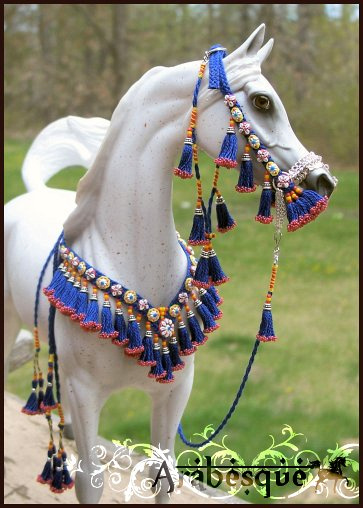
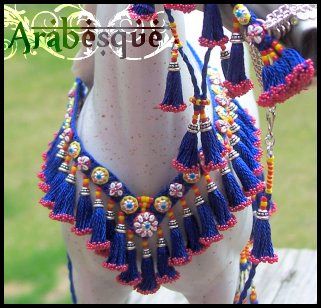
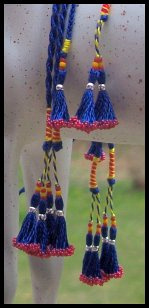
If you like what you see stay tuned to see this set in more colors soon! I plan to do the next one in red just like the reference photo, and have it in my mind that I also may be doing an orange, and a yellow? We'll see! My next blog post will start showing progress photos of my costumes I'm working on. Those are coming along nicely, and I do have photos to share, so maybe tomorrow?
]]>So here's the group, sporting the newest looks. From left to right we have: Twist wearing a Bedouin Native style presentation set in a vibrant emerald green, and in the center we have Miss Elizabeth Bennett wearing the blue mix set with the fancy brow band, and finally to the far right Tu Fire wearing a plush red Bedouin Native style presentation set.
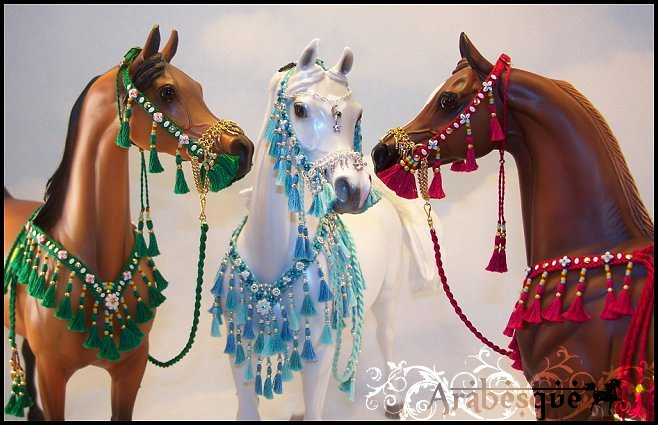
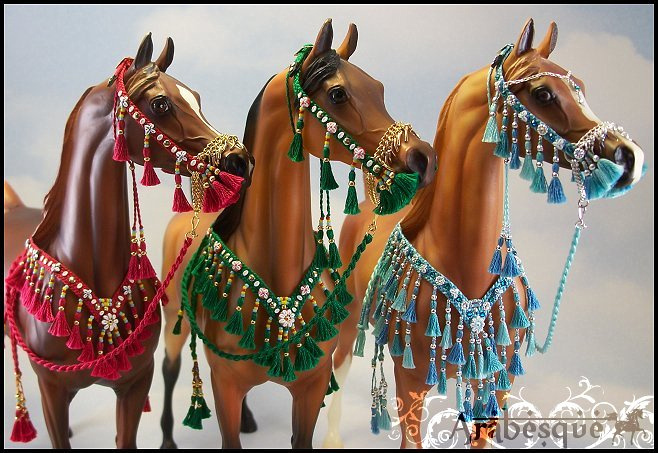
This red set features a lot of my typical details. The shark teeth on these are hand filed to prevent rubbing and scratching and is a favorite method of mine still. I was doing my nose chains in this method before Rio Rondo came out with their awesome Arabian hardware sheets, and I still like to do chains in this style sometimes, it gives it a fuller look. If you read the progress blog on this red set you may remember that I started out with a red base for my halter and collar, ran out red floss and ended up picking up the wrong red to match. Instead of making an additional trip to the craft store I decided to use it anyway, and the effect is not bad. The tassels have just a kiss of fuchsia in them. This gives a very subtle contrast between the two colors that is almost undetectable.
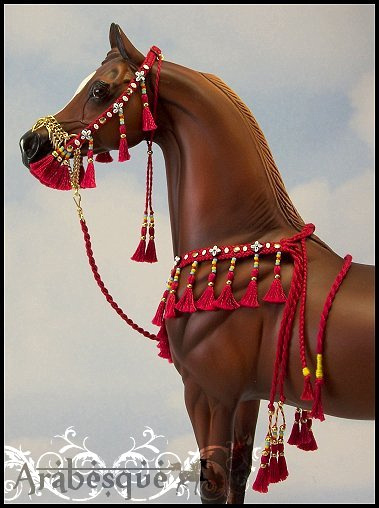
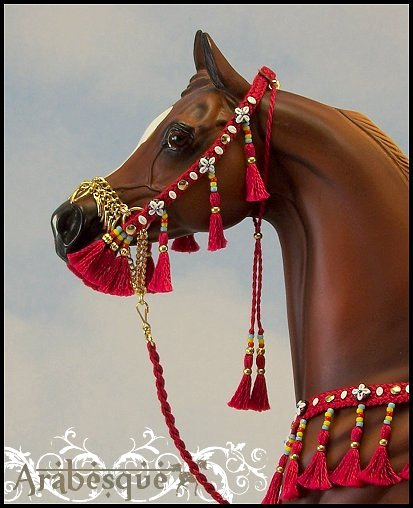
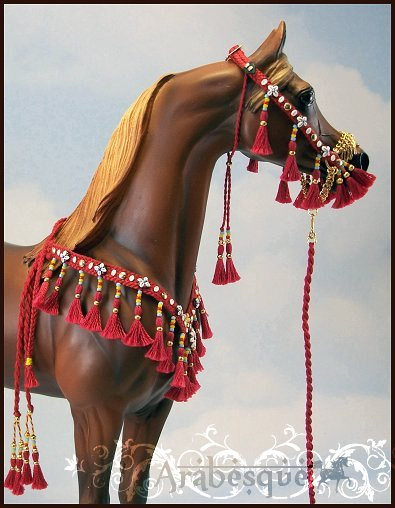
Below you can see a close-up of my new method I developed while working on these sets for doing what I call the "drop ropes". It adds a punch of color and an authentic flair to the style. I also threw in some metal embellishments and further accented the gold theme by tying my tassels with gold plated beads. I have found this to be a wonderful time saving method, it saves on my hands, and even better there is way less of a risk of the tassels coming unraveled at any point or coming apart. Even though when I do hand wrap tassels I use a special method and materials to prevent this as much as possible, this is a nice and attractive alternative that I've become a quick fan of!
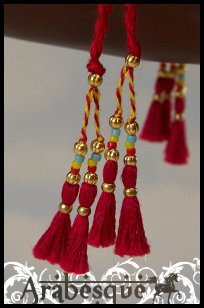
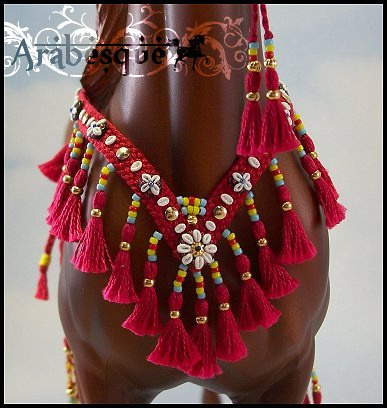
I may or may not have said before that I LOVE a bay in emerald green, so to some degree this set fulfilled a desire to put green on my bay. This set is done very similar to the red set, same sizing, number of tassels and new details added, just in different colors.
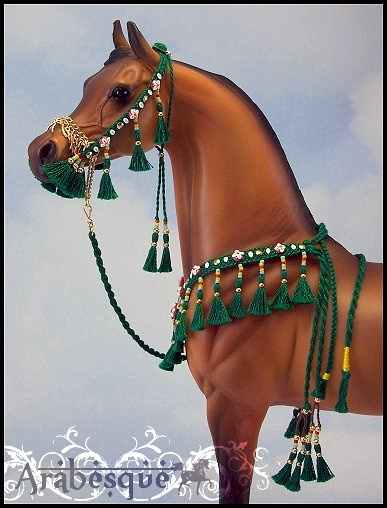
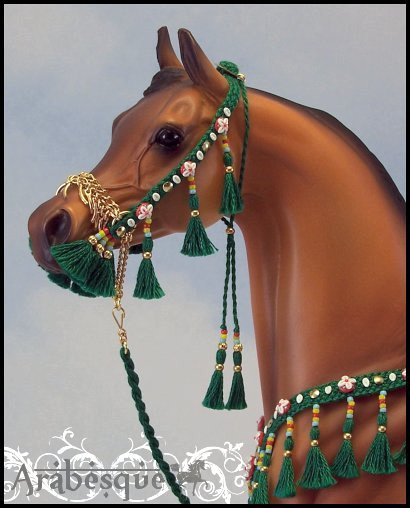
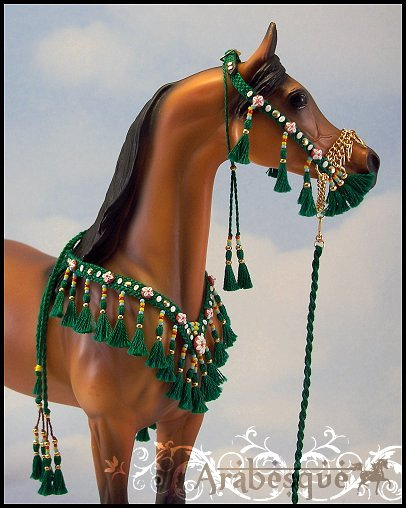
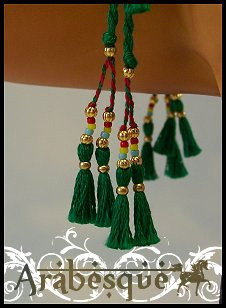
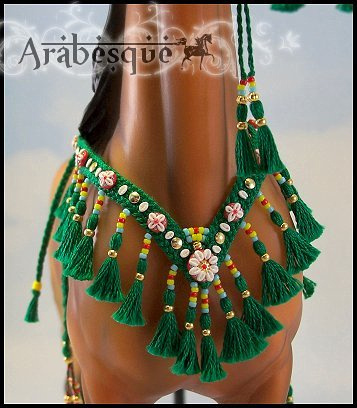
I very nearly was about to do a third set like the red and green, but in a blue when I decided...no, this one must be different and then I couldn't decide which shade of blue should be used, so I used three! I was using reference photos as a guide for the top two sets, but on the blue set I decided a little "Hollywood" flair was necessary! So this one is created with three different shades of blue, first all braided together to make the headstall and collar. Then there are alternating tassels in each shade. I almost made this one a single tier also but then decided why not do a double tier? Once the tassels and chain were set, the decision to add rhinestones and a brow band with charms came to me later. I really let the set speak to me as I went along (do I sound crazy yet? Oh good!). The charm on the brow band is a crescent moon, with a "blue" moon or a turquoise rhinestone, and then a dangling star charm. I also carried this theme out to the nose chain where a larger star with a rhinestone was also added. I'm such a fan of crescent moons on Arabian tack anyway, so this is probably something we can expect to see more of in my work! I'm excited to say the gal who bought this set also loves crescent moons, and also owns a Miss Elizabeth Bennett that can wear this set, because it just suits her doesn't it?
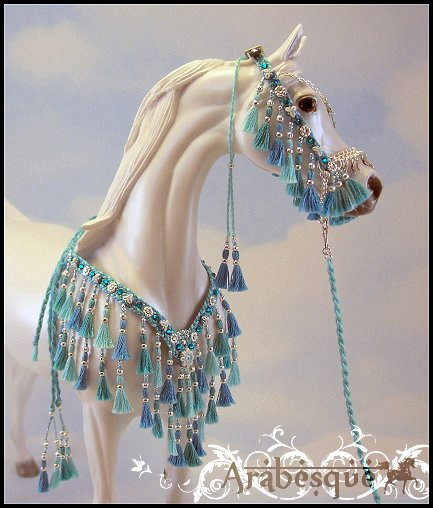
Ra also wanted to try the set on.....
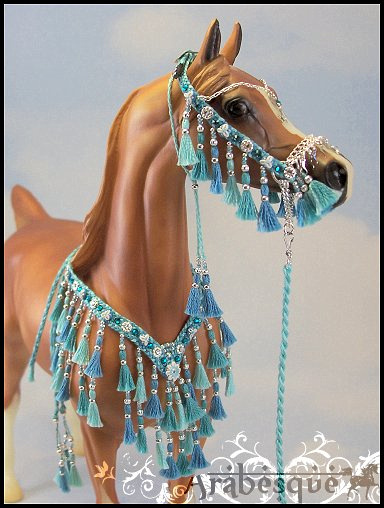
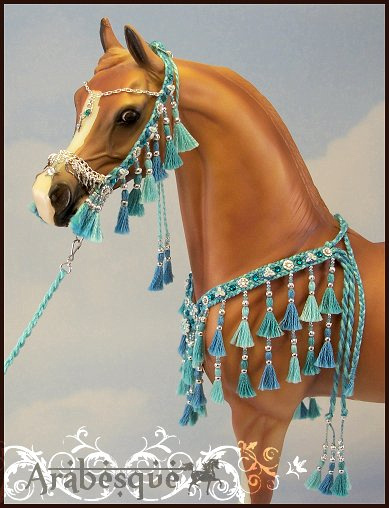
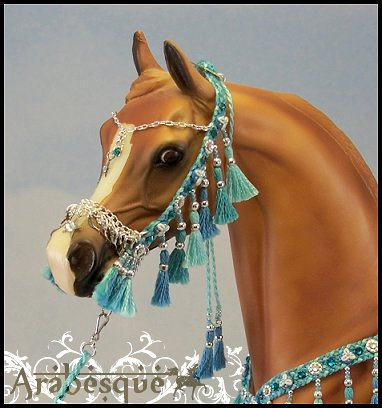
Here's a close-up of the collar details, a mix of hand sculpted cowries, silver embellishments, turquoise and clear rhinestones. It's hard to tell in this photo but the "drop ropes" on this set were wrapped with silver. This method is a keeper!
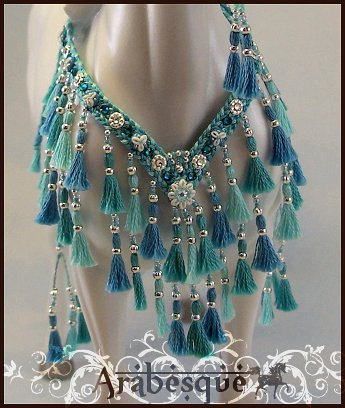
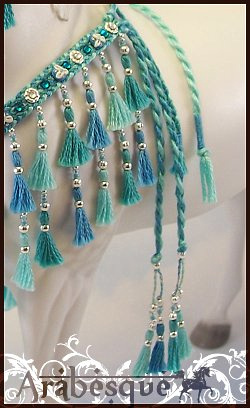
And there we have it! I'm currently trying to start a resin Arabian collection, and periodic presentation sets coming up forsale are going to help support that growing addiction for me, so expect to see a few more of these here and there. I have another batch of 3 planned to sell which are in the design stages. It probably won't be too soon because I'm also working on 3 Arabian costumes! I can't wait to start sharing more progress of the costumes as they come together. I'm very excited about my newest costumes, each one is unique in it's own way, and therefore it'll be a very fun mix to work on! Something a little different going on with each one!
That's all for now, if you've managed to read through all this extra babble I thank you! If you've just stopped by to look at pictures, that's totally fine too! Either way thanks for stopping by, and taking an interest in my work! Thanks for reading and happy collecting everyone!
Melissa :0)
]]>Here's an updated shot of that "fring-y" halter from last week. In the next few days this one will receive a brow band, throat lash, nose chain, lead line and some cowries. There are 9 of these altogether. The other colors aren't as far along. I assembled the black and white ones first just to make sure this "experimental" new design was headed in the right direction first!
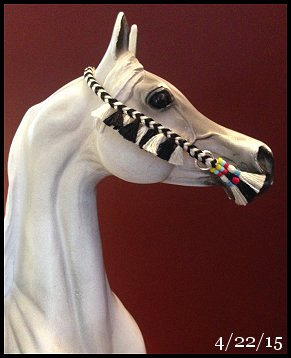
Here's a shot of the red set. Funny thing about this one, I ran out of the red I used to make the collar and halter bases. So I bought what I thought was the same shade of red and started making tassels, only to realize the two shades are slightly off from each other, but I decided to leave it because it's not a bad effect!
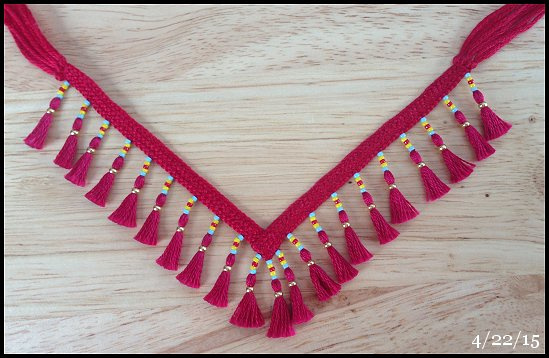
This set is bright emerald green, it seems paler in these photos but it's actually very vibrant!

I stayed up late last night and finished up end ropes on the green and blue sets. This morning I will finish up the ends on the red. I came up with a newer method for doing these end ropes too, that I am just in love with! Sometimes sleep really is overrated and your best ideas just happen when you should be sleeping!
Take note of the red/green stripe on these end ropes....
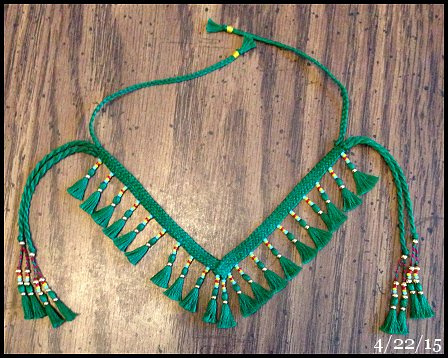
Here's the blue set before the ends were finished, Jedi was just dying to try it on! I think these colors look great on a lighter horse and I will definitely photograph Miss Elizabeth Bennett in the sales pictures for this set!
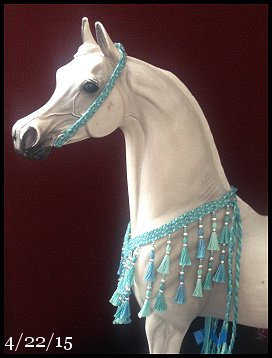
Impossible to see in this photo but the end ropes in this one are wrapped with silver! LOVE how this one came out...tempted to keep it, but must sell so I can buy more ponies and supplies!
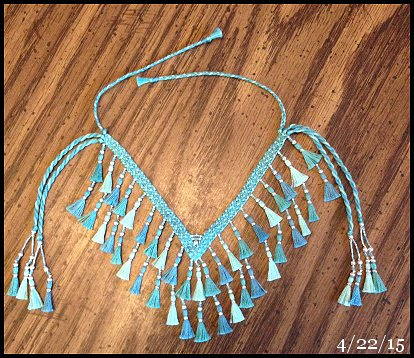
I should be finishing up some of these pieces to sell this week! Stay tuned for more to come soon!
Thanks for reading and Happy Collecting!
Melissa :0)
]]>
The most exciting news in my week by far is that I found out that I'm having a boy! This is my little boy blue manicure I did for myself to celebrate (nail polish is my other addiction). I'm a little over halfway there now and I'm finally feeling better. I tell you what those first few months of pregnancy were tough! But now I'm actually able to enjoy my pregnancy and my energy and appetite has returned almost full force now! As a result of that, I've got several new projects going in the studio:
Here's a funny picture of Jedi before the fringe was trimmed down! LOL! Looks like he has a beard or something? "OMGZ Iza Zebra!"
It's safe to say after last week's experiment with fringe halters that I am now addicted to fringe! The halters that I'm making this week are even "fringier" than last week! Above you can see 3 black and white ones that I added the side fringe to yesterday. Today they'll get more tassels, browbands and throat lashes. They were inspired by the "Nazeer/Morafic" style halters.
First of all at the bottom of this photo (shown above) the 6 halters that are laid out in an arc shape are more of the "Nazeer" style halters. There is light blue and white, and a pretty teal and white. I'm doing 3 of each color on these, they are just too cool to offer only one of each. If they turn out the way I hope I have plans to do some wilder colors next week! These are more of the authentic soft/dramatic shades I've seen in reference photos.
In the top section of that photo we have four halter bases. The "zebra" colored one is the new costume I'm working on for Lea, should be an awesome costume! The other three: red, light blue mix, and green are all new presentation sets I'm working on. The red and green will be more authentic style with a single row of tassels and the blue mix is a mixture of 3 soft shade blues which will be reflected in the tassels. There will be an alternating mix of these colors in a double tier of tassels on the collar piece...safe to say this one is done more with the "artist's flair" in this case since I'm such a fan of blue!
Here are the collars for those pieces. They are a little flippy floppy in this photo because they just tend to do that until you put tassels on, and trim up and finish those ends to make them lay down right. Of everything I am showing you today, the only pieces that are not going to be for sale is the "zebra" style halter/collar for the costume. The 9 Nazeer style halters, and 3 presentation sets should be hitting my sales list by the end of the week or sometime at the beginning of next! Stay tuned for more updates!
This guy showed up in the mail yesterday! This is another Peter Stone Arabian for my collection "Autumn Knight". The coloring on this guy is just gorgeous, he's by far one of my nicest. He also has these pretty white flecks at the tops of his eyes which give him a very concerned expression. Like usual, I can't wait to play dress up! And the addiction only continues, because while I was writing this blog...3 more Stone Arabians for my collection showed up in the mail which I will talk about next time! Until then....
Thanks for reading & happy collecting everyone!
Melissa :0)
]]>
For those that don't know I am about halfway through my first pregnancy, and with summer on the way I will be shifting my focus to planning for the arrival of my new baby! This means that I don't want to leave anybody hanging with open orders, and in order to avoid that I am closing my books now possibly for the remainder of the year or longer to adjust to my new and exciting life-style! However, for the next few months I have plans to turn out as many new sales items as I can so if you see something you like now is the time to snatch it up! Even though I am not accepting paid commissions if there is something you'd like to see in a certain size or color I am open to taking "requests" for items to be made, I just will not be accepting payment up front for them in the event that I don't get to them so feel free to contact me if there's something you desperately want! If all goes well I will be listing new sales items every Sunday for at least the next two months. A few costumes may also be coming up for sale, something that I have not offered for several years.
Feel free to bookmark and check back to my sales list on MH$P often, here is the direct link to my sales list: http://www.modelhorsesalespages.com/searchlist.asp?Accid=17086
To see sneak peaks at what I'm working on before it hits my sales list keep following my blog!
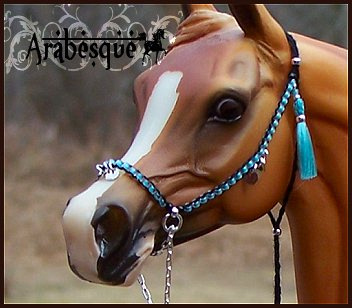
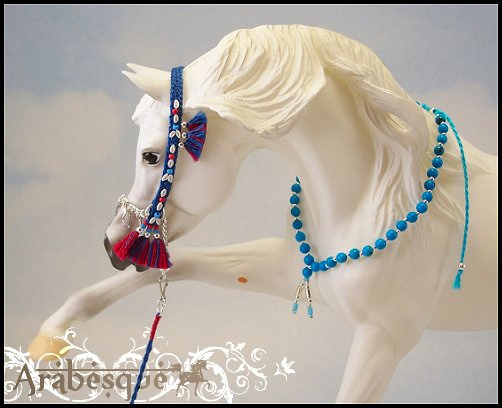
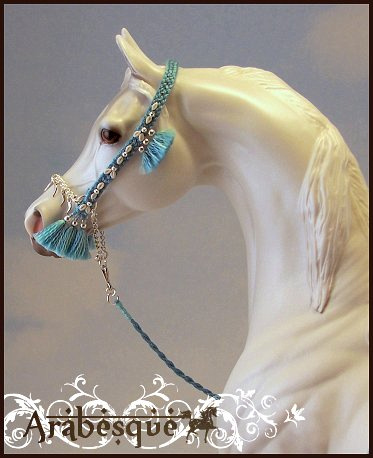

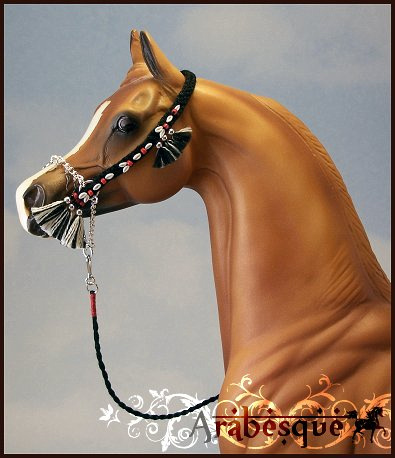
On Friday I finished up four new Arabian halters that were actually inspired by a painting of an Arabian horse, done by Lesley Ann Hartman. The painting is called "Summer Shadows". Here is a link to what the painting looks like from her website:
http://www.lesleyannhartman.com/_images/summer_shadows.jpg
The blue and red halter shown on Sahran is the one closest in color to the halter in the painting. I then came up with the other three color combinations myself. On these halters I found great joy in trying a different cowrie shell pattern, and also tried to mimic the spaced out simplicity of the shark tooth nose chain. I'm really happy with how they turned out, they just sit on the horses faces so nicely and aren't too overdone. All four halters are currently for sale, you can find them by visiting my sales list on MH$P: http://www.modelhorsesalespages.com/searchlist.asp?AccID=17086
If you've never visited Lesley's website before take a moment to check it out support her artwork if you can. There are so many beautiful paintings at: http://www.lesleyannhartman.com/
I am thankful to Lesley for inspiring me!
]]>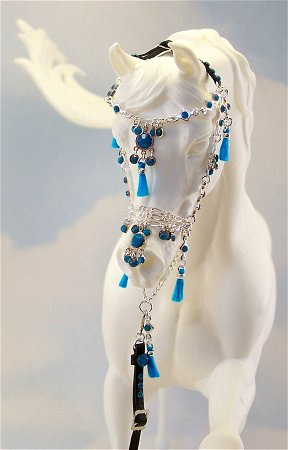

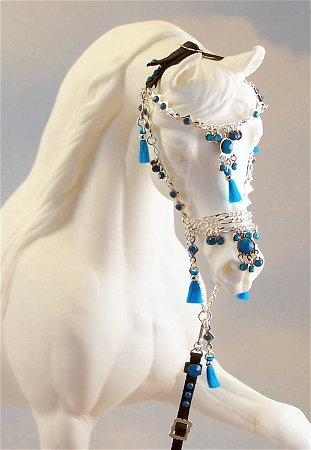
Story time! A few years ago...okay so more like 10, I started out making Arabian horse tack and went by the name of "Adiva Arabians". Well, since all these awesome changes came into my life...getting married, buying a house, having a good job...I quit the hobby for about five years due to just not finding time anymore, and my passion shifted to the job I had. I also sold my entire collection. When things unexpectedly took a turn for the worse with my job last fall I had two choices: stay and fight for what I deserved, or get a life! Well, thank goodness it was in the budget to get a life! Now I'm happily home, and about four and a half months pregnant! A dream for me really, so that's given me a lot of extra time to find enjoyment again in a hobby that was pushed to the back burner for some time which is why I came back to it with a new name "Arabesque". You see, this time around I'm a changed woman, someone I can be proud of and I like to think a much better version of myself. Everything is better, my outlook on life, my relationships with people, and even my art, I've grown and changed for the better as a person and I'm ready to be a mom! It used to be real hard for me to sit down and put a whole day of tack making in, even when I had the chance. After experiencing the loss of a hobby for the obsession and dedication to a job that I wasn't really appreciated for, I can never take this hobby for granted again. I missed it and I really do enjoy it! So now that we've gotten all sentimental...here's to a my new start!
Gosh I always do this, get started on a story....okay so back when I was known as "Adiva" I had started my own model horse halter line called "The Crystal Desert Signature Series", which was basically a line inspired by the modern takes on Arabian horse presentation. Now days in the real horse world you see more crystals, chains, and charms on presentation tack, essentially it is the designer stuff of real Arabian horse tack. These sets aren't typically seen at Arabian shows in the ring, from what I gather, but are more so used for showing off horses at home, on websites, at festivals, for photo shoots, in magazines...etc. They are a way to compliment and celebrate the true beauty of the Arabian horse, to decorate them. I have come to the conclusion myself that it's like jewelry for the Arabian horse.
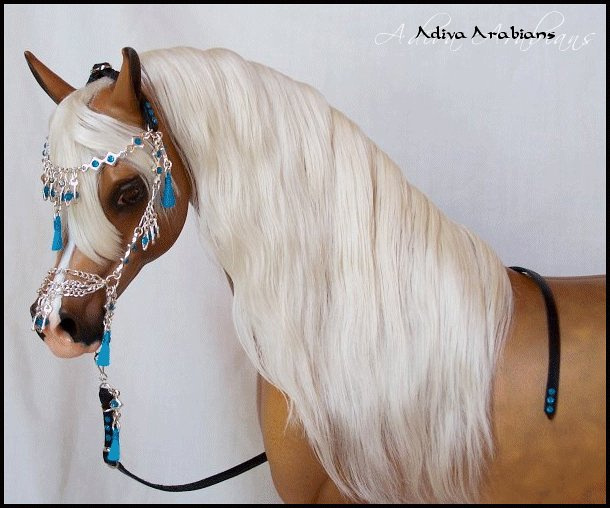
Shown above is a photo of the original halter that started off "The Crystal Desert" line, pictured on a gorgeous horse I used to own. This one is kind of an *ouch* although I do have my reasons for having parted with her that made it okay for someone else to enjoy her! She was an original Aisha resin painted/haired by Faye Cohen. I have no idea where this horse is now, but I hope whoever has her likes her as much as I did! The halters pictured in this post are both original designs by me. They were inspired by real Arabian horse tack, but not directly copied from anything real, which is where the "signature" part comes into play. They are unique and completely original to Adiva Arabians and Arabesque! Piece by piece I planned, measured, arranged, designed these halters. The halter pictured above on the bare model (Ajmal by Debbi Lermond) was a recent order, also belonging to Heli that I just completed this morning. After not having made one of these halters in how many years that is my more modern take on it and I forgot how much I love it! Really, who I am as a model horse artist is someone who loves and craves sparkle on everything, most times I will find a way to put a bit of bling on my work.
The short version of all of this is with the edition of this new halter to my portfolio "The Crystal Desert Signature Series" is back, and there will be more of these in different styles and colors coming this way very soon!
]]>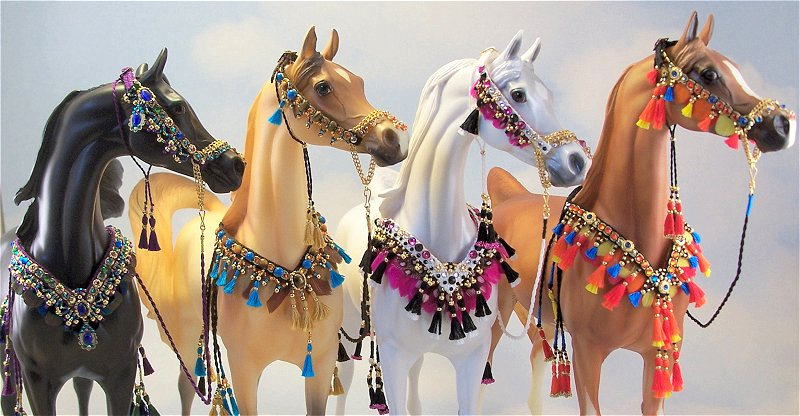
Well vacation is over, and I'm back home now but man was it worth it! It's still spitting snow here at home and the temperatures are up and down like usual! I miss the sunshine already! So being back home I had some serious work to do to catch up on the last of my backlog. I finished up the "Feeniks" and "Ermine" sets, both ordered by Heli. Actually all four sets pictured above are owned by Heli! She has just been awesome to work with, all of these color themes and names ideas came from her, and I have to say I am beyond flattered of Heli's enthusiasm for my work. Feathered sets are something that is still a fairly new concept to me, and that fact that she ordered four sets from me made me feel pretty good about my work! So thanks again Heli! I can't wait for you to see these in person soon!
So below we have the "Feeniks" set. The idea behind this one was to demonstrate the flame-like colors of the mythical bird known as the Feeniks/Pheonix, it's spelled a few different ways for those that didn't know that! I used "Fire Opals" for the main rhinestone here and the unique thing with these stones is that they give kind of "flame" like colored effect actually making them perfect for this set. If you look at Fire Opals up close they actually range in color from gold to orange to red naturally so they were made for this theme! The pictures below are of my new "Ra", a recent addition to my collection. I actually ordered this one while I was on vacation (naughty naughty naughty!) but I've always wanted one, and I'm so glad I did! This horse is so photogenic!
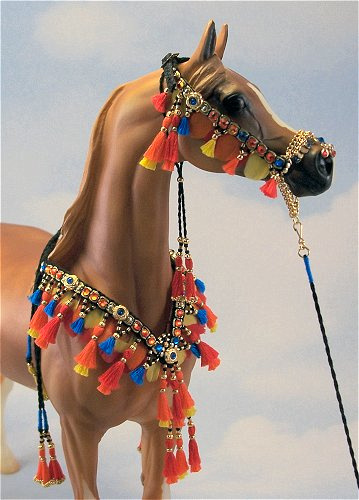
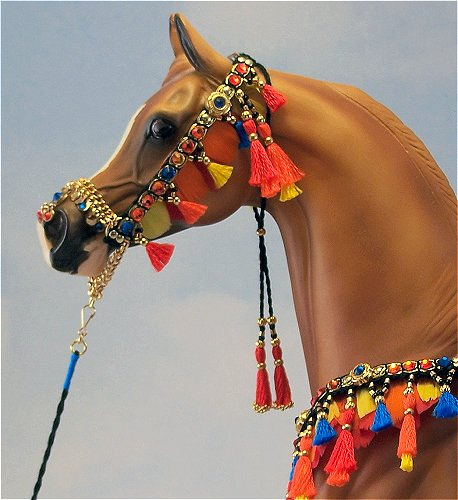
Here's "Feeniks" on my bay. This set just might be meant for a bay by the looks of it! If my camera was behaving I would have gotten more photos of the set on this one, but this photo is about where the camera started to die! Might be time for a new one... *sigh*....
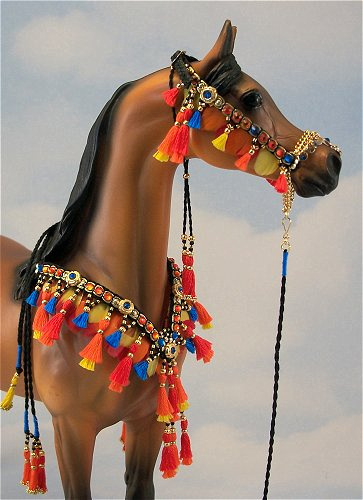
And here is the final set that Heli ordered called "Ermine". The idea she had here was of those royal capes with the white fur and the black spots on them, so this one was to have kind of a royal effect to it. She then chose a purply-pink or as I am fond of calling it Fuchsia to go with the black and white, and of course the color of royalty--gold! On the edges of the collar I actually mimicked the "Ermine" effect with little jet black rhinestones. I had wanted to carry this out into the headstall but since it is narrower decided to keep that simpler so it didn't get too crowded. I also, while I was on vacation, got to visit a real craft store...Michaels (some of you may roll your eyes, but for me Michaels is a BIG deal for a girl stuck with JoAnn's and a rinky dinky Ben Franklin store). So at Michaels I found some polka dot black and white feathers which I integrated into my design to further mimic that "Ermine" effect.
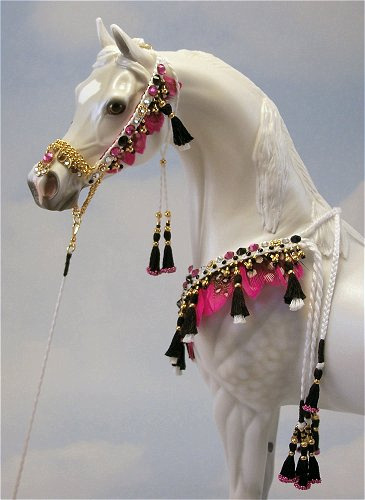
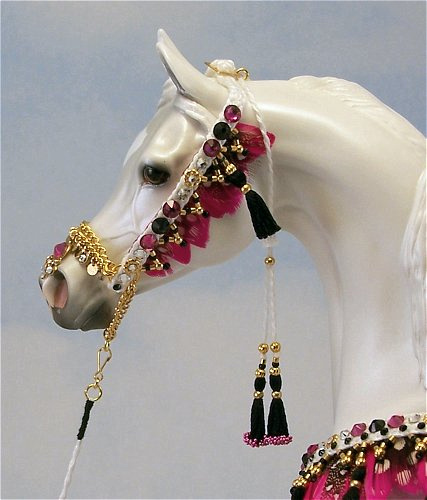
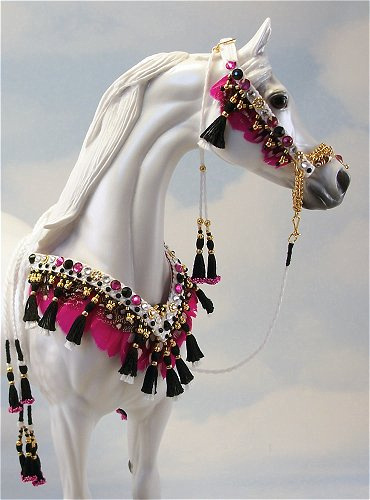
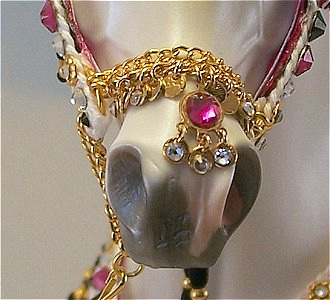
Lastly I took a few extra photos of the "Peacock" set on Ra so we can see those feathers better. I like the way they looked on Blackie but some of the details were absorbed in his dark color during those photos. This one is probably my favorite set of the four...
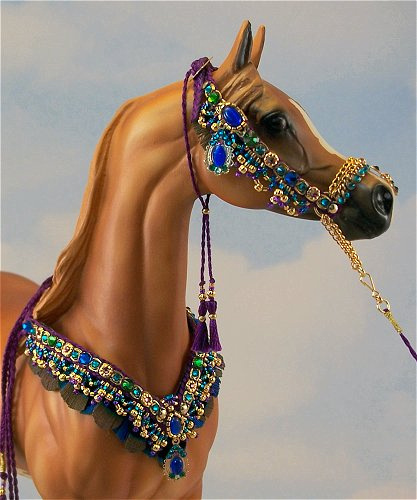
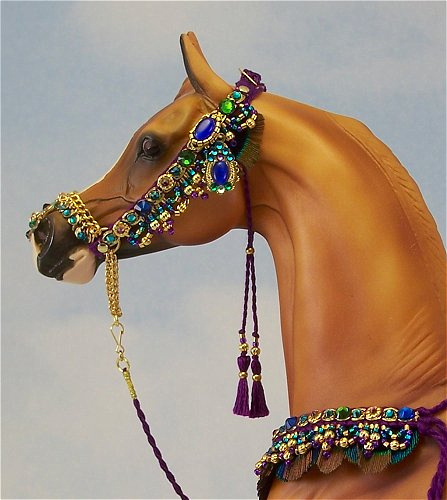
And one more of the "Tiger's Eye" set on Brownie. Can you tell I really need to name some of these horses? The shame...and now I want an actual Brownie with some ice cream please! Ta ta for now, off to raid the kitchen!
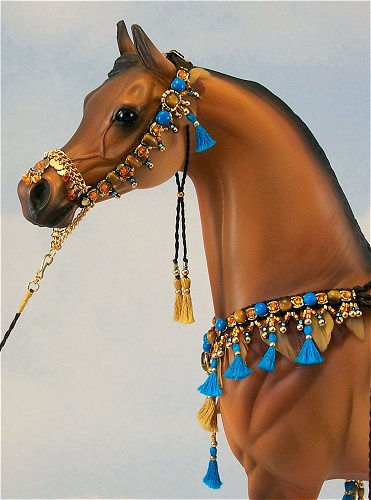
These first 3 photos are in sunlight:
These next two photos of him were taken in shade:
Here is Vanilla meeting Blackie (for a lack of a better name, because I haven't come up with one yet). I haven't done a blog on Blackie yet because I haven't gotten any super awesome photos of him yet.
I am in the process of making a special presentation set to photograph Blackie in that will probably be done sometime in April, so he'll get his own blog with nice photos then! Photographing black horses is incredibly challenging!
I'm almost finished with a really unique presentation set that I will post photos of soon. It is a commission so it won't be for sale. I've got a few more customer orders I'm wrapping up, but so close to being all caught up! Starting in April/May I will be focusing on some artist's choice pieces and I've got some really exciting stuff planned (to sell) that I cannot wait to share with you all!
]]>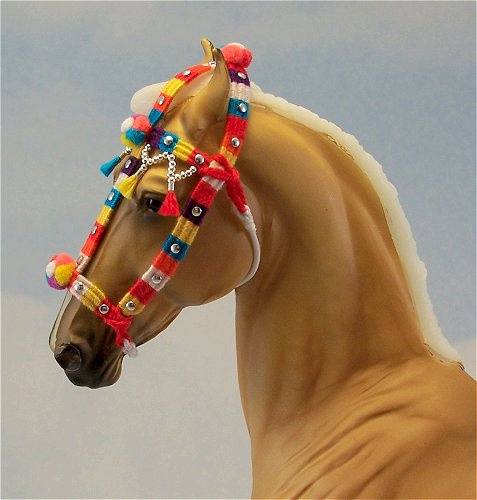
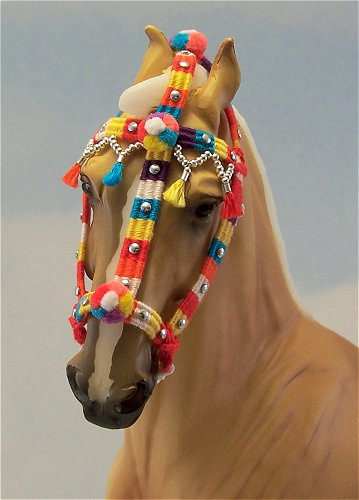
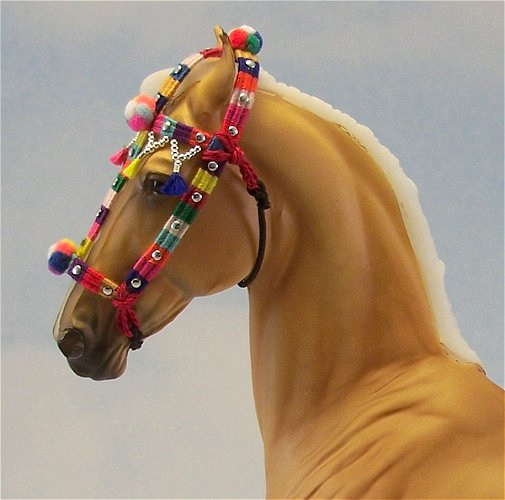
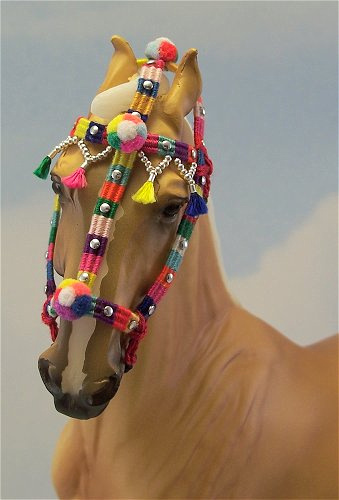
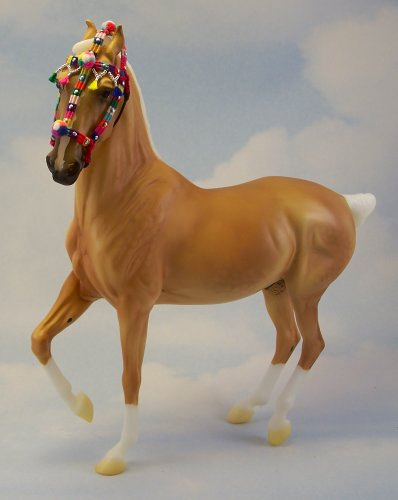
I finished the Marwari halters that I blogged about this morning! I had a quiet afternoon to get a lot of work done and surprised myself by finishing them! I love it when I overestimate how long something will take to finish. Shown here are #4 and #5. Both owned by VK! :0)
]]>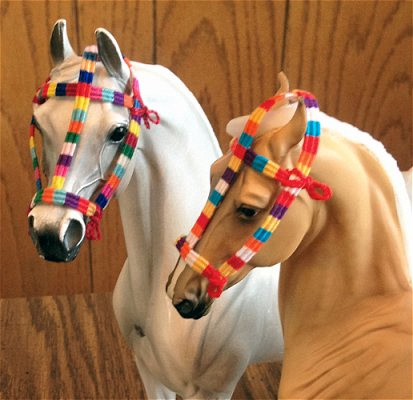
Here is a sneak peek at this pair of Marwari halters that are almost done! These are an order for VK, so they are not forsale. She chose the neat color palette on the red/orange/yellow/white one with a little blue and purple thrown in for pop, just love that one! The other one is more of the traditional color theme, close to what I did on my first two Marwari halters that I made. These are both made to fit the breyer Marwari. He has that tricky forelock to work around, but looks so darn cute all dressed up! Obviously they don't fit the PSA as well, but I thought it would be cute to photograph them side by side.
Today's project is the second photo, another time-consuming step to the art of Marwari halters. Can you guess what these are for? These are what my little poms look like before they are assembled. I roll little pieces of colored poms into tiny balls, wetting them in a cup of water as I do so. They take several hours to dry but have an easier shape to work with. Then today I will glue them together and form the cute little hacki-sack shaped poms. It is a sticky, messy process, but it is the method to my madness that works for me. And like I say, with any time consuming task in tack making: the result is always worth it!
]]>
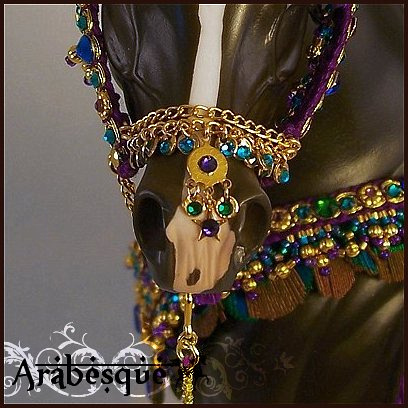
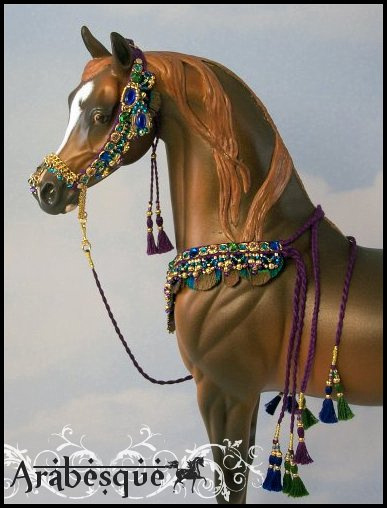
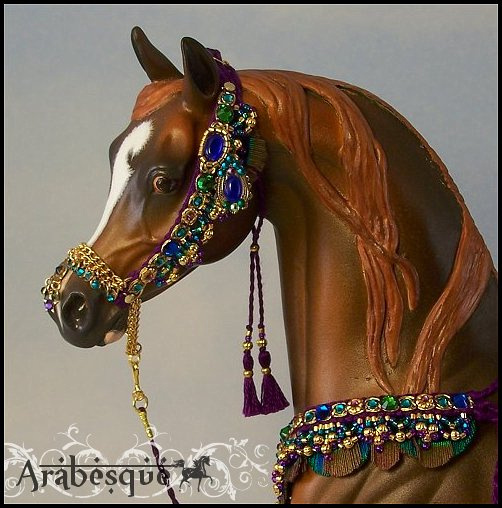
Newly completed, the "Peacock" feather set, also owned by Heli. I love how this one turned out. It is the most detailed one yet. I had fun coming up with some little additions to this one like the hanging blue oval charms seen on the center of the collar and on the sides of the headstall. Those were blank and I added the matching stones to them. This is my first time experimenting with peacock feathers on one of these presentation sets and I think it's safe to say I'm hooked. I have plans to do royal blue, red, black, and emerald green varieties of the Peacock theme later on when commissions are done, but this one will always remain one of kind.
Up next in the feather department is the "Feeniks" set. And it sounds like I'll be doing one more on this commission order in yet another unique theme, but more details about that will come out later once they are decided! All I can say is I can't wait! And since I will have all four together before they go off to their new home, I've decided it's only fitting to have a very special "feather photo shoot" with four of my horses probably at the beginning of April!
Also coming up this week I have a few new Marwari halters on the work bench soon to be finished, and another very unique presentation set coming up next week! You may also see a few sales pieces slip out soon! Stay tuned!
]]>
Recently I got the chance to add a horse to my collection that you could say is a "grail" horse for me. I have admired this horse from the moment I first saw it on Liz Shaw's website. Liz Shaw is who I would call my hobby idol. I had always loved Arabian horses, but I had no idea that they could be dressed in such beautiful ways until Liz Shaw started making Arabian costumes. Her work is what inspired me to try my hand at making my first costume and I quickly discovered that I love it. What this horse represents to me is not only getting to add a beautiful horse to my collection, but somewhat of the legacy of inspiration passed on by a woman whose talents I will always admire.
I was able to find the original name of the horse by looking it up on Faye Cohen's website, "Sahra Lazaan", which translates to "Desert Flame" so very fitting. Faye painted this horse to a gorgeous chestnut, with rich metallic gold pigments in her coat. Faye Cohen is another favorite artist of mine, and I've owned several models by her over the years, although this is the first one I've had in awhile since I'm starting my collection over. I'm told the customizing was done by Sue Thompson, possibly with some work done by Liz. Unfortunately this horse's mane and tail are starting to lift from the body but since I don't show my models she can be enjoyed as a shelf model who helps make my tack look good, and she sure shines in photos regardless! Chestnut is also my favorite coat color on the Arabian horse.
]]>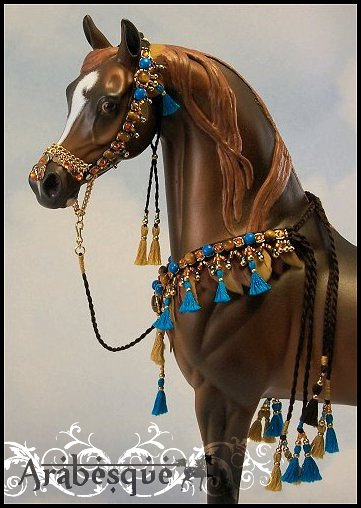
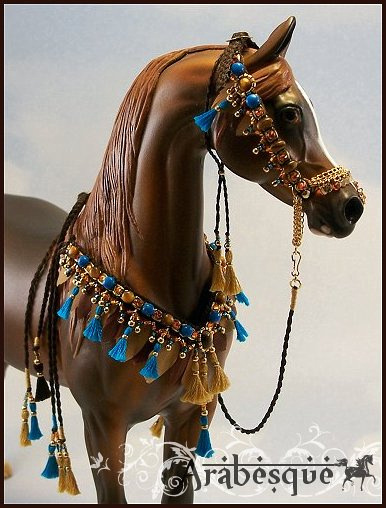
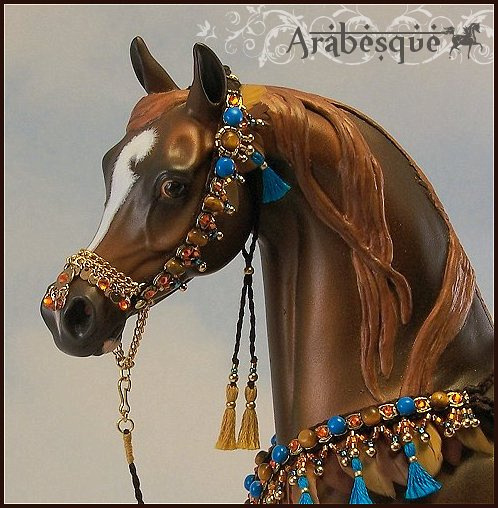

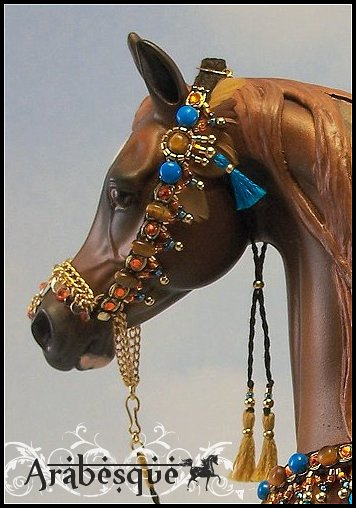
I completed the "Tiger's Eye" feather set today. I'm really happy with how this piece came out. I'm kind of thinking these kinds of presentation sets is where my niche really is. I'm all about putting fancy stones, feathers, tassels, and bling together! This one features real Tiger's Eye stones, along with imitation turquoise (real turquoise is a little on the pricey side), and orange rhinestones. It is hand beaded, with a layer of feathers underneath. The feathers match the colors of this horse so well they aren't super visible in the photos, but I like the touch of softness they add. It also has a bling-y noseband which I got a cool close-up shot of. This is also pictured on my new horse that I got in the mail this week. Could not wait to play dress up with her! She will have her own blog post probably tomorrow. I've taken a bunch of photos of her that need to be uploaded next, but first I should get to work on my next feathered set, the "Peacock".
]]>
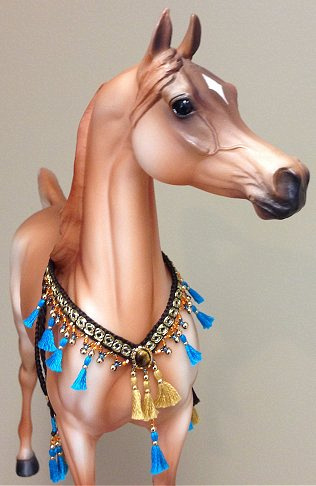
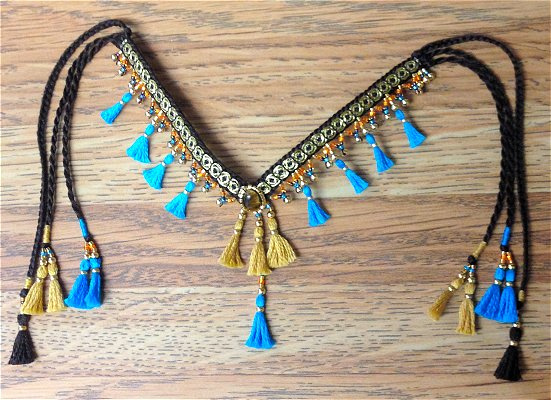
This is a commissioned set, one of three feathered sets ordered by Heli. She gave me "Tiger's Eye" to use as the inspiration for this set, and I decided why not use real Tiger's eye stones for it? The collar piece is nearly finished, it just needs feathers added, and the little embellishments that will go all the way around the collar. So far the collar is hand beaded, with tassels added, and the center medallion is a real Tiger's Eye stone. Heli has also given me "Peacock" and "Feeniks" to use for the inspirations behind the next two sets which I'll have progress pictures of soon as well.
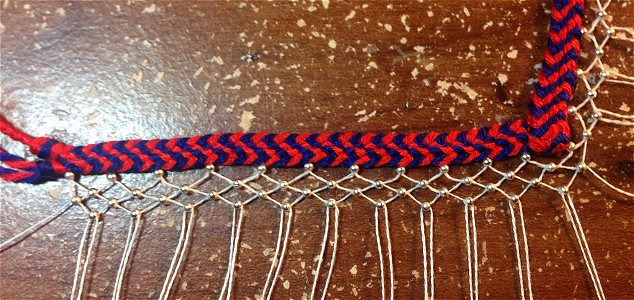
This one is a side project I started. Sometimes I get an itch to do things and just need to make time to make the things that strike my fancy in that moment. In this case I just bought a pretty new DAH Arabian in black from the Peter Stone Company, and felt inspired to make a set for him. I was also itching to try my hand at some "netting" on a collar, which I've discovered I love to do. I'm also using a yellow and a bright minty teal green for colors. The matching halter piece is also something entirely different and new for me that I can't wait to share! This set will eventually be for sale upon completion, I kind of just pick at it here and there while things are drying or if I get stuck on something else. I will photograph my new horse in it once it's done to show him off a bit before parting with this set!
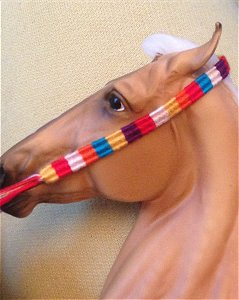
Here is the start of another Marwari halter! I'm currently sold out on all my Marwari halters, and I've closed my books to new orders. But a gal named VK contacted me a couple weeks ago and wanted to order two and I decided to take on a couple more. She picked a warm palette for this particular one complimented with a purple and blue. Really neat and bright in person. All the pieces on my Marwari halters are completely hand woven and it takes me a full working day to get through just the weaving parts, but the results are so awesome! This halter has all the pieces ready for assembly, but I've got a second very colorful one (like the original ones I did) also in the works that I'm going to weave first. I love working on these in the evening when it's too dark in the house to do the super detailed stuff clearly without straining my eyes, and I sit in front of the TV and weave while I watch all my favorite stupid TV shows!
Still more cool stuff in the works that I'm not ready to share pictures of quite yet, but if you enjoyed this sneak peek stay tuned for more soon!
Thank you for reading, and happy collecting!
Melissa :0)
]]>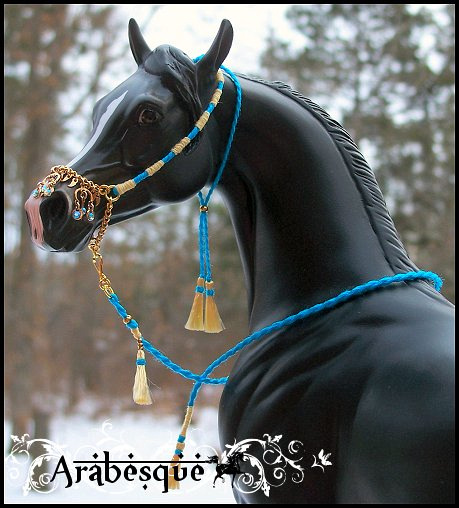
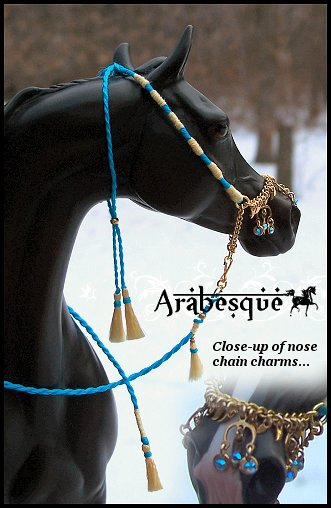
This is one that I just completed this morning. I've had a craving to make this halter for awhile, and it is based off a reference photo I have saved of a real halter. However, I just had to put my own finishing touch on it so this one has the typical bling-y nose-band that I'm becoming known for! Everything is just better with a little sparkle, don't you think? Well, I do anyway! This halter is completely hand wrapped and twisted. The tassels are made from rayon floss to give it that shiny effect and they are slightly elongated to add elegance. The horse is my newest addition to the herd, and soon he will get photos of his own on my collection page, along with another fabulous beauty I can't wait to show off that is on her way here! I'm in the process of putting together an indoor light box, well it's done I just need lights...nice right? Because I am so tired of trying to battle the cold, the wind, the weather really, and the unpredictable lighting that comes with this time of year. It can be the middle of the day, sun is shining and my flash will still pop on while I'm taking photos...ridiculous! So, hopefully pictures will drastically improve soon, can't wait to show off my new cloud background...so serene! Anyway, stay tuned for more! I am busy at work on commissions so not as new many things coming out right now, but a girl does need to reboot her inspiration at times and that's where halters like this one come from. I have vacation coming up next month so my goal is to get all commissions done and out the door before I head off, and when I get back in April I will probably just be focusing on being pregnant and producing sales pieces at my leisure. That's right, the books are probably going to close down for the year so I don't risk making anybody wait too long for me on stuff! It's going by so fast, thank goodness! Can't wait to have summer!
]]>
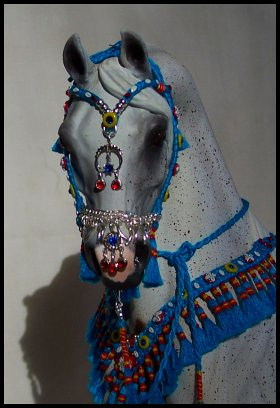
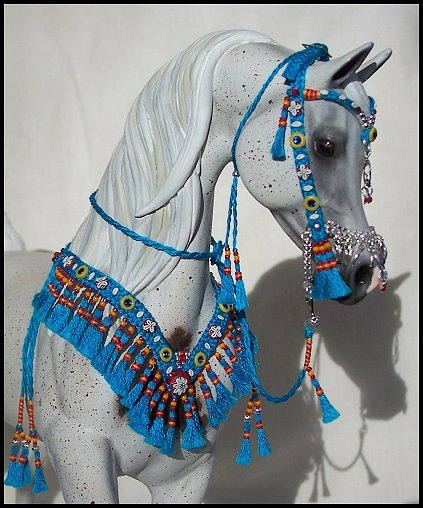
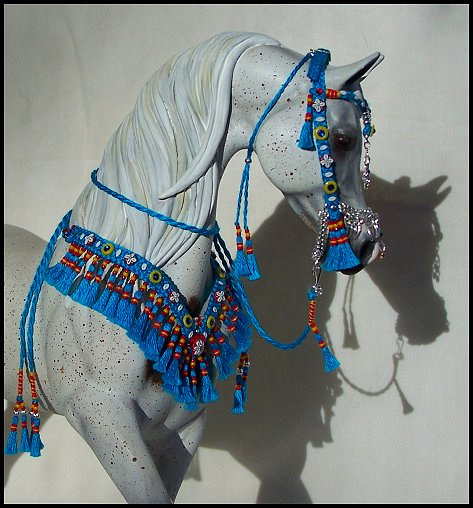
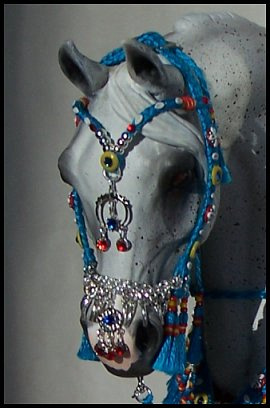
This is a presentation set that I finished a few weeks ago, but forgot to put on my website so I decided I would share it now. You can again see that popular bright turquoise-y blue native halter, but this time made into a presentation set. I actually love how this one came out. I used more jewels on it, and varied the jewel color on the halter by using a mix of blue and red. This one is a customer order so it is not for sale. The owner liked the original blue halter and wanted one made into a set so I just took it from there. I like to make each one a little bit different than the last even though there are some halters I've made that are similar. This one is my favorite so far, especially since this particular shade of blue is my absolute favorite color!
]]>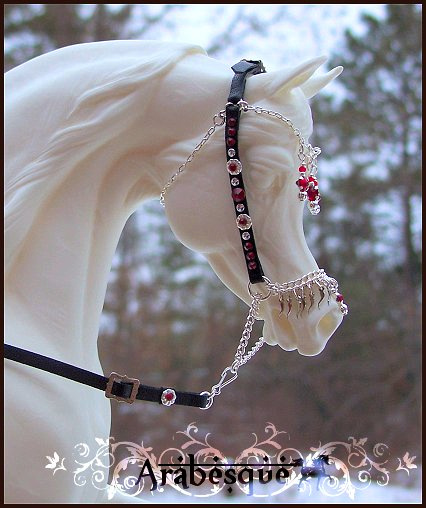
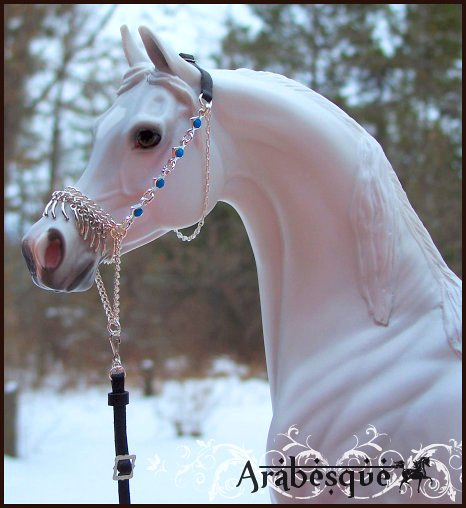

These are all new and all are for sale! Here is a link to my sales ads: http://www.modelhorsesalespages.com/searchlist.asp?AccID=17086
For the red one I had a much different plan for a unique nose band but it just would not work the way I wanted it to so it's back to the drawing board on that one! I had a request to start making some of these for Peter Stone Arabians, since these horses have become so popular, so the bottom three photos are all made to fit the PSA. I always use real swarovski crystals to get the true shine and sparkle I'm looking for and to give my work the quality to stand the test of time. These four have also especially given me some more experience working with leather lace. I have to say, not one of my favorite things as far as prepping it. It has to be hand carved and sanded down to get it to the right thickness to keep it nice and in scale. There were many moments when the blade would slip or I would turn it too much and cut the lead rope I was working on in half! Very frustrating! I'm starting to get the hang of it now and I'm loving the results I'm getting so I plan to keep working with it. I've got some more exciting things in the works for this year, so if you like sparkles as much as I do stay tuned!
]]>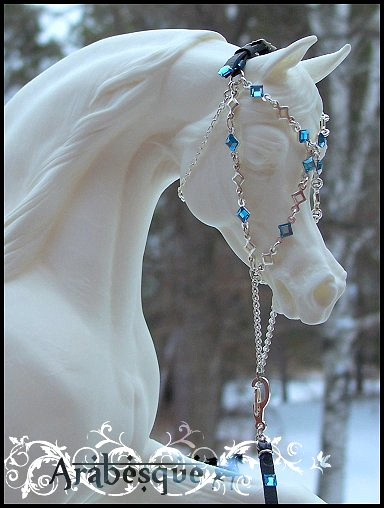

Here's two new crystal Arabian halters I just completed today. These two designs are Arabesque originals, truly a labor of love! To be fair these ones were started a long time ago and I just never finished them, probably because they can be really frustrating. There is a lot of trial and error that goes into making these, probably more so than any other kind of Arabian tack I make. The main reason being that getting a precise fit can be areal challenging, especially considering what model you're working on. Funny enough, today Ajmal kept tipping over and for the life of me I could not figure out why. I kid you not I have chunks out of my fingers from the pliers slipping. I didn't figure it out until these were both done and I went to photograph them that a little ball of chain had gathered under Ajmal's magnetic base which was just enough to cause him to be extremely tippy today. I gave myself a forehead slap over that one. It's a wonder the horse isn't broken. At least now I know to keep an eye out for that being an issue! Kinda funny now though! I gotta find some kind soul to paint this darn horse for me one of these days, I have a few people in mind but just haven't gotten around to planning it out yet. I think he'll be a gray though.
I wish these photos would have come out better. Winter in Minnesota is literally a "dark" time of year. It was about 1:00pm when I took these outside and it's so cloudy this time of year on most days that getting nice pictures is nearly impossible. I MUST make myself build a light box for indoor photos very soon. It's not worth it to battle the cold, the wind and the dang clouds all the time, though I'd happily do all that if I could get some decent lighting.
Progress on my work, and new things has been real slow lately. It's safe to say I completely lost inspiration for my work there for a few weeks, but I lost inspiration for everything to be fair. This will be my first full week back to work since just before Christmas. This pregnancy is really kicking my ass! I'm sick and tired of being sick and tired all the time! LOL! I'm having a ridiculously frustrating time with smells. If I can smell any food smells, especially meats I am instantly sent running to the toilet. I have not thrown up yet, but I've come darn close. I have a really hard time figuring out what to eat, mostly because nothing sounds good. I went from being an avid meat eater to not being able to stomach pretty much anything meat. I hope this nausea part comes to an end after the first trimester for me, and it's not something that goes on through the entire pregnancy. I definitely have good days and bad days. My books are pretty much closed from here on out (probably through the year's end to be safe), though I'll make a few exceptions here and there as I feel inspired to, especially for good understanding people. On a brighter note I did get to see my baby's heartbeat last friday, and it was one of the most amazing moments of my life. I'm about 8 weeks along! Despite how miserable I've been it's all worth it!
These are both for sale, here are the individual MH$P links for these:
(Blue criss-cross style) http://www.modelhorsesalespages.com/view.asp?id=1135673
(Teal & gold crystal style) http://www.modelhorsesalespages.com/view.asp?id=1135671
]]>
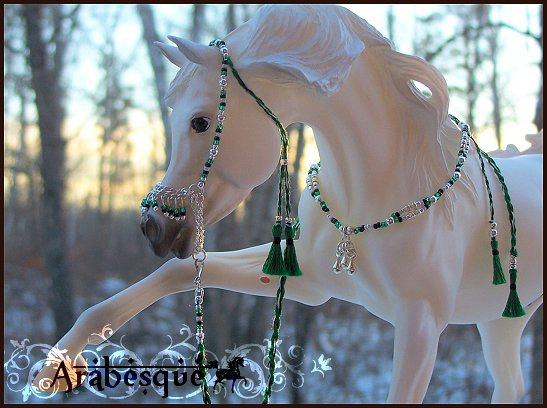
Shown above is a customer request I finished today. This is one of those collars that I've had for sale, and I made a beaded halter to match it so it made a set. The halter was made to fit Sahran, and the collar already fits him nicely! It's really cold outside today, well below zero so pictures were tough! I'm going to have to build myself a light box really soon so I don't have to battle this dumb cold weather anymore!
Below are 3 new halters that I completed around Christmas time but just haven't made time to upload these photos to my website until now. These color schemes just struck my fancy one day:
Bird of Paradise
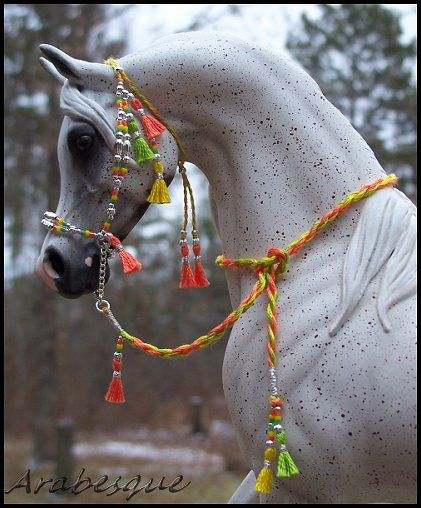
Waterfall
Chocolate Mint
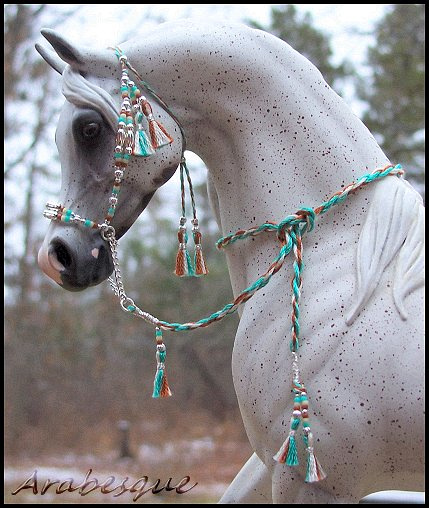
I wanted to try adding a few more tassels to my beaded style so these were a little experimental. I learn something new about the way I want to make new things each time I make something I know. (wow, does that make sense?) I especially like how the lead ropes came out on these, the ends in particular are cute and I will probably being doing more ropes in that style in the future. Lead ropes are one of those pieces where sometimes they just end up real simple and don't get a whole lot of detail or attention, that's something that I'd like to change on my future work. The "Bird of Paradise" color scheme is what got me going on these 3, and those colors will likely be used on a feather set in the future.
]]>Strawberry Wine
Prismatic Jet
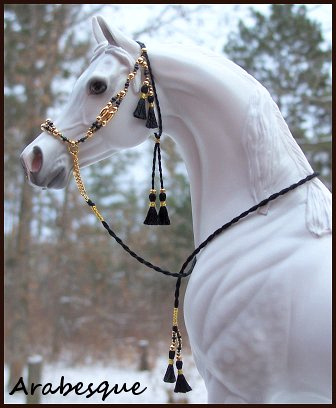
Lucky Clover
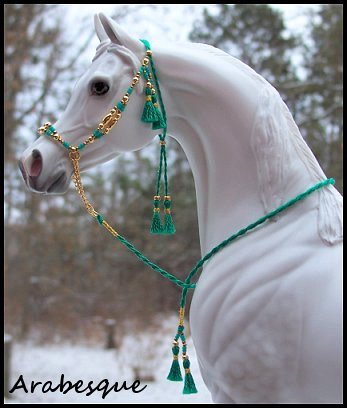
Golden Icicle
Gilded Cranberries
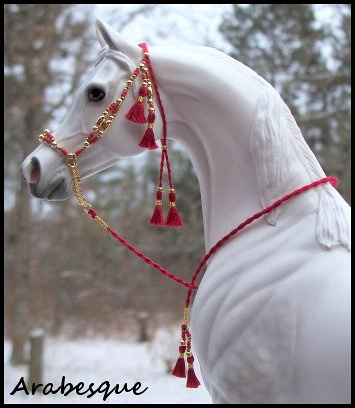
Egyptian Treasure
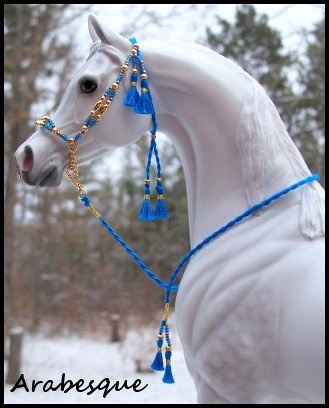
These are made to fit the PSA but are conveniently adjustable in the headstall via sliding beads. All are for sale and have just been listed to MH$P. If you're intersted in purchasing one, please visit the following link: http://www.modelhorsesalespages.com/searchlist.asp?AccID=17086
]]>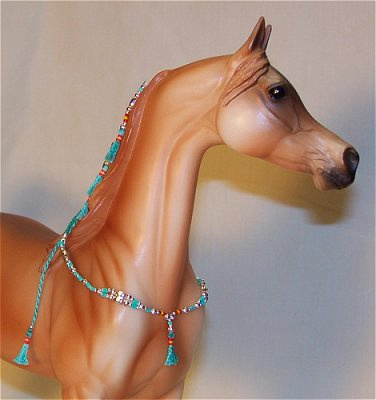
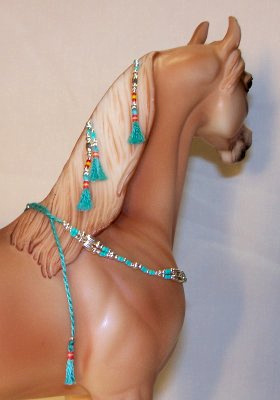
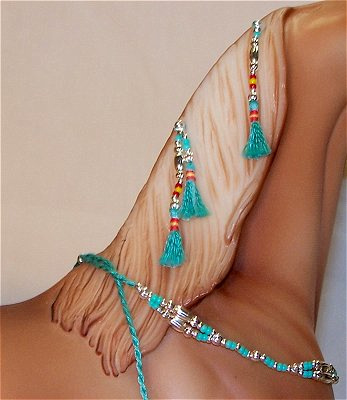
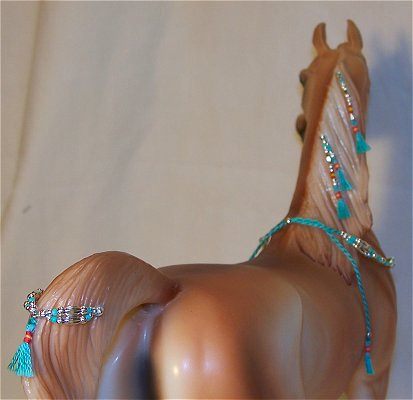
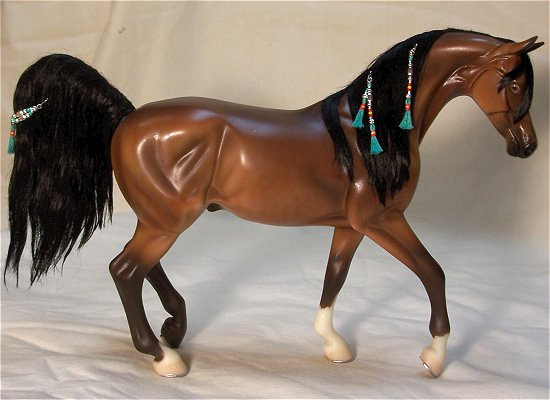
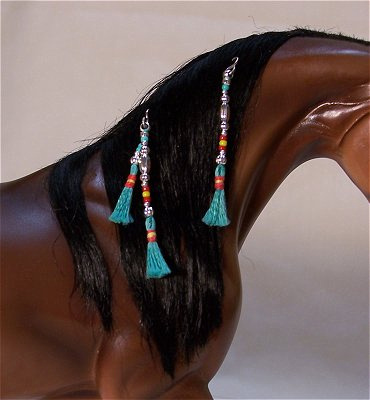
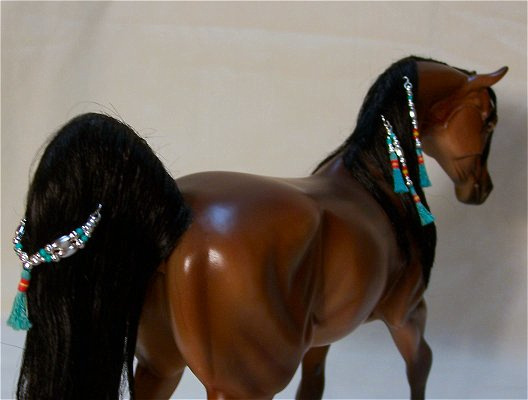
I have been literally dying to try to make a set of these for model horses, and I finally did! This particular set was made for my friend Diane to match this halter that she bought:
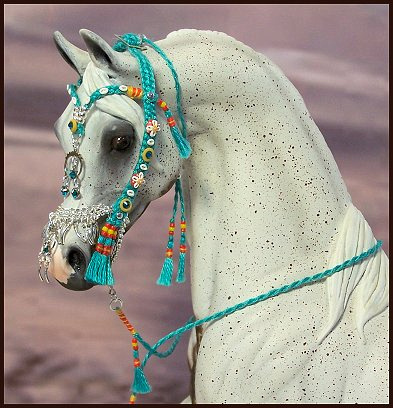
When designing new things, and trying to make them compatible with model horses, I put a lot of thought into how they can be made. I've been working on this idea since August of this year. My main concern was do I create these for mohair models (the easier choice) or do I create them for molded manes and tails, the solution? Both. Each set that I will sell will consist of a collar and 8 additional pieces. There is a set of mane and tail decorations for mohair and molded hair. The molded hair decorations attach very easily with a little sticky wax, and the mohair set attaches with little hooks that you gently place in the hair. There is an additional set of hooks that can be attached to a western saddle or just used however you want. This set was "native" inspired to match a native halter but there are many options to making rhythm beads. They can be done in any color, with charms, feathers, tassels you name it. The possibilities are endless and they are for any breed of horse! These are now order-able through me, contact me today if you're interested at: [email protected]
For those unfamiliar with Rhythm beads, here are a few good reference websites to check out:
http://www.rhythm-n-beads.com/
http://www.rhythmbeads.com/
http://www.fancyhorses.com/rhythmnecklace.html
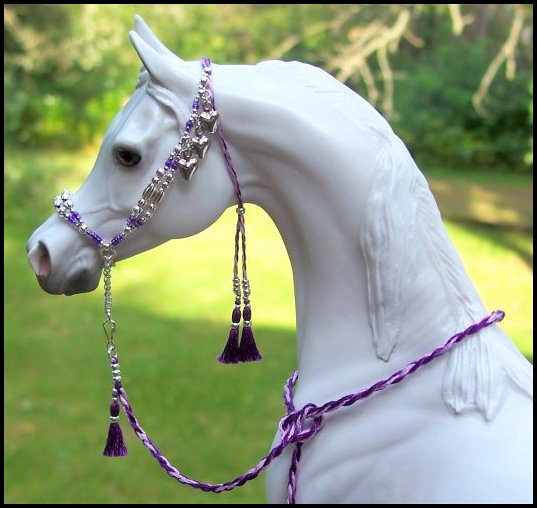
Just updated the "Beaded Halters" gallery and added some stuff from a few months ago. Look at the green in the background.....ooooh how I miss it! Hoping to do some more beaded halters soon because I've got some new colors! If you're bored and reading this, feel free to check out the updated gallery!
]]>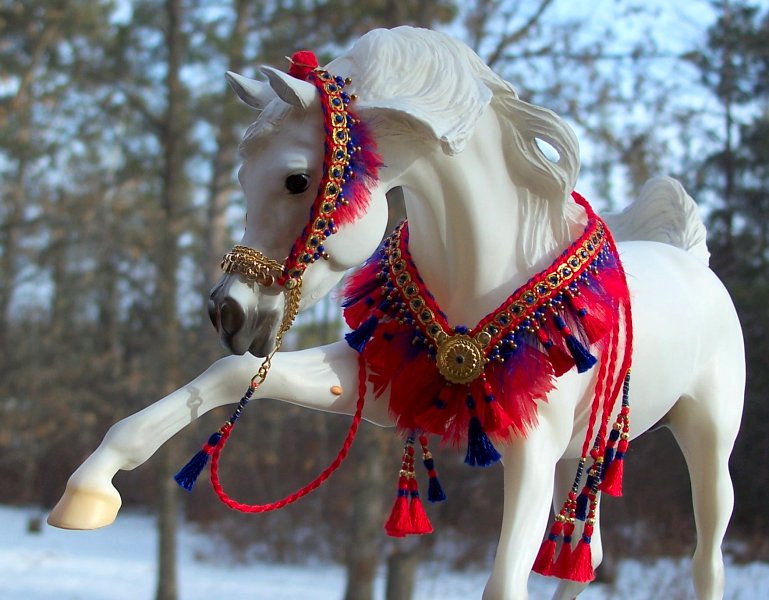
I had the joy of creating and completing this set today for Diane. She traded me this Sahran model for a presentation set and gave me full artistic freedom, all she said was "make me something in red!". I am really pleased with how this came out, and I see a new beginning here. I just want to make more in every possible color! I want to extend a special thanks to Diane for asking me to make this, and offering me the horse. He will be great to have around for those that want tack made to fit him, plus he's just plain beautiful! Creating this set also made me realize that like any artist, I will typically do my very best work when I am given that artistic freedom. It gives me great joy in what I do, and here I can honestly say I have created my most favorite thing I have ever made!
A new gallery has been added under "Presentation Sets" called "Feather Sets" where I will post pictures of all of my feather sets as I make them. I also plan to name each set something cool just because. This one is called "Cirque Du Sahran", kind of like Cirque du Soleil, because of the bright colors and feathers but instead "Cirque Du Sahran"! I think it's cute! LOL!
]]>Here's a new presentation set. The colors were determined by Jackie, lovely combination that I would not have thought of without it being requested. That's one thing I love about custom orders! This one might possibly be made into a costume next year, probably hand embroidered to get those colors to match up just perfect!
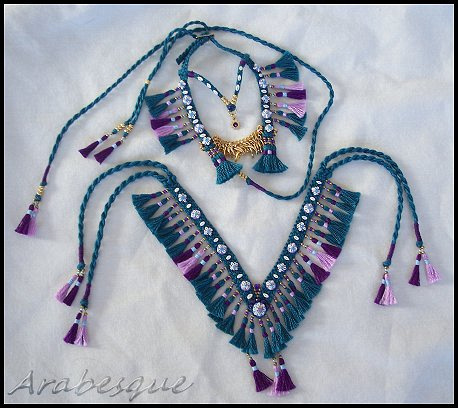
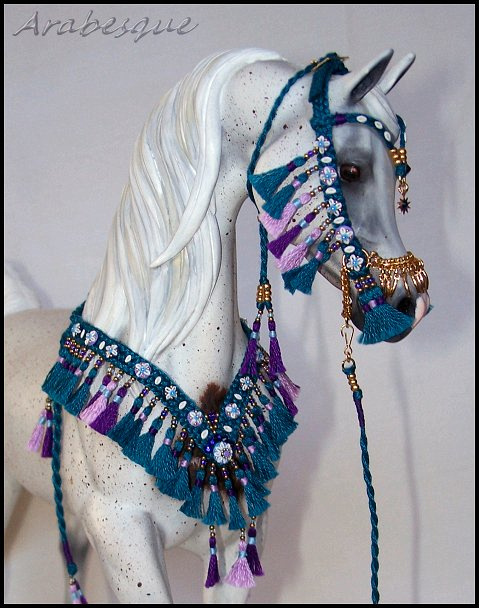
And below we have a native halter to fit Sahran. He looks really spiffy all dressed up doesn't he? I'll be making more tack for him real soon here. I'm currently working on a "top secret" presentation set to fit him for a customer. It's completely an artist's choice surprise set so I cannot reveal pictures until Diane has it in hand and has seen it first! But soon, real soon! So excited!
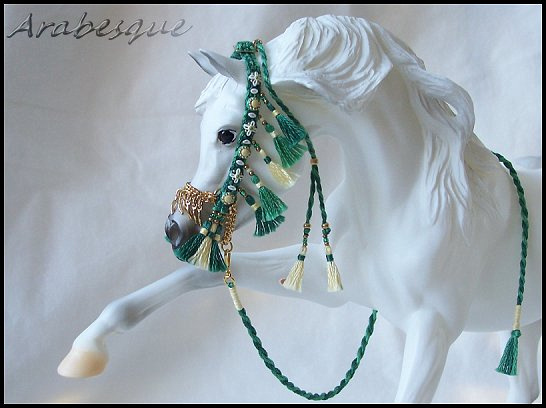
I'm also starting an Arabian costume, finally. However I'm working on it "after hours" in my studio since it takes so long. I'll spend my day time hours working on the stuff that comes along more quickly like the halters and presentation sets, customer orders! Speaking of "sets" I just set up a gallery for presentation sets now, so that will be updated possibly with some photos of older work as I find them.
I've also made the decision to close my books to costume orders for now, at least for a few months. It's been about five years since I last made a costume and I think I need to make some artist choice pieces to get into my "groove". I have had some good conversations with customers about making some, so if we've spoken about it I still want to do it after I've brushed up on my skills a bit!
]]>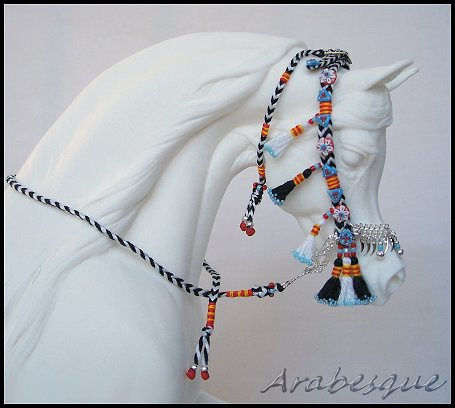
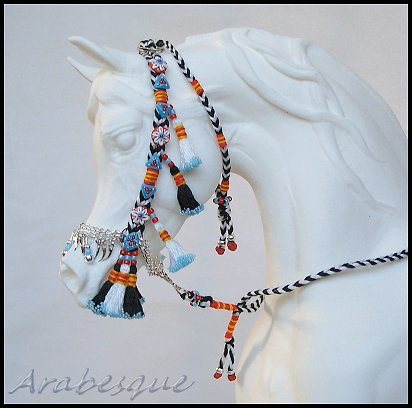
Introducing another new style from Arabesque! I like to call these "zebra" native halters because of the striping details. This is the most detailed halter I have ever made, featuring many delightful hand wrapped and beaded details. It is done in a hand braided black and white stripe design, modeled after a reference of a real "Bedouin style" native halter. It is heavily accented in red and orange details, with little hints of blue. The cowries are hand sculpted, and the nose chain features shark teeth, and the addition of some little blue and silver charms that I made The Bedouin tribes believed that blue warded off evil, so they included it in their work quite often.
This halter is adjustable via a buckle at the top of the headstall, and the best part is the throat lash detaches on one side! There is no longer any need to struggle getting the throat lash to fit over the horse's ears! All you need to do is unhook it on one side, bring it up under the horses neck and re-attach it at the top! I'm pretty happy about this discovery because I've been wanting to do that "tight-tied" up look that you see in a lot of native halter references for awhile, now I've found the way! This halter was truly a labor of love, and I liked it so much I made 3 of them to sell. I cannot even describe how many hours of trial and error are into the making of these halters! They are originally made to fit the PSA, but I have sized them according to my largest resin (Ajmal, pictured in these photos) so it will fit a variety of model.
Here's a direct link to the sales ad, I've got 3 of them up for grabs!
http://www.modelhorsesalespages.com/view_details.asp?id=1128022
]]>Here are some of those progress photos I promised yesterday....these first three are all commissions.
First up we have a native halter made to fit Sahran in a mix of greens and cream. I still need to add cowries, nose charms, throat lash and a lead rope and it's all done after that! I finally got more gold charms in the mail, but low and behold the jump rings I need to attach them with are not here yet. Would have been smart if I realized I needed those at the same time I needed charms. Ah well, after today I should be well stocked up for awhile anyway! LOL!
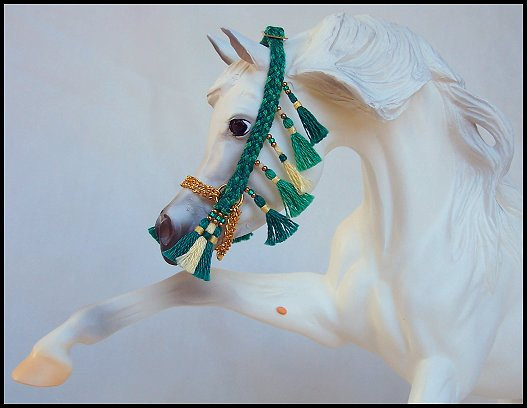
Here's that set from yesterday again. Still missing some key details like cowries, nose charms, throat lash, lead line, and more tassels. This one will have a brow band like the original blue one I did, and matching charms, but this time in gold! There is a possibility of this one being made into a costume someday. I just love the colors!
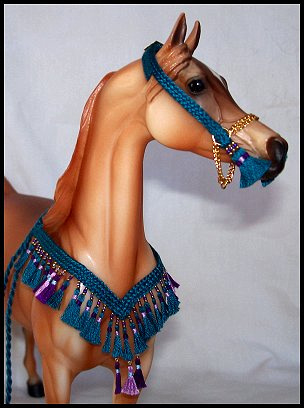
Here is the start of a presentation set that is being made with a matching halter with a brow band. Picture the original blue halter I did with the brow band and this set together. It's hard to tell in the photos but this blue is a bit more turquoise than the original blue I used. It's like my favorite color, like how I snuck that in? I've been dying for someone to let me make it in this color! Thank you, Heli!
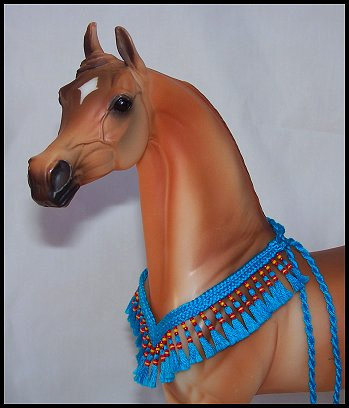
This one below is the start of a new sale halter that I'm really excited about! I've been wanting to master the "zebra" style native halter for awhile, and I think this is going to work for me. I'm actually making 3 of these, all the same, because they are just that fabulous in my opinion where I need to be armed with more than one! They will feature hand stitching, "el badia" style tassels (the ones dipped in beads), and a new take on the native throat lash for model horses. Something convenient and authentic!
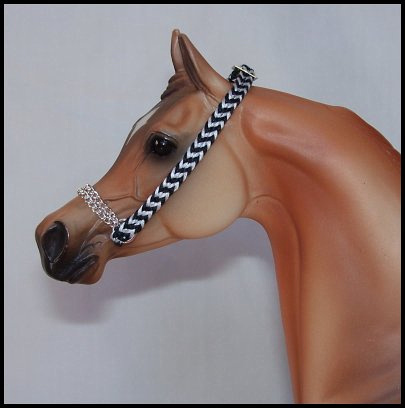
Here's a peak at the matching tassels that go with these halters. They are wrapped in red, and then triple wrapped in yellow. I cannot even describe how tedious this process was, but boy is it worth it! They have such an authentic appeal that I'm just so excited to put these halters together! These tassels are also a little bit thicker and shorter to give that "fluffier" appearance when attached to the halter.
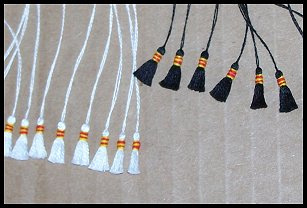
These zebra style halters should be hitting MH$P by this weekend! Stay tuned here to see finished photos, and links to sales ads when they are posted! If they go over well I will be releasing more to sell in different colors. I'll have finished photos of the commissions I'm working on as well. There are actually more sets than what I could photograph, but like I said, some of them are a surprise!
Well that's all for now! Have a Happy Thanksgiving to all those that celebrate!
Melissa :0)
]]>
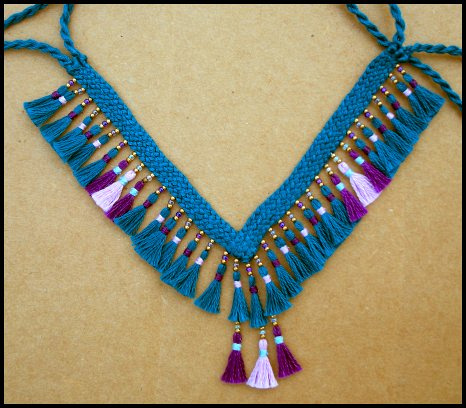
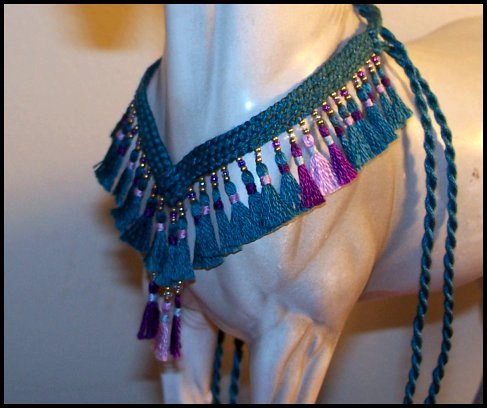
THE WORKBENCH
This is the page you are on right now, and it includes updates of my work bench throughout the week. As I gather more customer orders this is where I'll be posting progress photos of what I can, and sneak peaks at sales pieces.
NEWEST WORK
http://arabesque.zenfolio.com/p305166076
This is a link to a gallery where I will post all the photos of my newest work. The photos in this gallery will be temporary as I will be updating them to the categories they belong to as the gallery starts to get full, but this is a place to view all my new stuff at once. This will probably be the first place that pictures of new stuff goes, including sales pieces, so tune in and watch it!
CUSTOMER GALLERY
http://arabesque.zenfolio.com/p101993105
This is a new gallery for photos that my customers send me that they have taken of my work. I put these pictures here with their permission. If you have work by me and photos you would like to share please send me an email. I will also be adding a "Show ring" gallery eventually as soon as I start to get updates from customers on how my costumes are doing since that category is something I'm starting over on. I will be making some new costumes very soon!
]]>
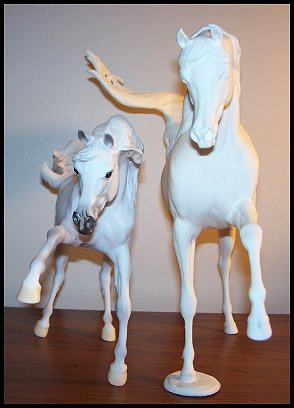

Been hard at work all last week on customer orders. I've got a little variety going on several native presentation sets and native halters. It's been about a week since I last blogged, but some of these sets I don't want to be seen until they are completed because they are more like a surprise to my customers, so here's just a sneak peak! Tied lots of tassels the other day....here's the pile before...
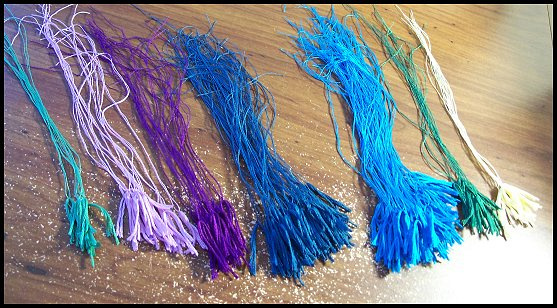
Then the pile after a few hours of wrapping below.... I figured out I can wrap an average of 40 tassels per hour. That's just the wrapping part, the actual pre-tieing, cutting, and sometimes re-wrapping or silkening effect (hand brushing the tassels out) add on hours of extra time. The bright blue ones need to be wrapped again with yellow, so those are only halfway there. I'm glad to have all these tassels mostly done, that always feels like such an accomplishment!
I should have most of these new orders completed this week! I'm giving myself a little more time with them because I had the misfortune of noticing I'm completely out of gold chain and shark teeth. Nice job, Missy! So that stuff is all in the mail and on it's way to me this week! I want to get cowries done tomorrow, and then the assembly begins! Stay tuned to see the finished stuff!
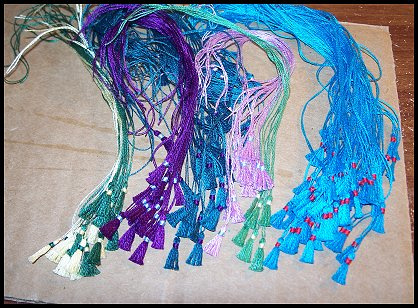
Every now and then when I'm working an idea will strike me with inspiration so hard that I just have to try it out. The other night this happened..... Even though Marwari wanted to try it on, it's an Arabian halter, actually more like part of a new group of 10. It's just so dainty, and has that little bit of flash to it. I figure I can use any color beads or combination of thread colors. It's just plain fun! This style will be showing up in my sales ads soon....
Since it is Sunday night and technically I'm trying to make myself take weekends off from making tack because it's probably good for my mental health I decided to take a mini break from my commissions and do something for me. It's been bothering me that I haven't made a costume in such a long time. It occurred to me that I have no saddles ready for a costume. So tonight I hung out in front of the TV (anybody else watching the AMA's tonight?) and sculpted some saddles. I did a variety of sizes and styles. Very soon I will be working on a new Native costume, and a Dancing Horse Costume. I think that Sahran and Ajmal both need Dancing Horse Costumes, actually! LOL!
Well that's all for now! Just some Sunday night randomness for you! Stay tuned to see more!
]]>
Anyway, Pressy is going to be helping me model all of my newest tack. This was our first photo shoot in a custom variation of the original blue halter with the brow band that I did. That had such positive feedback from multiple people that I've decided I need to make a few more as requests, and I'll be creating this in a few more colors as well. However, when doing similar pieces I always add in some differences, no two are exactly the same so this one is slightly different from the original!
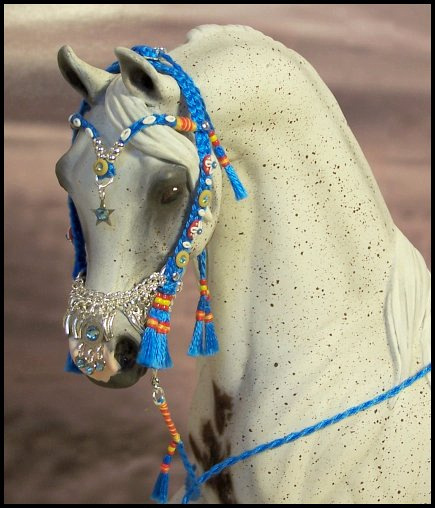
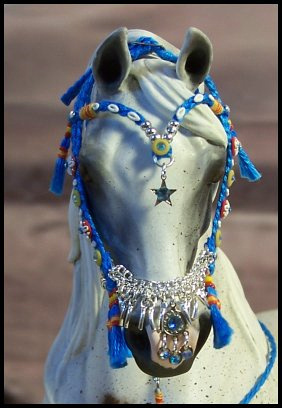
What I've learned from making the original blue halter with the brow band, is that my customers appreciate "uniqueness" and added details as much as I do. I had my reservations about the original piece when it was in the making because I love rhinestones so much, and I just took it and ran with it, and I thought what if it's too much when I'm done with it? I know there are those that prefer "simple" and more authentic, and sometimes I like to do that too. But expect to see more unique, very detailed tack coming from me! The positive feedback I've been given for this original piece is like the permission I needed to keep putting my own touch on things, which means more bling, hidden charms and sparkle sparkle sparkle!
]]>
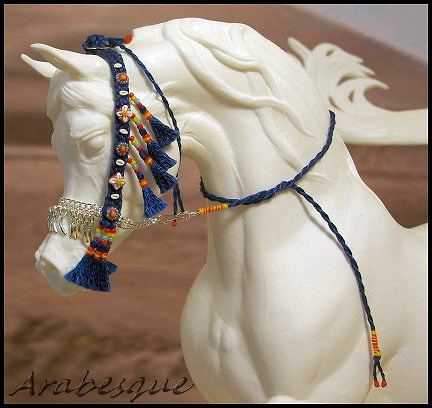
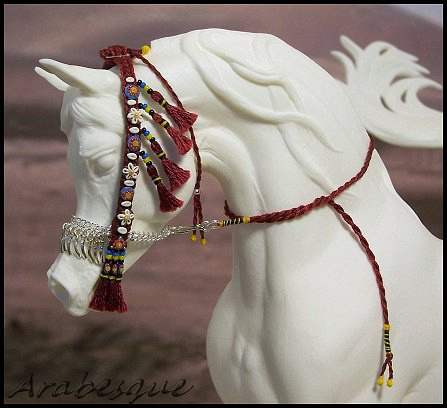
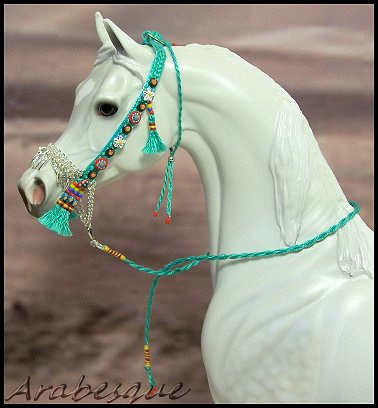
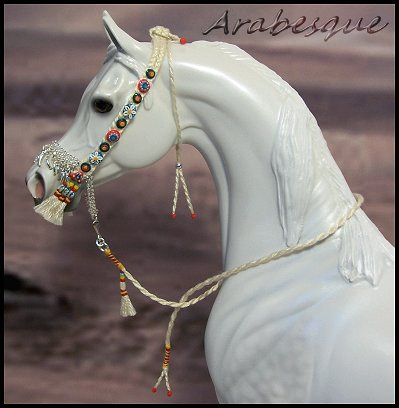
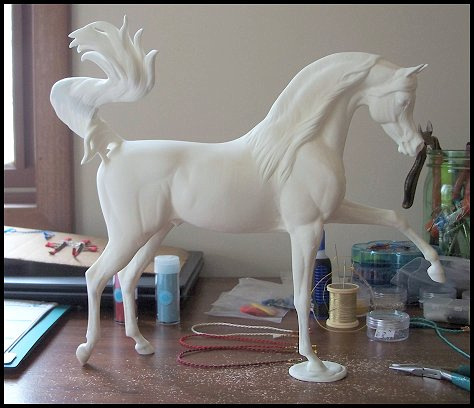
This is Ajmal, sculpted by Debbi Lermond. This is my second time owning an unpainted Ajmal, and he is just as spectacular as I remember. I sold my first copy when I got out of models for awhile, and the opportunity arose to purchase another one. I have plans to hair him, and paint him a light gray. I haven't decided who will paint him. I'm thinking I might, but I need to practice on a few horses first. Or I will find someone to paint him who will let me do the hairing after, because that is my favorite part. I'm also going to make him a dancing horse costume, and it will be my first one. I will soon begin to hair prepping on him myself, quite a task.
The halters are coming to a finish today. Here's a look at that bright blue, and my reds. I just finished cowries for the bright blue, and will be adding those shortly. I just need to make two more sets of cowries for my red halters.
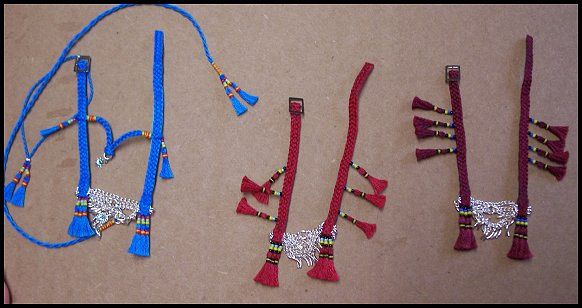
This batch below is really coming to life now. I added the cowries this morning and I forget how much life it brings to them. I'm also excited because I discovered another detail tactic that I hadn't thought of before. If you look closely at the close up of that turquoise halter you'll see on the end tassels, right above where they are wrapped there are little designs added on. Just gives it more pop, and makes it even more gloriously detailed!
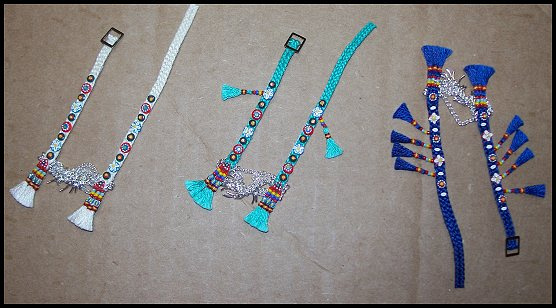
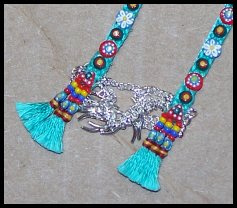
That's all for now, next up will be photos of all six pieces finally finished! WOO!!!
Thanks for reading & Happy Collecting!
Melissa :0)
]]>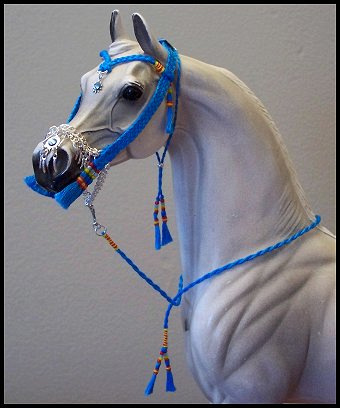
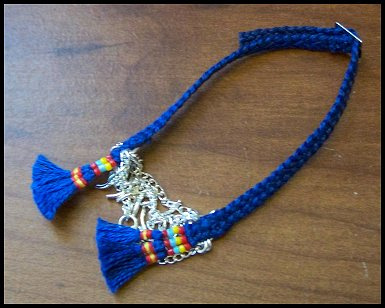
It's another day of native halters, still the same group of six. The bright blue one is really taking off. When I'm working on tack I constantly have to remind myself "less is more, less is more" and then I was trying to stick to the more authentic look, but I just *had* to let myself put rhinestones on at least one of them. This one has really developed into something completely different that I originally intended, but I'm having fun with it. It is nearly finished, I just need to make some cowrie designs, and add a few finishing touches on it. The brow-band slides up and down so you can position it on the horse's face just right, because the headstall is adjustable and as you're lengthening for bigger heads you want to be able to move that brow band as needed. The side tassel is attached directly to the brow band so it can move up and down also.
I'm just starting to piece together the medium blue halter (pictured next to the bright one above). This is the only one that I have cowries done for so I should have just started with that one, but the bright one is one of my favorite colors and I just kept going with it!
After a four year hiatus I completely forgot how time-consuming cowries really are. I use a dinner plate to cure my cowries in the stove and I had intentions of doing cowries for all 8 halters last night, but it ended up taking me two hours to do just the one! Could be thanks in part to Dancing With The Stars being on last night...distracting, but so fun to watch! And it's really hard to stay seated because I just want to get up and dance! Yeah!
This is my "assistant" BooBoo. She likes to be in my face and on my lap just steady so she has to have her own chair to sit on, right next to me while I work. I feed her fancy feast and she gets really fancy and crosses her paws all the time, and yes I know that's why! (j.k. but it sounds funny!) She was particularly interested in my work today so I tied a piece of ribbon to her chair for her to chew on instead.
The weather here is very cold, dark and windy today and they are talking snow. I'm constantly cold! So far in northern MN we have had one oddball snowstorm that took place right at the beginning of October, but the snow didn't last.
My back is killing me right now so I'm just taking a break. I think I need to consider getting a better chair to sit in if I'm going to sew this many hours every day. I'm feeling a little tired just thinking about how many cowries I intend to sculpt today! LOL! With work this detailed it's easy to get a little burnt out on the same project, but hopefully I'll be wrapping some of these halters up today, and the rest of them tomorrow! Wish me luck!
Thanks for reading and happy collecting everyone!
Melissa
]]>
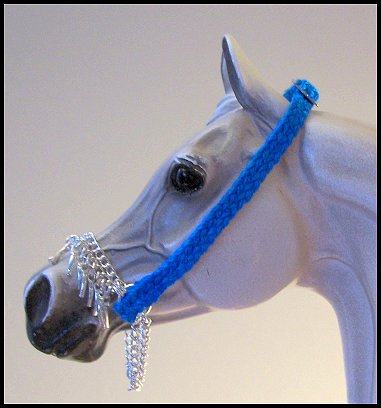
Here we have the lovely bases...From left to right I've got a deep red, a turquoise, a cream, a bright medium red (brighter than pictures show), a medium blue, and a bright aqua which is also the one my PSA dummi is wearing in the photo above.
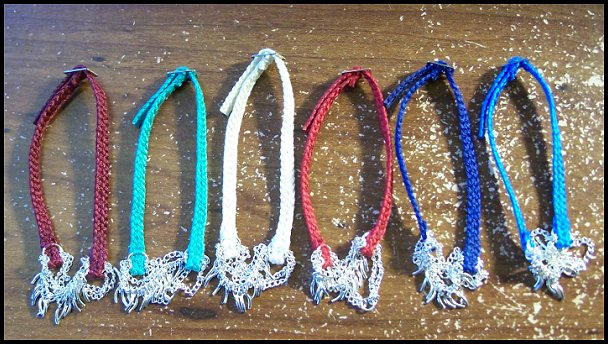
Just spent the last few hours working on tassels for all these. Each halter will be a little different in style, but the tassels for these are essentially double-wrapped. Something that is a double pain in the *youknowwhat* to do...haha! But the end effect it always worth it!
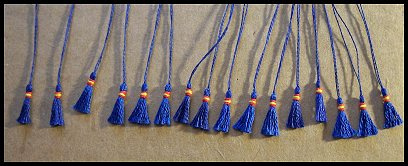
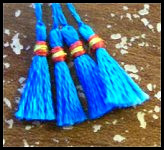
I'm really hoping to finish these up today, or come darn close to it! So stay tuned to see more, and in case anyone is interested all 6 halters are going to be for sale as soon as they are completed! Thanks for reading today's blog and happy collecting everyone!
Melissa Halvas
]]>