Braided Crystal Halter Tutorial
for Breyer "Mane Beauty Styling Head"
written by Missy Halvas
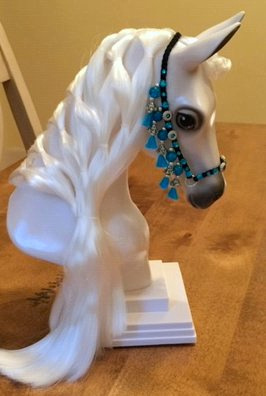
I am absolutely ecstatic that Breyer asked me to design a how-to halter tutorial to share with all Breyer fans! When asked to do this project my inner child was screaming with joy! I have wanted one of these since the moment I first heard of them! The most important thing I want to make sure you guys know is that this isn't just a project for kids, people of ALL ages and skill levels can enjoy making halters for these! I hope you will get your own styling head, and give it a try!
Before we get started, I want to take a minute to say how impressed I am with the Mane Beauty Styling Head. The one that I have here with me helping out is named "Daybreak". She is beautiful, and delicate, with super soft tangle-free hair. For this tutorial I chose to make her a braided crystal Arabian halter, and found she wears it really well! Working on a larger size is quite fun and it is easier to learn tack making skills that you can use in smaller scales!


TOOLS & SUPPLIES
Loctite Super Glue - Gel Control
Scissor
Wire Cutter
Needle Nose Pliers (2 pairs)
Ruler
Painter's Tape
Beacon Fabri-Tac Glue
Dritz Fray Check
Needle

Large Seed Beads size 6/0
Decorative strung beads or large fun beads
Chain (2mm or larger, I believe I used about 3mm)
Jump rings 5-6mm and 9mm in size, or split rings variety size pack
Gems/rhinestone crystals
DMC Embroidery floss colors 310 (black) and 3845 (turquoise)
Metal Bead conchos (optional)
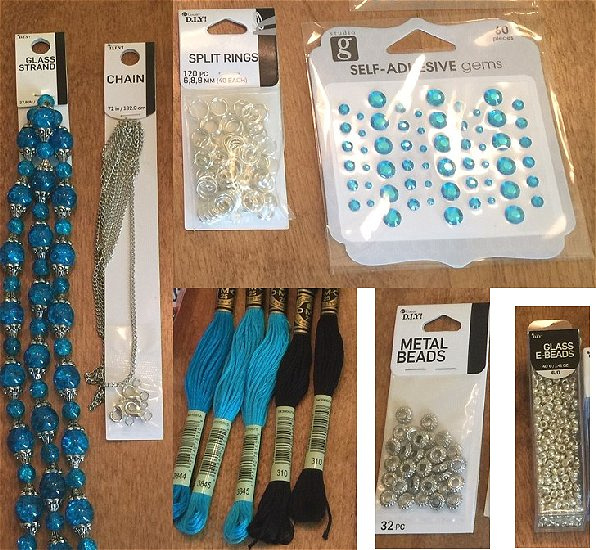
All of the supplies (beads, chain, floss etc..) I used for this project were found at my local Walmart in the craft section. They don't have the exact tools I used (pliers, scissors...) but they do also carry jeweler's pliers, sewing scissors and the types of glues and Fray Check that I use. Most people have a Walmart within driving distance of them or some kind of craft store, so I purposely purchased all my crafting supplies I used for this project from my local Walmart just to show what can be with some pretty basic supplies! You don't have to use the exact same craft supplies that I did, change up your colors, your beads, gemstones etc...as you like! I hope this tutorial of how I made this halter will be a nice skill guide for you to use to come up with even more designs of your own! If you do not have a craft store nearby you to get your supplies, try doing a search online, you'll find a wealth of options!
Let's get started!
HEADSTALL
1) Re-style the hair on your Mane Beauty to make a "bridle path".

2) Cut 9 pieces of black embroidery floss to 14 inches in length each. Knot your bundle of threads together at one end.

3) Cut a piece of painters tape to anchor your piece to your work surface. I recommend painters tape and use it a lot when I'm working on tack because it will not harm your work surface, and it can be re-usable. Separate your thread into 3 equal sections, 3 strands in each section. Braid the section to the end and close it off with a small piece of tape folded over the end. (Notice how the threads shrink about 2 inches in length when your braid them? Its always a good idea to give yourself extra length to work with!)


4) For the noseband cut 9 pieces of thread to 6 inches in length each, and knot them together at one end. Repeat the same steps you did for the headstall. Anchor your piece to your work surface with tape, braid to the end and secure the end with a piece of folded over tape.

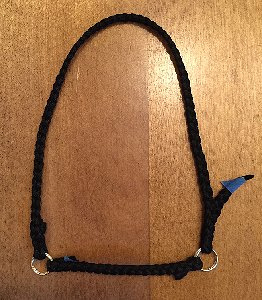
5) Now select 2 of your biggest jump rings from your pack. I'm using 9mm size here. Cut the excess threads off the ends of your headstall and noseband pieces leaving the knots and tape in place to keep your ends from unraveling.

6) Fold your shorter piece over one jump ring, leaving just enough excess to glue (about 3/16 inch, not including a knot or tape). Carefully apply a little ball of "Fabri-tac" in the fold and squeeze it down, pinching it in place for a few seconds. Fabri-tac grabs pretty fast and holds strong which is why I frequently use it for tack making!

7) Repeat on the other end of your noseband. Fold your other end over the second jump ring making sure your knots/taped ends are facing the same side. Measure the length to 2 3/8 inches (don't include the jump rings in your measurement). Fold over and glue into place. Leave your excess attached for now.

8) Attach your headstall piece to one jump ring in the same way. Leave a little excess and glue into place.

9) Fold the other end around your jump ring making this piece into one big continous loop with all the knots/taped ends facing the same way. Measure the headstall to about 9 inches (don't include the jump rings in your measurement), fold it over and glue into place. (Note: You may find attaching the headstall piece to the jump rings first easier then attaching the noseband first, because it will be easier to measure the length of your headstall without the noseband attached first. It does not matter what order this is done in!)
10) Let this dry for about 20 min. (While you wait for your piece to dry, now is a great time to start making your tassels! Click here!)

11) Apply "Fray Check" generously to the fronts and backs of the excess threads (think bottom side of the halter, cover the area where you will cut the excess off). Let this completely dry, then cut your excess threads off, this will keep the threads from fraying apart after they are snipped off.

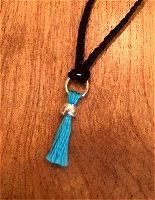
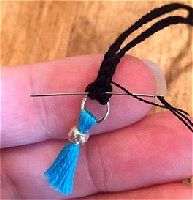
Make your TASSELS while you wait for your pieces to dry! Click here for instructions!
12) Next we will do a decorative wrap on the halter ends. This not only adds a little more detail but will make your final piece stronger. Take 2 threads from a 14 inch section of floss, thread on a needle and knot your ends together.
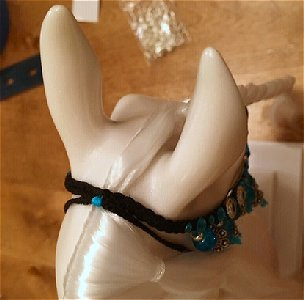
13) Put the needle through the center of the back side of the halter section you will wrap first, close to the jump ring. Pull it tight, then carefully wrap the thread all the way around 10 times. Do a double knot on the back of your piece by running your needle through a few threads. After you double knot, run your needle up under a few threads, pull it up, then cut. This is a little trick I use to ensure I am not cutting my threads off right next to my knot, which can pull itself loose over time. Use a fresh set of two threads for each section and repeat these steps, wrapping a total of 4 sections of your halter with detail. When you are done apply Fray Check to your knots and set aside to dry.


Next we will decorate the sides and nose-band with some crystals.
GLUE: For gluing crystals I like to use "Loctite Super Glue Gel Control". You may also use Fabri-Tac for gluing all parts on this halter. Fabri-Tac will be a bit more forgiving and come off your hands and surfaces more easily. I recommend putting a little dab of glue on a paper plate and applying your glue with a toothpick as needed. When I use Loctite I carefully squeeze out a tiny drop right onto the headstall and then place my crystals down as I go.
14) Next take 5 medium-large size crystals and glue them one at a time on each side of the headstall about 1/2 inch apart. Repeat this step on the other side. In an upcoming step we will glue more crystals of a different size in between each crystal. (Note about the crystals: The kind I used were "self adhesive" but I picked the adhesive off of them as I glued them on. They will only stay on if you use good glue!)


15) For the noseband glue one med-large crystal directly in the center. I find center by pinching the noseband in half, then gluing my crystal down. Next glue a crystal about 1/2 inch to either side of the center crystal.

16) Next I glued the smallest crystals I had going in between each larger crystal all the way around the headstall and then one on either side of the center crystal on the noseband. Next I placed a metal bead/concho over each small crystal by applying just a little bit of Fabri-Tac to the outer edge of the backs of each piece. (This step is optional and depends on if you are able to find these at your store. Remember you can decorate your halter however you like!)


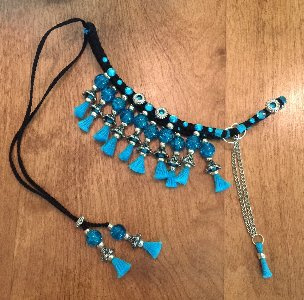
17) Time to sew the tassels on! First prepare the beads you will use by dumping them all into a small dish. Thread a tassel onto a needle (both threads) and pick up which beads you will use. For my bead pattern I used a silver bead cap bead first, then a silver bead, a blue bubble bead, and another silver bead on each tassel. For this piece I did 5 tassels down the side of the headstall using the largest crystals on the headstall as a guide of where to place my tassels. (Set 2 tassels aside for the throat lash and do not string beads on them.)


18) To sew on the first tassel place your needle so that it is centered beneath the crystal. Push the needle up through the bottom of the black trim and aim it so that it comes out about centered in the back. Sew a double knot. (To do so put your needle through a few threads of the back, make a loop, pull your needle through the loop and pull tight. Repeat again. After knotting run your needle up through a few threads, pull tight and cut (again, this is so you don't cut your thread off right next to your knot). Do all your knot work on the back side of your headstall so that it stays neat, secure, and out of sight.

19) Repeat these steps to sew on your remaining 9 tassels. You will have 2 tassels left over when done. Just set these two aside for now, do not string beads on them.
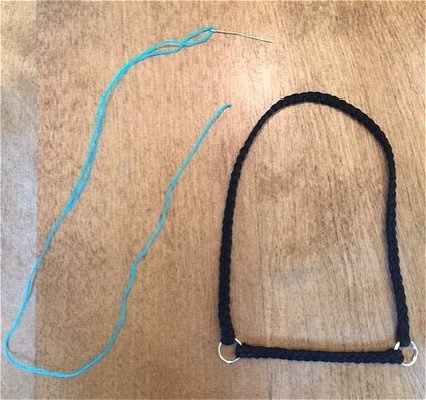
THROAT LASH
1) Cut 3 pieces of black embroidery thread about 2 feet long each. Gather the threads together and knot them together about 4 inches up. Anchor your piece on the short side with a piece of tape to your work surface. Do a 3 strand braid down the length of the piece. Stop braiding about 4 inches from the end.

2) Lay your piece along a ruler and measure from the first knot out to 13 inches, then place another knot, creating 13 inches of space between knots with "tails" on either end of your piece.


3) Next anchor your ends right above the knots with a piece of tape, and cut away all but one thread from each end. When I do this I cut a few pieces of thread at a time instead of all at once to get a cleaner cut.


4) Cut the stringing threads away from your remaining two tassels.

5) Thread a needle onto one end of your throat lash piece, and load your beads on. Next grab a tassel and push the needle down through the top of the tassel, pull the needle out of the bottom of the tassel (use a pliers if needed) and all the way through. Do this carefully so you don't disrupt the bead holding the tassel. Repeat on the other side.


6) Next select a side and anchor your throat lash with a piece of tape above the knot to your work surface. Slide your beads up as far as they will go, leave a small space between the beads and tassel. Place a dot of super glue onto the thread beneath the bottom bead thoroughly covering the string and slide your tassel quickly, and carefully up into place. Repeat on the other end and snip off your excess threads.

7) Next we will place a bead that can slide up and down the throat lash to loosen or tighten it. For mine I used a decorative round metal concho bead. You can also use any other kind of bead with a large hole or a tiny jump ring. To easily thread the bead onto the throat lash fold a spare piece of thread over the top of the throat lash. Slide the bead over the thread and right onto the throat lash. Remove the thread once beaded.


8) For the final step find the center of your headstall, thread a needle (I used double threads for added strength, just like when I did wrapped details on the headstall), knot the end and push it up from the bottom side. Find the center of the throat lash and sew the two neatly together. Wrap the thread around several times and securely knot underneath so that the knot is hidden, and cut your thread.

Almost done now! Looks awesome right?

CHAIN
1) Using your wire cutters, cut a piece of chain to 5 inches in length.

2) Open a jump ring with a tassel attached and set it aside. If you haven't made your tassels yet CLICK HERE for directions!

3) Put your chain through the jump rings on either side of your headstall making sure there are no tangles or twists in the chain, and gather the ends together.
4) Put your tasseled jump ring through each end of your chain, then close the ring carefully with your pliers. Make sure there isn't a big gap in your jump ring so that the tassel and the chain cannot slide off.

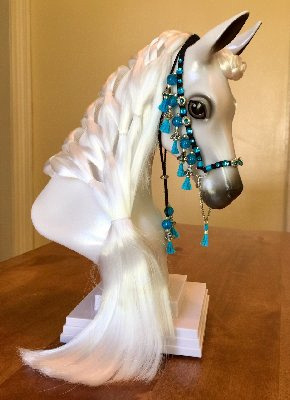
5) Arrange the halter on your horse. Your halter is now done if you so choose! If you would like to add a matching brow band continue on...
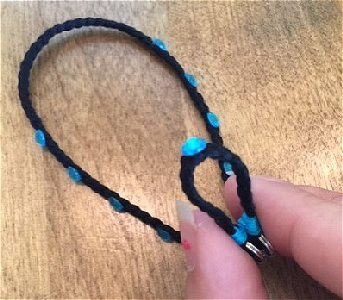
BROW BAND
For the brow band piece we will be attaching a braided piece to a tasseled jump ring in a v-shape.
1) Cut 3 pieces of black embroidery floss to about 8 inches each in length. Knot the threads together at one end. Anchor your threads to your work table with a piece of tape and braid to the end. Secure the end with a piece of folded over tape. Cut off your excess but leave your tape and knot in tact.


2) Make sure the gap in your tasseled jump ring is closed tight. Fold your braided string in half and push the folded end part way through the jump ring. Bring the ends of your the string around and down through the black loop. Carefully pull it tight, making sure you have even lengths on either side.


3) Thread a needle with a single black thread and knot the end. Carefully sew together the center of the back of your V-shape brow band piece.
4) Next cut two small and thin piece of tape to mark the length of your brow band. Measure two inches from the end of your center knot to the outer edge. Fold a piece of tape over each side making sure each side is the same length. Place the tape inside the 2 inch measurement so that it measures 2 inches from the end of your center knot to your outer tape edge. Make sure each side is the same length.

5) Apply Fray Check to the back of your center knot where you sewed and to the ends of the brow band past the tape. Let this dry before continuing.
6) Next glue a small rhinestone to the very center of your brow band. I chose to apply a metal bead/concho over the top of the center crystal with some Fabri-Tac, setting the concho around the stone.


7) Continue to glue crystals on your brow band spacing them about 1/4 inch apart until you run out of space. I used medium crystals and was able to fit about 4 on either side.

8) Start by attaching one side of your brow band to your headstall first. Apply Fabri-Tac with a toothpick to the top side of your brow band, just past your tape but not touching your tape. Next place this piece underneath your headstall fastening it centered, beneath the highest and largest crystal (about 3 inches up). Do the same on the other side making sure your placement looks even on both sides.


9) Let the glue dry completely then trim off your excess ends. Carefully remove your tape pieces where you marked for size. All done!
I hope you have enjoyed this tutorial on how to make a braided crystal halter for your Mane Beauty Styling Head! Imagine all the possibilities for other colors and styles! You can take the skills from this tutorial and use them to completely customize something one-of-a-kind for your styling head, or take what you've learned and try it in another scale! You can choose to add more or less tassels, change up the colors of the crystals or what you decorate with, the style and color of the beads used, endless thread colors, even try switching from silver tone chain to gold! The sky is the limit when you use your imagination and get creative!
If you haven't seen the tutorial by Mindy Berg on how to custom paint and hair your own styling head you must check it out! Again I say all ages can enjoy these projects! Imagine customizing your own styling head in your choice of color, hair, and then making a pretty halter for it to wear! You'll have a horse uniquely yours and all your own! Have fun and enjoy creating!